
Kick drums define modern tracks so getting your kick right is vital but flipping through presets to get exactly the right one can be unrewarding. Here’s how to create the perfect kick drum which suits your song, and sits in your mix just right. Powerful, punchy and professional sounding – using Ableton’s Operator instrument. Before we continue if you want to get more up to speed on kick drums to better understand this article quickly check out this free masterclass chapter on creating better kicks, now back to the article
Here’s a the flexibility of the kick drum we will be making
Why Create your own kick drums?
Imagine finding the perfect kick, but it needs to be a little longer, or the pitch needs to bend downward in a slow curve, or you wish it were a little more punchy, or rough on the attack then smoother on the decay, or you want it to be just a little different. If you have the ability to make your own drums and tweak them then you can make alterations which suit your mix any time, and you can modulate the sound so the drum stays dynamic and changing – unlike a sample. This is a synthesised kick drum, and it can change however you wish.
How to create your own kick drum
The requirements for this tutorial are a copy of Ableton which includes the Operator synth, that’s a 4 oscillator FM synth which is included in Suite and also available separately. This tutorial also demonstrates the Drum Buss effect which is new in Live 10, but any transient designing compressor will have a similar effect.
It’s possible to follow this tutorial with any synth which has 4 oscillators as we do not use the FM feature of Ableton’s Operator synth here, merely the ability to have 4 synchronous amplitude envelopes and pitch control.
Step 1: Set up Operator
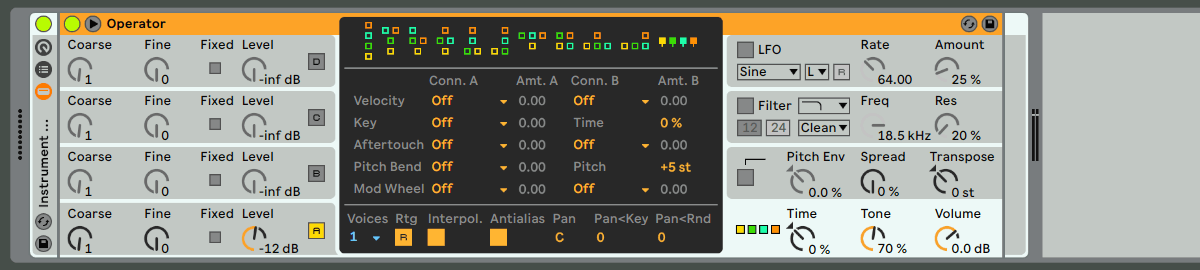
Drag in an operator and set it up as shown in the image below. For now with just one oscillator active (to keep things simple). Set the voices to 1 , and the FM matrix algorithm control (the little boxes) to the setting where all 4 oscillators are independent.
Rack the Operator up using either the context menu, or Control & G (Option G on a Mac) to “Group”.
Then nest that Instrument rack one further level by using the context menu “Group to Drum Rack” (there’s no keyboard shortcut for this)
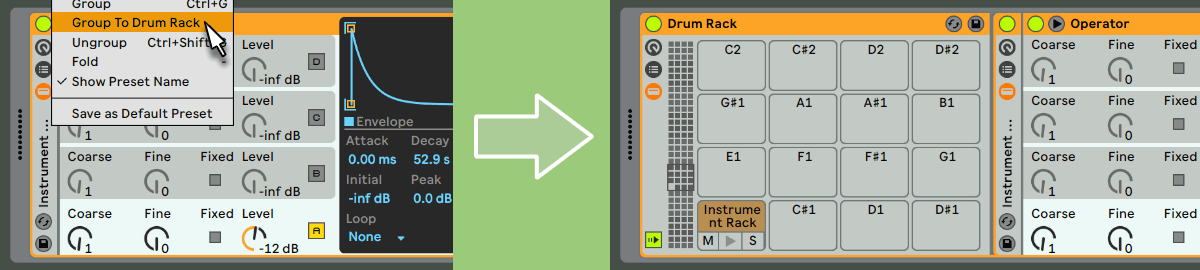
Now if you click, or trigger the Kick drum slot on the Drum Rack you will have a very basic sound, but it will be locked to the correct key for a kick.
Save the Instrument Rack. On the little folded up rack which reads “Instrument Rack” there is a save icon (floppy disk!) hit that and save it as My Kick. You should see the Kick Drum cell name change to reflect that change.
Save and name your kick, using the icon shown
Step 2: Shaping the Kick drum sub-bass sound
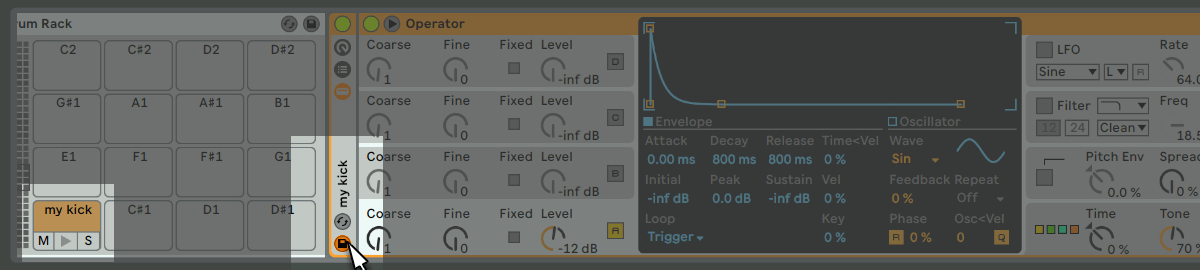
Firstly we’ll work on Oscillator A, which will form the sub-bass component of the kick drum.
The lowest part of the kick drum should fall down around the 30hz range, and should be relatively short so that the track, the beat and the sounds system has time to breathe! You can alter this later but for now set the envelope up as below.
Notice the Loop: Envelope section is set to Trigger. Which is perfectly designed for Drum sounds.

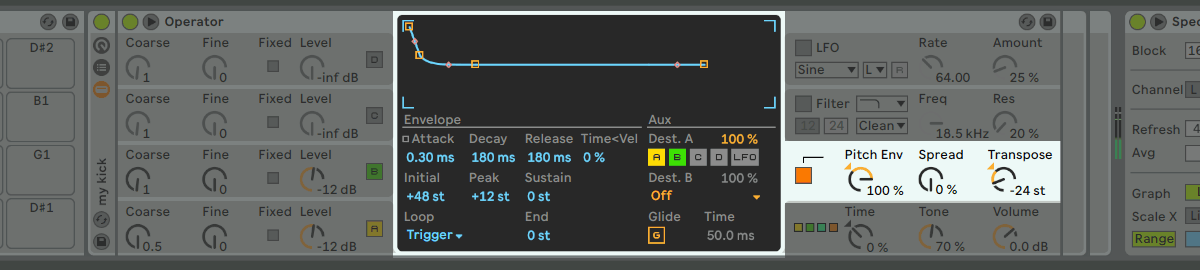
Set the Pitch for Oscillator A to 0.5
Set the master transpose to -24 st (it’s over there on the right above the Operator main volume knob)
Now is the perfect time to add some visual tools to make sure we are in control of our sound, so drag in a Spectrum device and take a look at the pitch of the low Oscillator A. It should be around 30hz

The sub-oscillator (A) is a short note at 30Hz
Step 3: Creating the mid punch sound
We’ll use Oscillator B to create the mid range of the kick drum, at the moment this wont sound very punchy, but it will do!
Waveform: Triangle
Pitch: Coarse 1
Envelope: Loop mode “Trigger”, Decay & release 135ms, Sustain 0
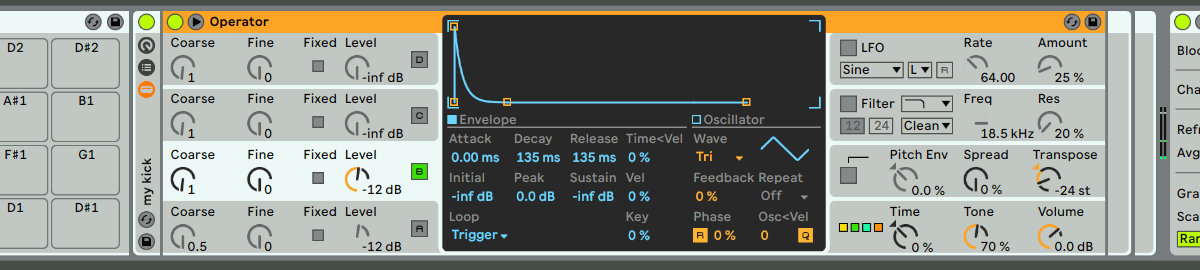
The triangle wave gives harmonic complexity to the low-mid sounds
Step 4: Adding the beater head “poke”
The kick doesn’t sound too impressive yet, but it will!
We’ll take a quick detour to the Pitch envelope, this is the start of making the kick drum punchy and emulating the click or beater head impact. We will have great control over this in future.
Set the pitch envelope to “trigger” and the initial peak to +48. An attach of 0.30ms, Decay of 180ms.
Remember to turn that master Pitch Env. dial all the way up to 100%
Now lets create the actual beater head noises with the remaining oscillators.
Oscillator C
A coarse tuning of 1, and a Fine tuning of 170.
The amplitude envelope should be Trigger mode, and with a decay of 57
To create an interesting beater head tone lets draw in our own waveform here. Choose the Waveform “User” and draw the wave like this:
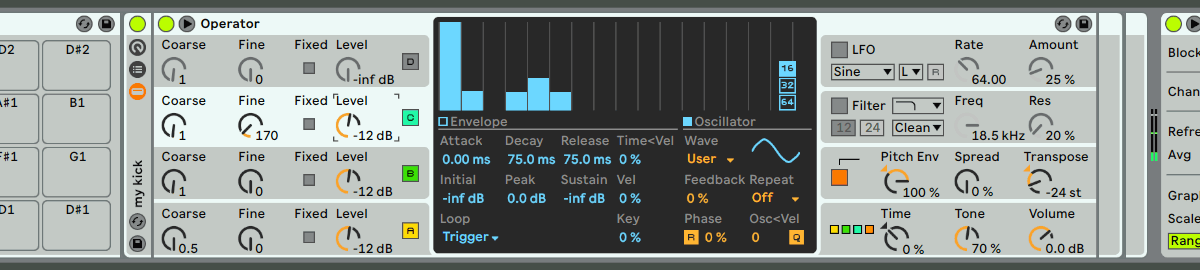
Creating a custom waveform for the beater head
That’s a kind of saturated triangle waveform, look at the little waveform display by the word “user”
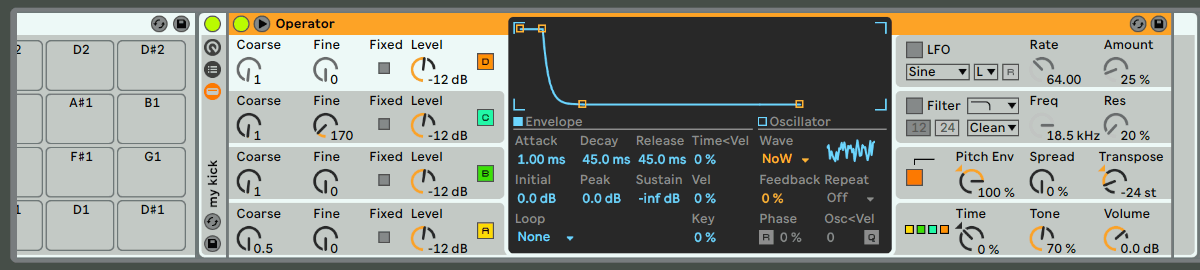
Oscillator D
A little noise always helps with drum sounds, so for for the last oscillator we’ll add a bit of that.
Set the amplitude envelope to trigger mode, and attack 1.00ms, decay and release 45 ms. Importantly set the value marked “Initial” to 0.0 DB
Set the waveform to “Noise White” and it should look this way
Step 5: Add the Fatness!
Right, now we have our audio sources lets shape this kick to be fat and punchy.
Firstly we need to muffle it a little, so activate the Filter section, and using a 12 Db clean filter set it to 425 Hz with no resonance.
Make sure the filter envelope is not acting on the filter and is set to 0%.

Make it dirty and punchy
Now for the secret sauce to bring out the flavour. The Drum Buss effect is perfect for this, but if you have a combination of saturation and transient designing plugins (such as those from FabFilter) then these will be perfect.
I’ll demonstrate with the Drum Buss.
Add a Drum Buss effect and set it as follows, set the Boom drequency to 32Hz. The same as our sub note.
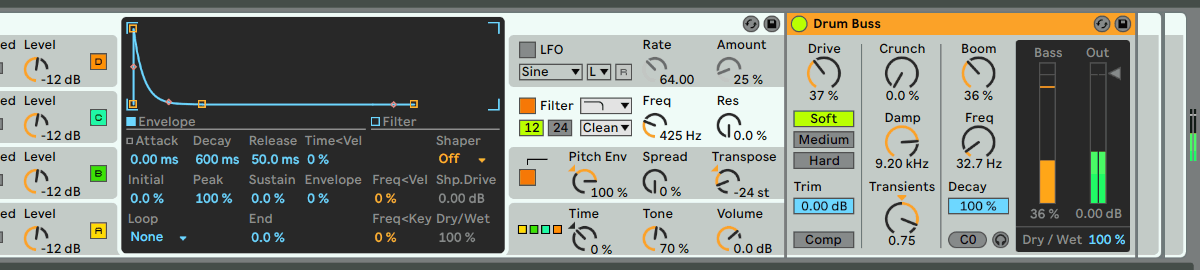
The drum buss gives a powerful punchy sound
Right now you should be hearing a really nice deep and yet puncy kick drum sound, so lets add some flexibility to that, so we can tweak it easily.
Step 6: Adding Controls
Before you start adding controls remember to re-save what you’ve made so far. Your “My Kick” in its raw state.
Now, the first control we’ll want to add is a pitch control so that the Kick drum is tunable. Right click the main Operator “Transpose” dial and choose Map to Macro 1.
Macro 1 will automatically rename itself to Transpose.
Now, we want to limit the range of this dial to useful kick drum pitches, so hit the Map button and set the range from -36 to -12, this places our current pitch of -24 as the centre point of a two octave range.
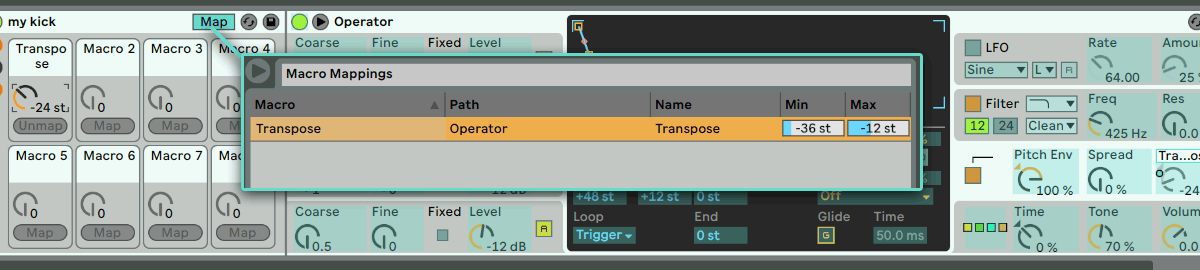
Now we need to make sure that the “Boom” frequency also maps to the same control in the same range.
More Kick Drum Control
- Right click the Filter Frequency and map it to Macro 2.
- Right Click the Pitch Env and map it to Macro 3
- Right Click the Time control and map it to Macro 4.
You now have Pitch, Filter, Pitch Amount, and Time control. Set the ranges for these as shown
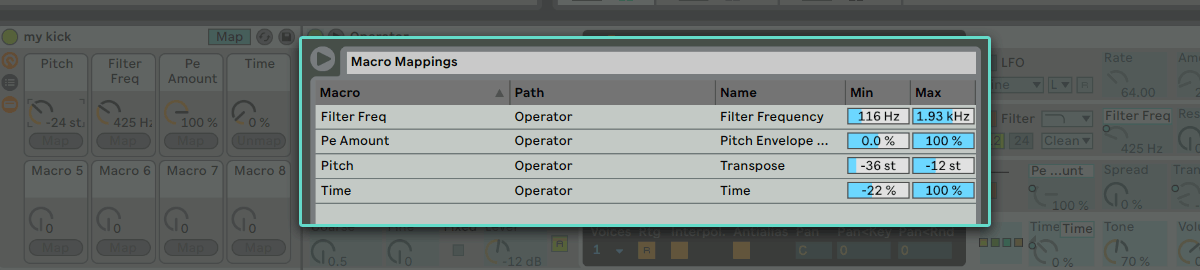
Try playing around with these controls and you’ll see how you can alter this drum even further. Great for sitting in a mix or making your own unique sounds !
if you want to further your knowledge on mixing kick drums you have to check out this masterclass on compressing kick drums, your kicks will come alive after watching!
Things to try
Try altering the voice levels within the drum to change the tonality
Try Mapping the level of oscillator B to a control called “Body”. You’ll find that taking out those mid harmonics makes the drum more like an 808
or altering the saturation in the Drum Buss. Try adding Velocity parameters, but add different values for each oscillator. Add velocity to the filter, so it’s more muffled when hit quietly. The opportunities for customisation of your own kick drum are endless.
Try taking what you learned here and create your own completely unique take on kick drums, because the variety you can create with this technique is huge. Every kick is different !


 50 Industry Music Production Tips You Must Know


