
Analog lead-synth sounds have an organic evocative and expressive quality which makes them great for creating emotive riffs. Here’s how to make an analog-style flute-synth lead in Ableton’s Operator!
Here’s the sound we are going to make.
The sound of an analog synth
There are several key components to the sound of an analogue synth lead. Of course many of them are difficult to replicate in digital synthesis, but it’s possible to emulate several characteristics effectively enough to give that flavor. You may find it as fun as I do to use the “wrong” tools for the job, so by using Ableton’s Operator (an FM synth) to create an analog sound we can discover how to make unique interesting synth leads.
The sound of Analog Oscillators
Though the talk of analogue oscillators can become very technical to teh point where aficionados indulge in discussions on the merits of whether “through hole” components are sonically better than their equivalent surface-mount semiconductor packages … for the purposes of this tutorial we are better off looking at the most essential sonic differences. We can get pretty close if we understand what the analog synth is doing.
Analog oscillators start at different points in the wave
Most vintage analog synth oscillator waves will not start at zero every keypress. An oscillator in an old analog monosynth synth will have the oscillator running and whenever the amplitude envelope is triggered it opens the signal path and the already running oscillator sounds.
This means the same note will sound subtly different each time.
Here is a Sawtooth wave from a Korg MonoPoly, the same note is triggered four times. Notice the waveform start point is different each time. This is because the wave was already running and we have allowed it out.
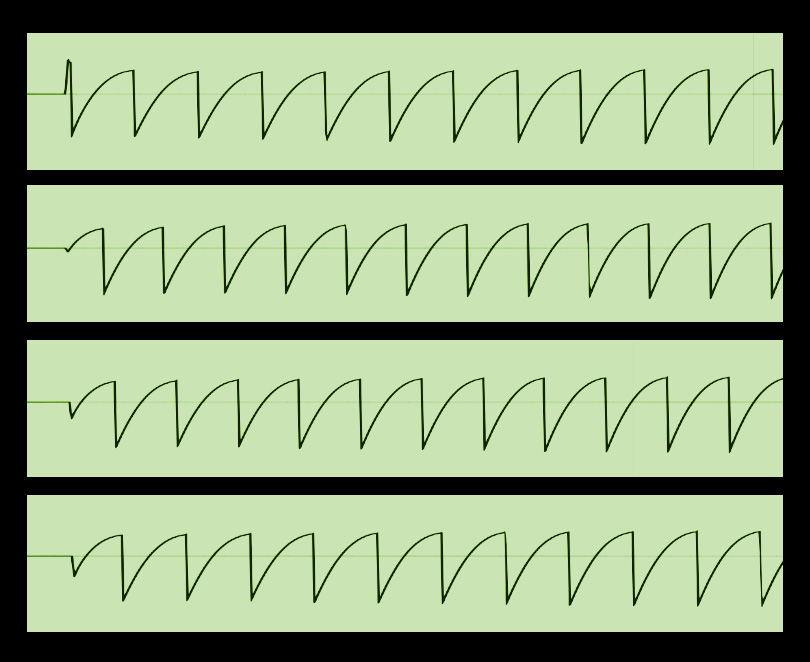
In contrast to this many digital synths will automatically re-start the waveform on each key press, this produces a very static sound. The repeating note will sound exactly the same each time on a digital synth and sound very “robotic” in comparison to the analog repeating note (which we can see is subtly different each time).
Analog oscillator shapes vary across the keyboard
The analog oscillator is rarely the same shape all the way up the keyboard.
While a digital sawtooth looks like the exact same triangle / ramp at every octave, in an analog synth the lower notes and higher notes are often different shapes, this is due to both how the electronics operate and also component aging.
Here’s an image showing C1, C3 and C5 on a vintage Korg Monopoly – zoomed in to show the shape.
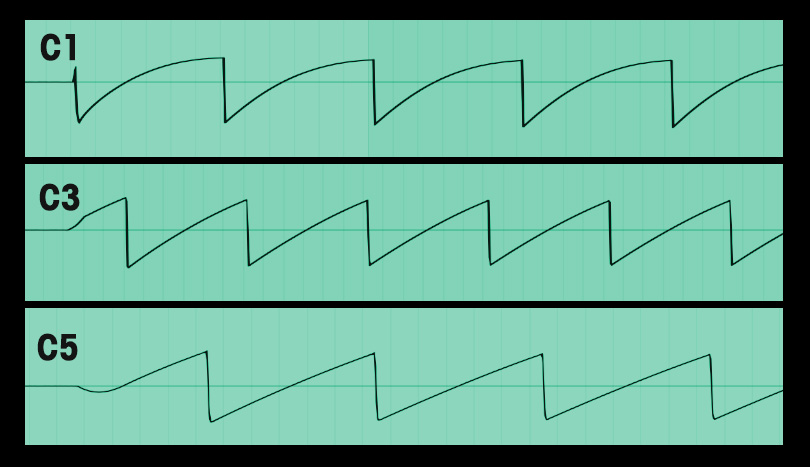
Notice how the lowest wave is “bent”, this gives a deeper richer, “fatter” fundamental frequency, while when we look at the higher notes the shape is more like we would expect from a sawtooth, sharp and precise.
So we can see that the analog synth will often have a lot of variance in note start, and in tonality across the keyboard. There are other components to the sound but we’ll cover them as we go through the tutorial.
Let’s make an analog lead “Flute” sound”
Step 1: Main Settings
Drag in an Operator synth and set the main controls to
- Voices 1
- Retrigger: off
- Interpolation and Antialias: On
- Algorithm D-> C and B -> A (the square)
- Volume -14 dB

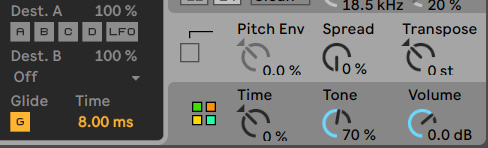
In the Pitch section, activate Glide at 8ms
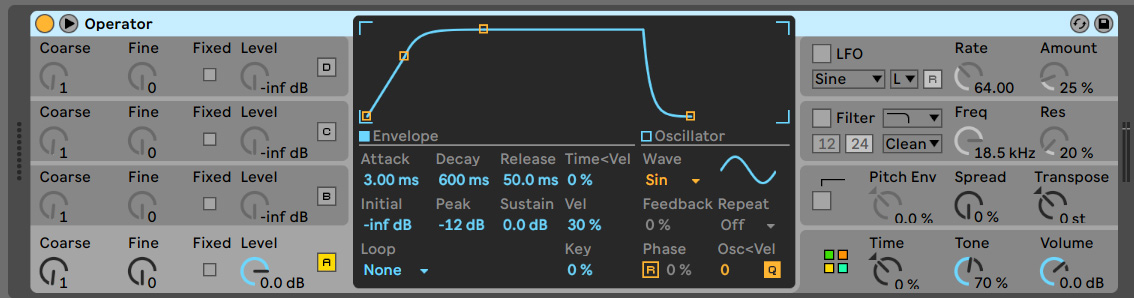
Step 2: Oscillator A
Settings
- Coarse 1
- Fine : 0
- Level : 0.0 dB
Envelope
- Attack: 3ms
- Decay 600 ms
- Release 50ms
- Initial -inf dB
- Peak -12 dB
- Sustain 0 dB
- Vel 30%
Wave
- Shape : Sine
- Phase switch : OFF
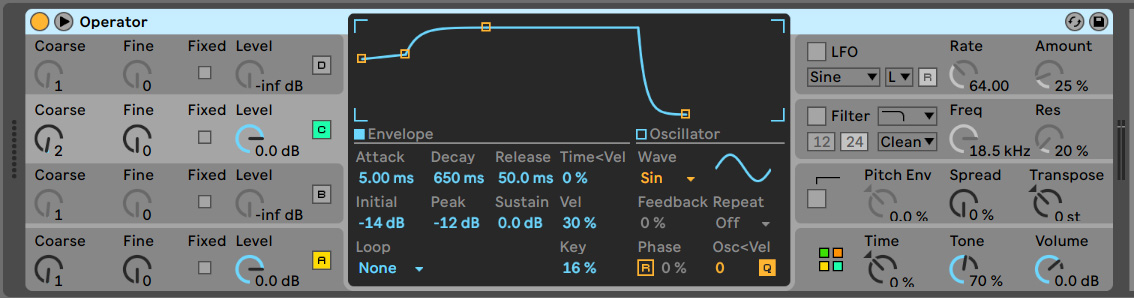
Step 3: Oscillator C
Settings
- Coarse 2
- Fine : 0
- Level : 0.0 dB
Envelope
- Attack: 5ms
- Decay 650 ms
- Release 50ms
- Initial -14 dB
- Peak -12 dB
- Sustain 0 dB
- Vel 30%
- Key: 16 %
- Phase switch : OFF
Wave
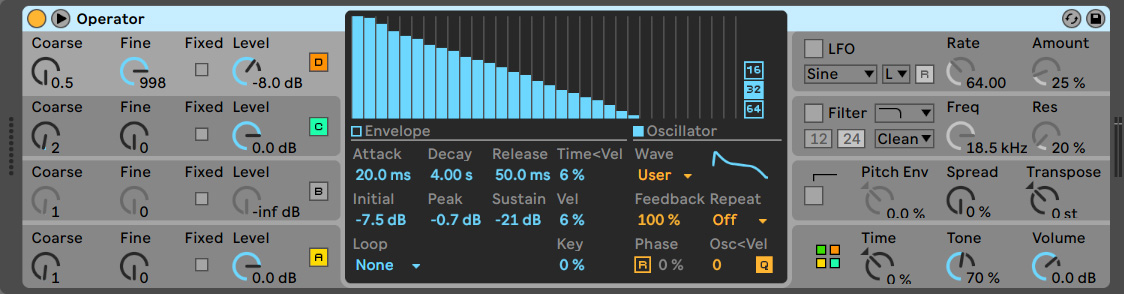
- Shape : Set the Oscillator shape as shown below. 16 partials, with the third harmonic slightly raised to give a slightly Square (saturated) sine wave.
- Phase switch : OFF

Step 4: Oscillator D
This oscillator is key to the sound of the flute synth. It feeds into Oscillator C as an FM source. It has a self-feedback which causes it to sound like white noise when the volume is high (causing a noisy feedback loop), and as the oscillator volume drops it becomes a saturated sawtooth.
Settings
- Coarse: 0.5
- Fine : 998
- Level : -8 dB
Envelope
- Attack: 20ms
- Decay 4 s
- Release 50.0 ms
- Time<velocity: 6 %
- Initial -7.5 dB
- Peak -0.7
- Sustain -21 db
- Velocity: 6%
Wave
- Shape : draw the shape below, producing a bent sawtooth
- Feedback: 100%
- Phase switch : OFF
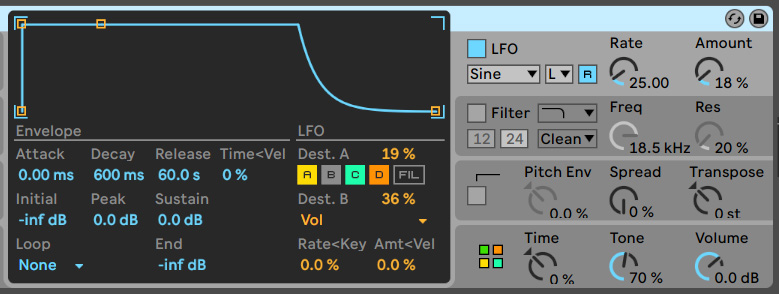
Step 5: LFO
To create a nice vibrato we need the LFO and to emulate a semi-naturalistic flute vibrato/tremolo effect here this is mapped to both the pitch and the volume, later we will have this controlled by aftertouch or mod wheel.
Envelope
- Attack: 0ms
- Decay 600 s
- Release 60.0 ms
Destination
- Destination A: 19%
- Destination B: 36%
- Destination B : Volume
Shape: Sine
- Rate: 25
- Amount: 18%
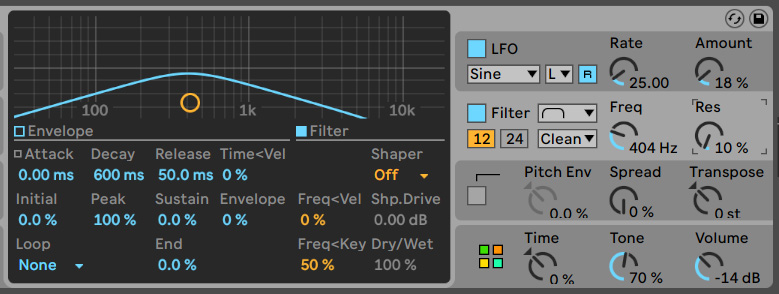
Step 6: Filter
- Type : 12 dB,
- Clean,
- Bandpass
- Freq 404
- Res 10%
Envelope section
- Envelope and env depth : Not used
- Frequency > Key : 50%
Step 7: Modulation Assignment Matrix
Here I’ve assigned the LFO rate to the aftertouch, you can alter this however suits you. You may prefer the vibrato to be controlled by the mod wheel. In the Aftertouch section use the pulldown to find “LFO Amount” it’s just by the option for LFO Rate.
You’ll see that the velocity is assigned to the Feedback, which gives the “chuff” of the flute sound.
- Velocity: OSC Feedback 40
- Aftertouch: LFO Amount 90 | LFO Rate 67

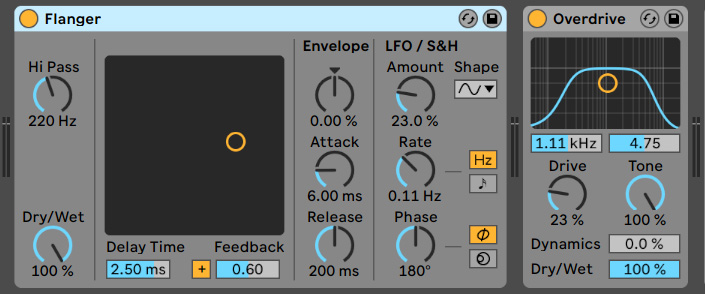
Step 8: Effects
To add the slightly hollow sound to the upper register of the flute we use a Flanger. Followed by an overdrive.
Finally and most importantly in the effect chain lets add the new Ableton Echo device, it’s capable of sounding like a vintage echo unit and we’ll use that to our advantage.
Here are the settings for the Echo effect.
Speed :
- 1/8 Sync
- Beat synch mode: Dotted
- Left -1.0 % (to create stereo width)
- Right +1.0%
- Input 1.3 dB
- Feedback: 55%
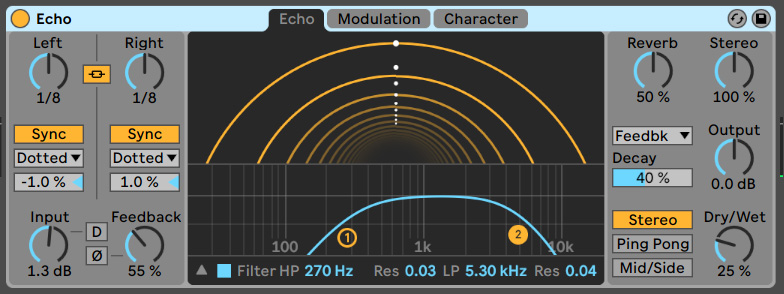
Filter:
- High Pass 270Hz
- Low Pass 5.30kHz
Reverb: 50%
Dry / Wet: 25%
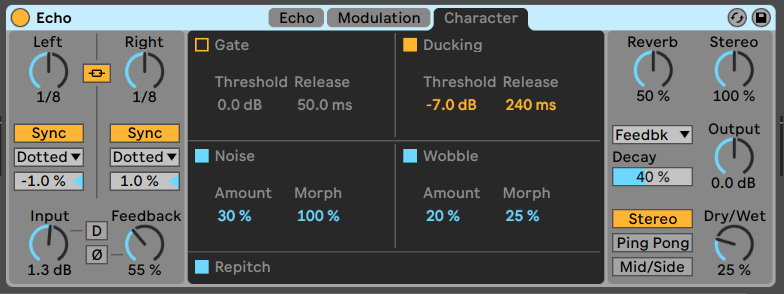
Now for the character tab we can add some modifications which will make the Echo sound like an old tape delay.
Ducking:
- Threshold: -7 db
- Release 240 ms
Noise:
- Amount: 30%
- Morph 100%
Wobble:
- Amount: 20%
- Morph: 25%
Final words
If all has gone to plan you will have a synth lead which emulates the characteristics of a particular analog lead synth sound. Like this:
Of course it’s not using the same methods, but it shows that by analysing the broadest characteristics of the analog synth sound we can choose strategies to get close.
This flute lead follows our sonic creative intentions even if it uses different strategies than an analog synth. Each note starts at a different point in the wave cycle (rather than at zero each time) giving each note a different and varied sound. Additionally the lower registers have a different (and more saturated tone) while the higher registers are sharper. We accomplish this through a combination of techniques. Try altering this synth patch and see how you can make it your own.
I hope you enjoyed this voyage into creating analog-type synth leads with Ableton synths, if you’d like to see more similar tutorials let us know!


 50 Industry Music Production Tips You Must Know


