
Snare sounds are notoriously difficult to choose, and to fit into a mix, so why not create your own with total sonic flexibility? Using this simple tutorial you will be able to make your own synthesized snare drum which is totally flexible so that you can tweak it to suit your tracks.
How to make a snare sound in Live
This tutorial only uses a single Operator synth with some EQ and compression. Here’s how the snare synth sounds, and you’ll notice that by turning a few macros it suddenly sounds wildly different!
Step 1: Add an Operator
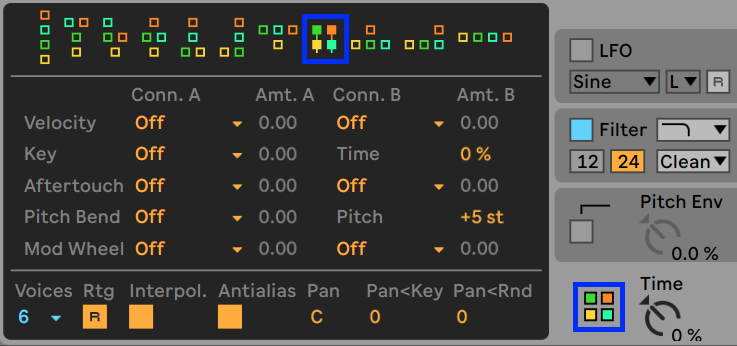
Drag in an Operator Synth and set the routing Algorithm to the mode which looks like a little square:
Oscillator A Pitch Settings
- Pitch mode: Fixed
- Frequency 110 Hz
- Multiplier: 1
Oscillator A Waveform Settings
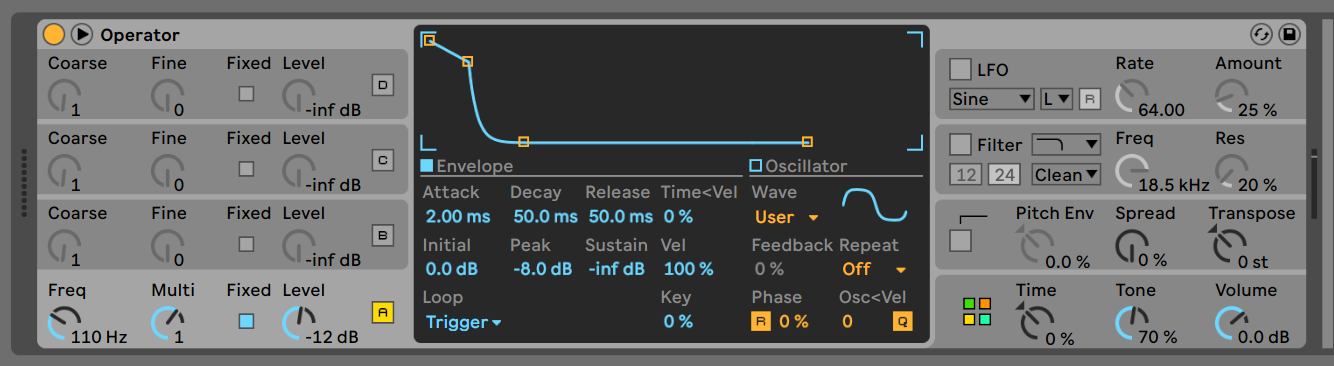
We will design our own waveform for the oscillator, it’s going to be a cross between a squarewave and a sawtooth wave. The little image of the waveform shows how it’s going to be.
Copy the shape you see here.
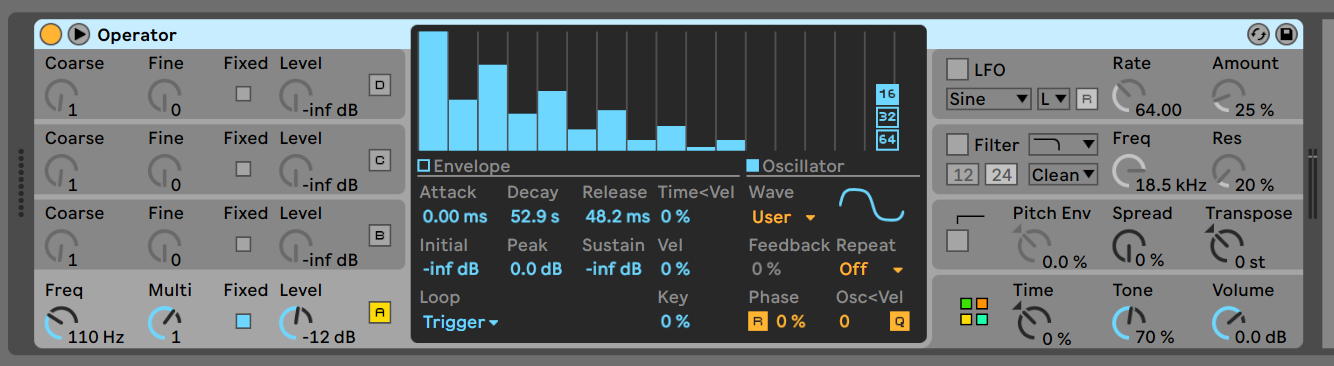
Oscillator A Envelope Settings
The envelope settings allow us to get a very snappy attack here, by turning up the Initial value to 0dB we hear the sound immediately.
- Attack: 2 ms
- Decay: 50ms
- Release: 50ms
- Initial: 0.0 dB
- Peak: -8dB
- Sustain: -inf
- Velocity: 100%
Loop mode: Trigger
Now, this isn’t going to sound too exciting so far, so the next step is to push some sound through that oscillator. The idea is to use this oscillator we just created as a kind of waveshaper.
Step 2: Add the second oscillator
This second oscillator will produce the main snare sound, the white noise … but it will be heard through the first oscillator we made. That’s the magic of FM!
Activate the oscillator B, and set the Level to -18dB
Oscillator B Waveform Settings
We will use the waveform called “Noise White”
Select the waveform you see here.
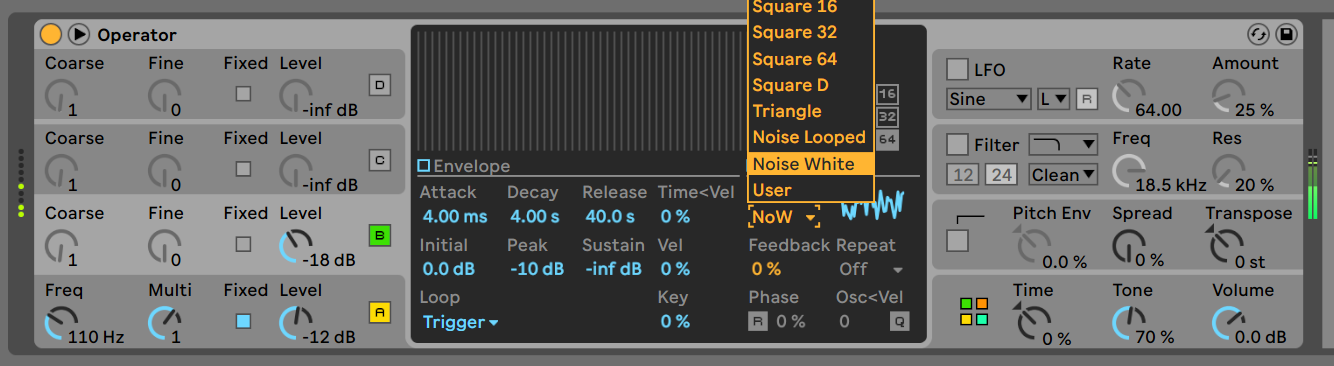
Oscillator B Envelope Settings
These settings are not heard directly, but are fed into the oscillator A. This is the modulator, and Oscillator A is the carrier. Please note the decay and release are in seconds, not milliseconds.
- Attack: 4.0 milliseconds
- Decay: 4. seconds
- Release: 40 seconds
- Initial: 0.0 dB
- Peak: -10dB
- Sustain: -inf
- Velocity: 0%
Loop mode: Trigger
Step 3: Adding the high end
We now have the basis of a body for our snare, but it doesn’t sound like much yet. So lets add some top end snap and fizz.
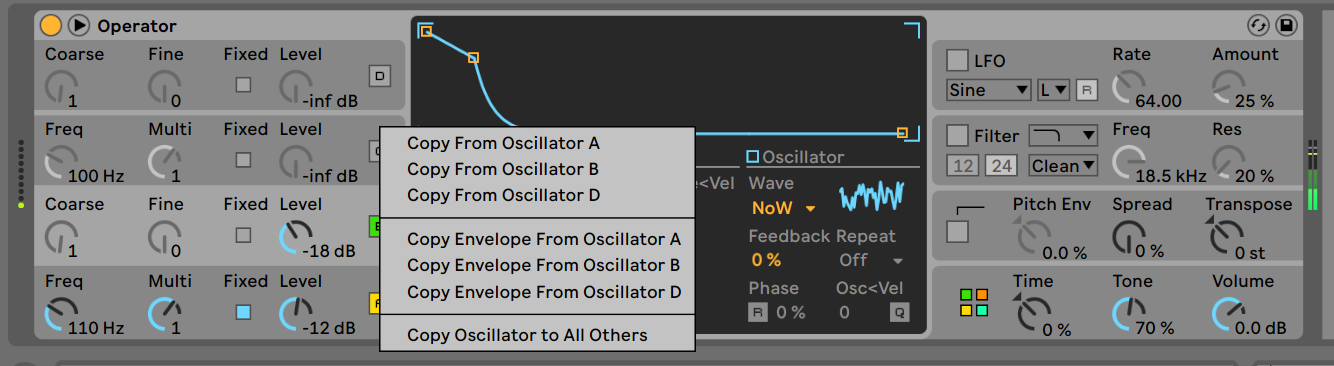
Right click oscillator C just above the little button marked [C] and from the menu choose “Copy from Oscillator A”
We are going to alter it a little though. First we will change the pitch so that it adds a subtle vibrato or shimmer to the top end.
Oscillator C Pitch Settings
- Pitch mode: Fixed
- Frequency 300Hz
- Multiplier: 0.01
Oscillator C Waveform Settings
We will design our own waveform for the oscillator, it’s going to be a cross between a squarewave and a sawtooth wave. The little image of the waveform shows how it’s going to be.
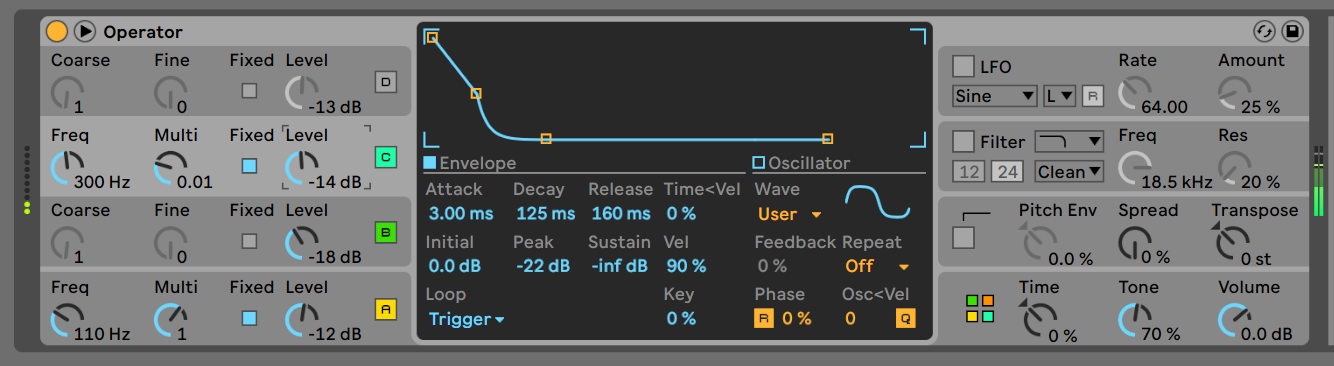
Oscillator C Envelope Settings
- Attack: 3ms
- Decay: 125 ms
- Release: 160ms
- Initial: 0.0 dB
- Peak: -22dB
- Sustain: -inf
- Velocity: 90%
Loop Mode: Trigger
Now this won’t sound like anything yet because it’s not shaping the noise. To feed into this shaping oscillator we will add more white noise!
Step 4: More noise!
Right click oscillator D just above the little button marked [D] and from the menu choose “Copy from Oscillator B”
Set the volume of oscillator D to -13dB
Oscillator D Envelope Settings
- Attack: 35 ms
- Decay: 60 seconds
- Release: 60 seconds
- Initial: 0.0 dB
- Peak: 0dB
- Sustain: -inf
- Velocity: 30%
Step 5: Shaping the sound
The sound is currently a little bottom heavy and unfocused, it doesn’t have the right amount of presence or snap. Let’s fix that
Adding body with the filter
Activate the filter and choose
- Mode: high Pass filter
- Slope: 12 db per octave
- Type: Clean
- Frequency: 130 Hz
- Resonance : 30%
This eliminates the rogue low end and allows us to emphasise the punch of the snare.
Adding Snap with the pitch envelope
A real snare drum has a pitch bend component, as the skin deforms it begins high and the pitch then drops as the tension is released through the vibrations. We will emulate that snap and bend here.
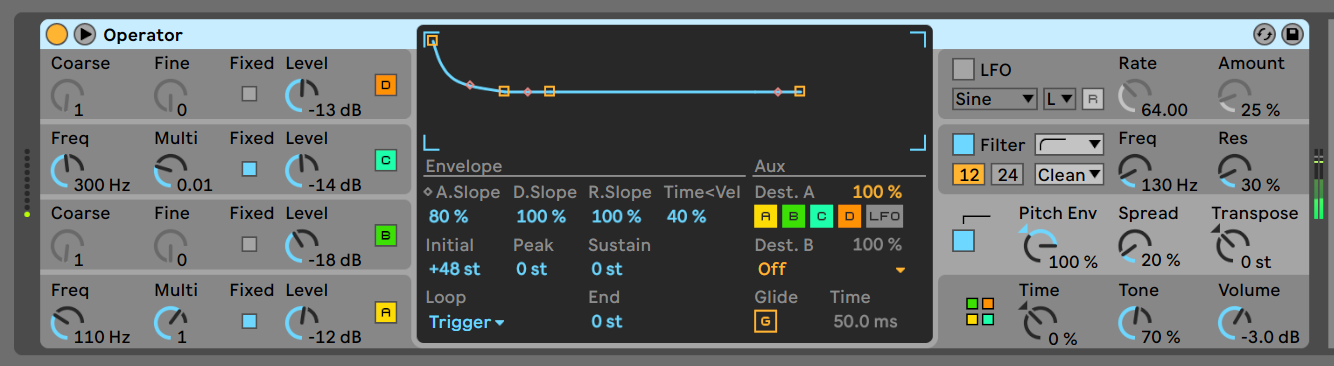
Pitch Envelope Settings
Activate the pitch envelope and turn the Pitch Env dial to 100%.
Turn the Spread control to 20%
- Attack: 25 ms
- Decay: 25 ms
- Release: 25 ms
- Time < Velocity : 40%
- Initial: +48 st
- Peak: 0 st
- Sustain: 0 st
- Mode : Trigger
To set the curve of the Pitch envelope you need to find this hidden feature … click the word “Attack” and the mode will change to the envelope curve settings.
Set the A.Slope to 80%
Step 6: Add Variety & Depth
Before we add more depth to the sound we can make the snare more responsive to velocity by making a few small changes.
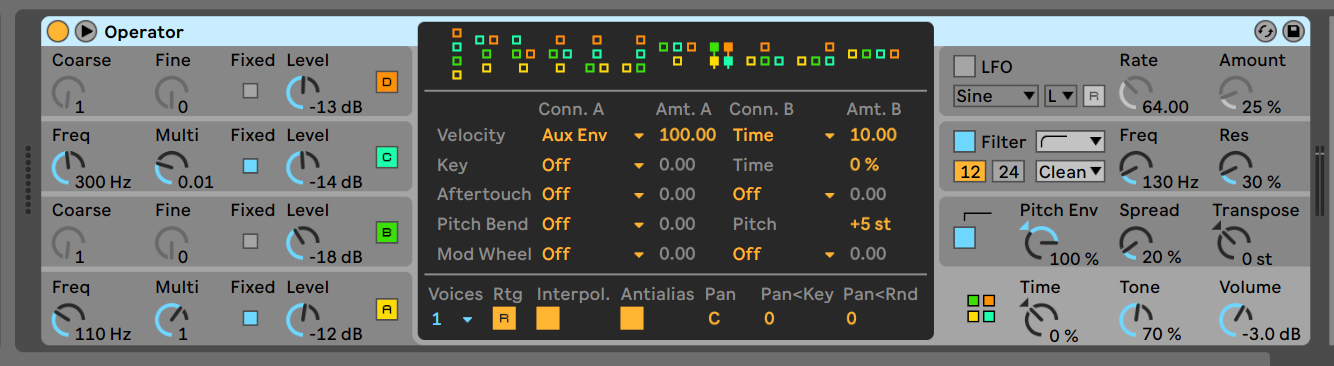
In the Global settings
Set Voices to 1
Set Velocity to Aux Envelope 100 and Time 10
Now, let’s fill out that sound a little more.
Compressor
Add a compressor with the following settings
- Ratio: 3:1
- Attack : 40ms
- Release: 20ms
- Threshold -20 dB
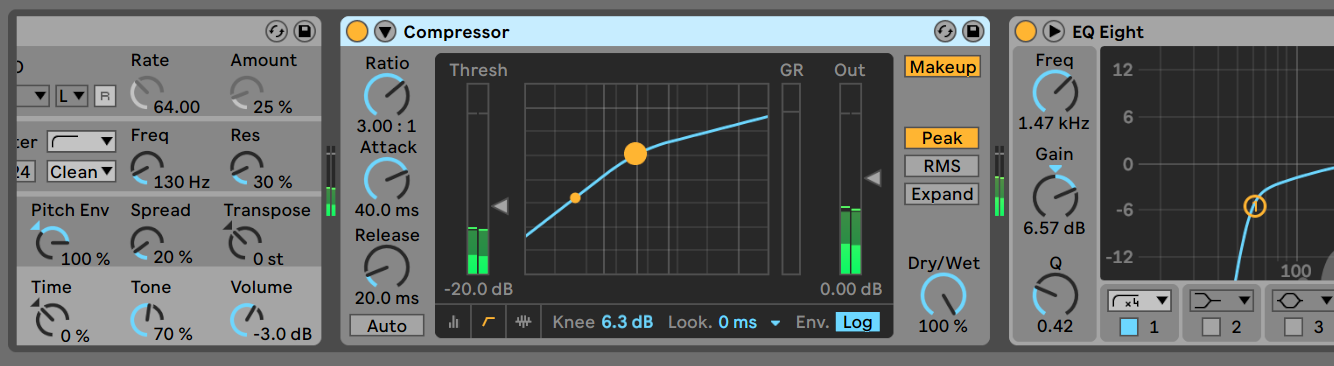
Equalisation
Add a an EQ 8 with the following settings
Band 1
- Low Cut x4
- Frequency : 60Hz
- Q: 0.50
Band 2
- Bell
- Frequency : 1.4 kHz
- Gain 7.0 dB
- Q: 0.4
Band 3
- Highpass x4
- Frequency : 60Hz
- Q: 0.50
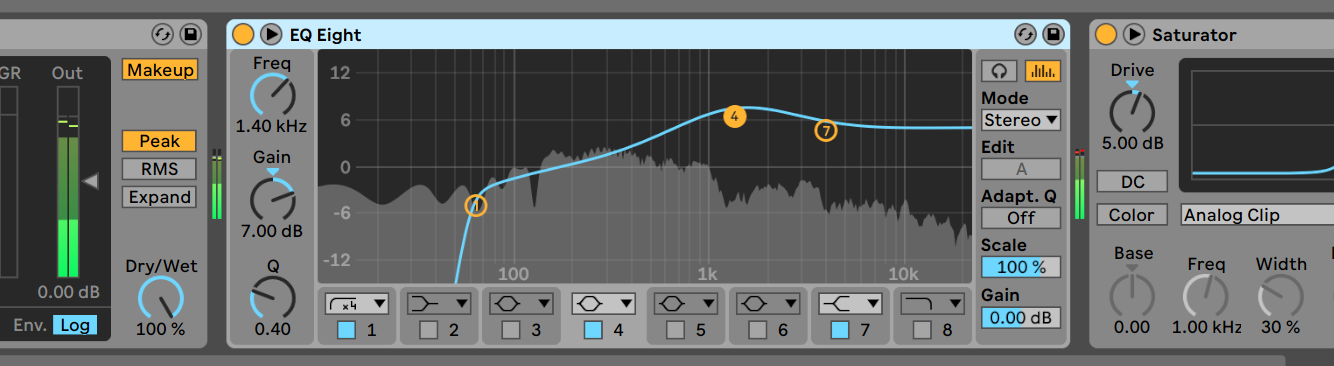
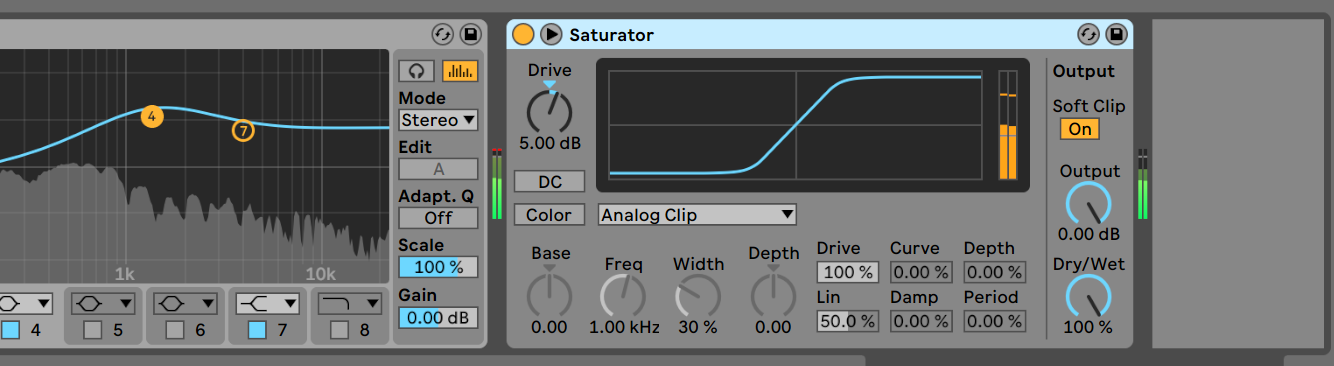
Saturation
Now add a saturator with a mode of Analog Clip and the drive setting as 5 dB
Step 7: Wrapping it up
Now to save this as a rack you want to select everything in this instrument lane.
Click on the Saturator and use your keyboard to select all with “Control + a” or “Apple + a” now use “Control + G” or “Apple + G” to make this chain into a rack.
Save the rack and give it a name. You just made a snare!
If you want to take it to the next level try mapping some of the parameters to macros, some things to try.
- Map the “Time” control to a macro dial
- Map the Operator Filter Frequency to a macro dial
- Map the Eq Low cut Q to a macro!
I hope you enjoyed this tutorial on how to synthesised a snare drum in Ableton Live. If you’d like more like this let us know!


 50 Industry Music Production Tips You Must Know


