
The rave vibe from the 90s is back in today’s electronic dance music, with faster tempos, detuned synths, and acid basslines taking over a lot of genres. So if you’re into this kind of stuff, in this tutorial we are going to show you, step by step, how to create your own ravey sounds from scratch using only Ableton’s Analog and stock effects.
1. Detuned lead
There’s nothing like a trancey arpeggiated lead based on detuned sawtooths to create an euphoric vibe in your track. A lot of trance records from the 90s used this iconic sound to build their epic melodies, and here we’re going to show you how to get that.
This is the sound that we are going to make:
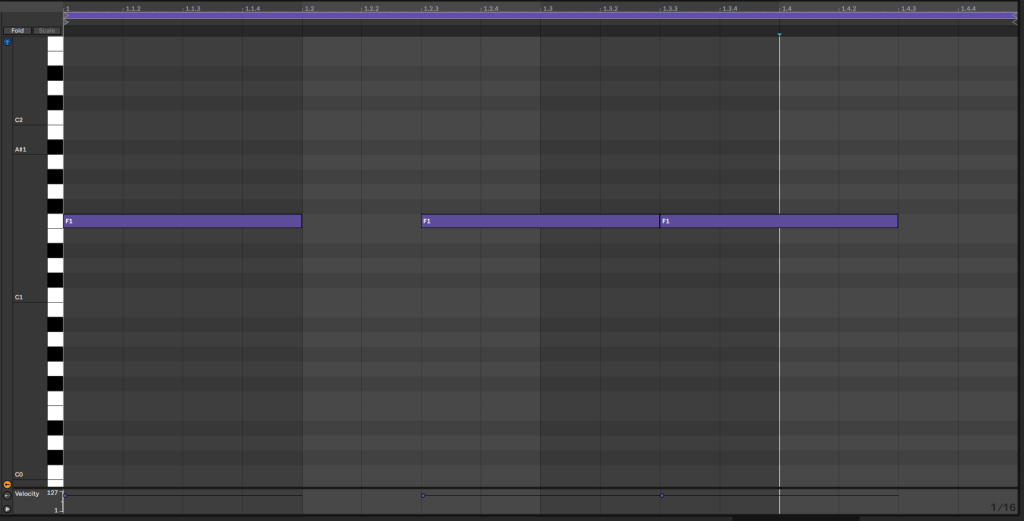
This is the MIDI pattern of the melody on an Ableton clip:
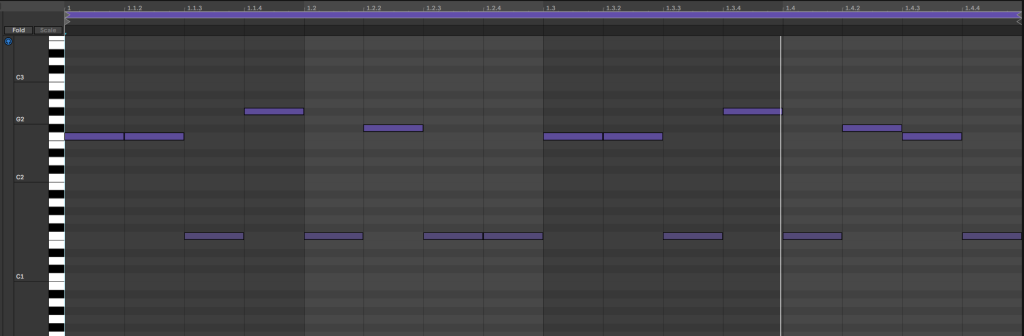
Notice how the notes in the lower octave have significantly lower velocities. These are ghost notes, similar to the ones on drum patterns, and they are used to fill the pattern and make it feel fast-paced and consistent.
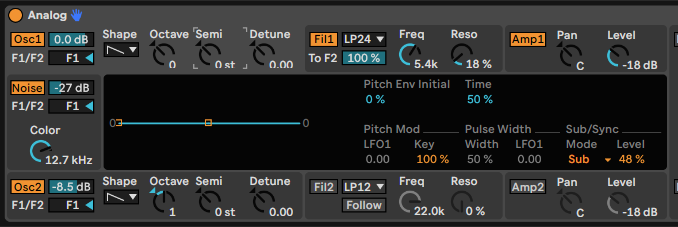
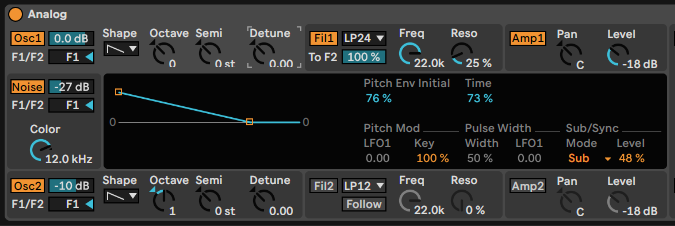
Now for the sound, let’s just load an instance of the default Analog instrument into our MIDI channel. First, let’s make sure that both Oscillators are set to Sawtooth waveforms. The first one should be left as it is, routed to filter 1 and with no changes on its pitch controls.
However, we want to add a sub oscillator – an auxiliary oscillator that plays one octave lower – to give the sound a bit more body, so head to the display while your Osc1 section is highlighted. On the Sub/Sync submenu, select ‘Sub’ in the mode box and bring the level up to 40-50%
The second oscillator should be playing an octave higher and a bit quieter in volume when compared to oscillator 1, but still a sawtooth waveform. Let’s crank the ‘octave’ knob up to 1 and bring down the volume slider at around -8 dB. Make sure this oscillator is also routed to filter 1.
To finish up with the oscillator section, we’re going to add a bit of noise for extra bright and texture. Toggle on the ‘Noise’ button and bring the Color knob up to around 12kHz, so the noise is mostly focused on the higher frequencies. Turn the volume slider down until -27 dB and make sure that this oscillator is also routed to filter 1.
This is how the oscillator section looks after all the changes we made:
It sounds like this now:
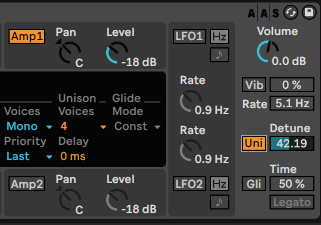
You might be wondering why we didn’t detune the oscillators against each other to get that classic timbre. Well, we’re just going to do that with the Unison function, which allows us to get a more aggressive detuning effect while keeping the second oscillator to be used as a higher layer, as we did.
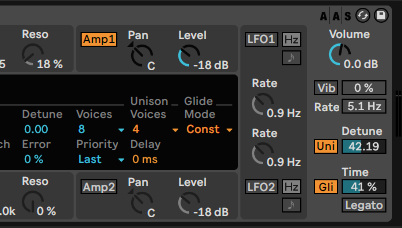
So let’s go to the global section, at the right side of the device. Find the ‘Uni’ button and toggle it on. Now go to the display and find the Unison options at the right side. Select 4 Unison Voices.
Now go back to the Uni button, and bring the slider next to it up to 42. We are going to apply some glide as well, so toggle on the ‘Gli’ button and bring it up to 41%.
Things should sound like this now:
This is how the global section looks like after the changes:
Now, let’s move the the FIlter section. Filter 1 is in the upper-mid section of the device, while filter 2 is in the lower one. By default, Filter 1 should be activated while Filter 2 is toggled off. Make sure you have it the same way.
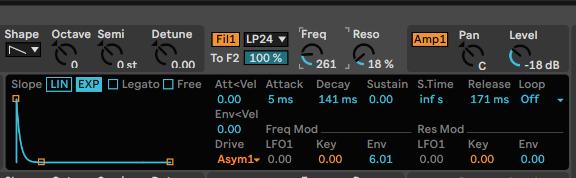
Now click on the Filter 1 panel, so the display shows off the related controls. First, let’s set up the Filter envelope. Leave the attack as it is, decrease the decay time down to 141 ms, sustain at 0, and release around 170 ms.
Then, on the row below, find the ‘Env’ control. This determines the amount of modulation applied to the filter, we have it at 6.01. We’ve also changed the ‘Drive’ control to the left of this panel to ‘Asym1’, to get a different relationship of harmonics, making it crispier this way.
Now, move the filter ‘Freq’ knob up and down, and notice how the envelope is affecting it, so when the cutoff is down, the notes coming out of the synth are pluckier. We’ve also added some Resonance, around 18%.
This is how the filter section looks after the changes.
All that’s left is make some tweaks in the ‘Amp’ section and add some effects. Click anywhere in the Amp1 module so the display will show off the related options. Going for minimum attack at 5 ms, 400 ms decay, sustain at maximum and 194 ms release.
As for the effects, we added ‘EQ Eight’ for a bit of cleaning and balancing, ‘Saturator’ for extra warmth and harmonics, and then ‘Echo’ and ‘Reverb’ to add some space, movement and depth.
The actual tweaking for each device was quite simple, you can check out the exact configuration for every effect here:


Now everything should sound like the first audio example we listened to. Try your own melodies, play with the filter for tension and release, maybe add some different effects… make it yours!
Let’s move on to the next sound.
2. The hoover
Another staple of the rave sound, the hoover is quite similar to our first sound in terms of timbre, although it has a key element to it that makes it different. Let’s listen to what we’re going for first:
This is the MIDI pattern that the hoover is playing:
Now load a new default instance of ‘Analog’ on a MIDI channel, draw your MIDI clip with our pattern or whatever you come up with and let’s create a hoover.
As we mentioned, the hoover is very similar in timbre to the previous sound, so let’s just set up the oscillators again. Oscillators 1 and 2 should be sawtooths again, with ‘Osc 2’ one octave above the first one. The level for Osc2 is around -10 dB.
The noise oscillator is the same as before too. So what is the difference here? If you listen carefully, the hoover doesn’t play a straight forward note, but some kind of decreasing pitch. It’s higher at the beginning and then it drops.
‘Analog’ can take care of this kind of effect thanks to the pitch envelopes available for each oscillator. So let’s click on Osc1 so the display shows off the related controls. Now all you have to do is set the ‘Pitch Env Initial’ at 76% and Time at 73%.
What ‘Pitch Env Initial’ does is tell the synth how high in pitch we want to go with the envelope, while the ‘Time’ control allows us to set how long the pitch will decrease.
If you’re using a different pattern here, it’s quite possible that the times that we were using here don’t work for you. Try lower values for shorter notes, or higher values for longer ones.
The sub oscillator for Osc1 is also activated, at the same settings as in the previous sound.
Now repeat the pitch envelope process for Oscillator 2 with the same values, otherwise one will have its pitch moving while the other plays a regular note, something you probably don’t want.
This is how the Oscillator section looks for this sound:
The filter section remains mostly unaltered for this sound, we don’t really need an envelope modulating the cutoff here, so we just made sure that the ‘Env’ value is set to zero. You can check it out by clicking anywhere in the Filter 1 module and then going to the display.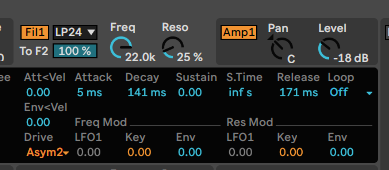
The ‘Amp1’ is a bit different, with longer decay and release times. Decay is at 410 ms and release at 386 ms. No further tweaking is needed here.
This is how it sounds at the moment:
To add the detuned character, go to the global section all the way to the right of the device, and activate ‘Unison’, with a ‘detune’ value of 42. This time we are leaving the glide out, since our pattern doesn’t really change in notes, so it doesn’t make sense. But if you’re planning on playing different notes with your hoover, feel free to experiment with it.
While on the global section, go to the display and set the Unison voices to 4, so the detuning actually takes place. This is how this part looks now:
And this is how it sounds with the Unison detuning:
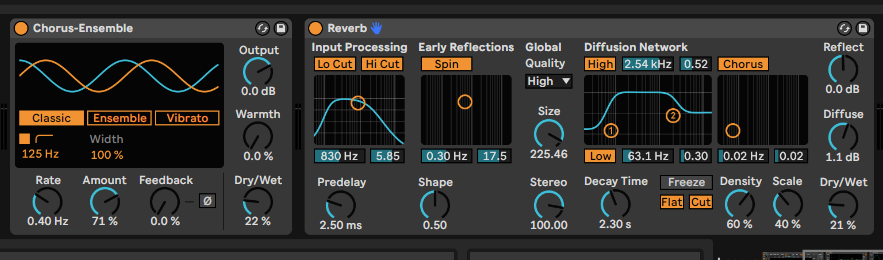
We added some effects, again ‘EQ Eight’ for cleaning and balancing and ‘Saturator’ for warmth and harmonics. Then, we used Ableton Live 11’s ‘Chorus-Ensemble’ to add some width and movement, and ‘reverb’ for space and depth.
You can check out how we’ve set them all up here:

Now everything should sound as in the first audio example. Experiment with different patterns, pitch envelope times, effects and even different waveforms in the oscillators for a wide range of variations of this iconic rave sound.
We will come back with some other classic rave synth sounds in part 2 of this post, in the meantime, experiment and have fun!


 50 Industry Music Production Tips You Must Know


