
The MS20 makes excellent raw and dirty sounds including a unique rich analogue bass patch. Ableton’s Wavetable may not seem like the immediately obvious synth to recreate this fat sound but it’s actually perfect for it. So lets make one now.
This is the sound we will be making and for fun I’ve made a direct comparison between the same patch on my MS20 (revision 2) and the same sound on a Wavetable. You’ll hear how close they are.
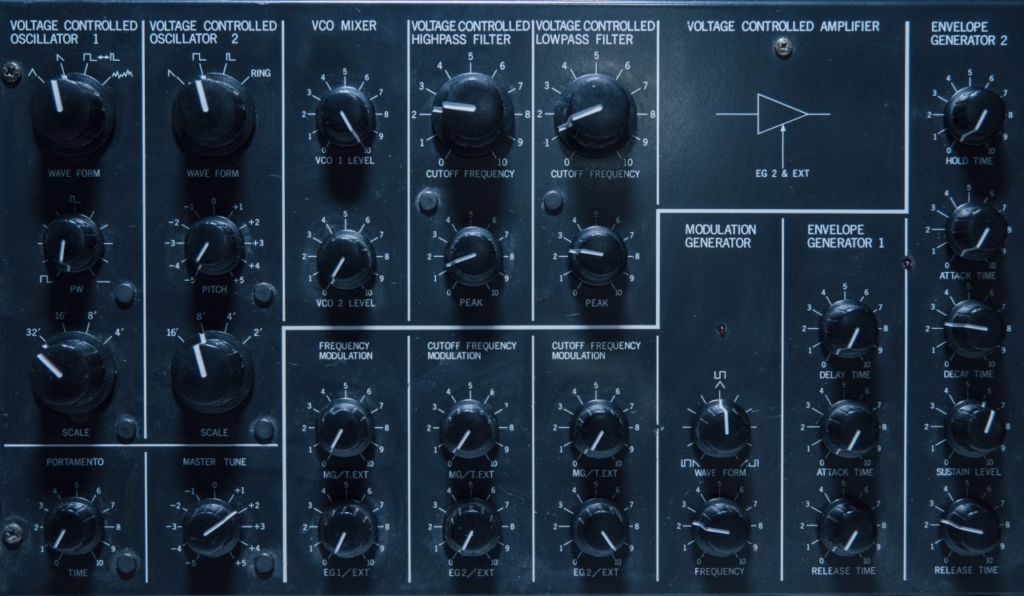
This is what the patch looks like on an MS20:
And by using some additional capabilities of the Wavetable synth we can take the bass sound to a new level so that it sounds fatter than the MS20, like this:
MS20 bass characteristics
The original Ms20 had two filter versions with the earliest famed for its dirty gritty sound and the later version sounding slightly more clean – but in both of these the combination of a resonant high pass in series with the resonant low-pass enabled some great fat bass sounds.
You may think of a high-pass filter as a way to remove bass, but instead think of it as a bass booster! The MS20 high pass filter when driven with a high signal (from resonance) into the low-pass produces additional harmonics, what can be called non-linearities, or perhaps more commonly known as “saturation”. This saturated overdriven sound is then shaped by the low-pass filter to create a fat rich bass tone.
Steps to create a fat MS20 Bass
Open up a copy of Wavetable and set the main controls as pictured:
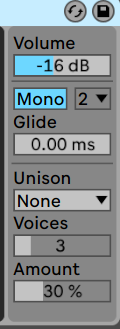
- Volume -16dB
- Mono
Oscillator One Wave
The waveform choice needs to be something like a simple square wave. The rich hollow tones give enough body for the filter stage to work on. However, rather than choosing the basic square wave let’s pick one which already has some character. So rather than Oscillator: Basic Shapes – Square, let’s instead pick the Basic Shapes – “Sub 1” because it’s slightly closer to the MS20 sound.
This is the setting for the first Oscillator:

- Main Transpose: -12
- Oscillator shape: Basics – Sub 1
- Semi 0 st
- Detune: 0ct
- Wave Position 85%
Dirty Filters
The basis of this sound is of overdriven filters, a high pass with a lot of resonance boosting the low end fed into the low-pass filter which shapes the additional harmonics which are added by that saturation.
The MS20 has a 6dB per octave High Pass filter, and the MS20 low pass filter is a 12 dB per octave. Wavetable has a 12dB and 24 dB per octave option. We will get close enough with these:
Filter One
Activate the first filter and set it to match these settings:
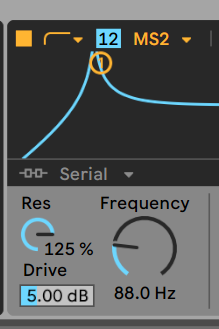
These are the settings for the first filter:
- Filter type: High Pass
- Filter Slope: 12 decibels per octave
- Filter model : MS2
- Filter routing : “Serial”
- Resonance: 125%
- Frequency: 88 Hz
- Drive: 5.00 dB
Filter Two
Activate the second filter and set it to match these settings:
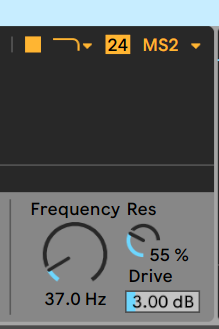
These are the settings for the second filter:
- Filter type: Low Pass
- Filter Slope: 24 decibels per octave
- Filter model : MS2
- Frequency: 37Hz
- Resonance: 55%
- Drive: 3.00 dB
Filter Modulation
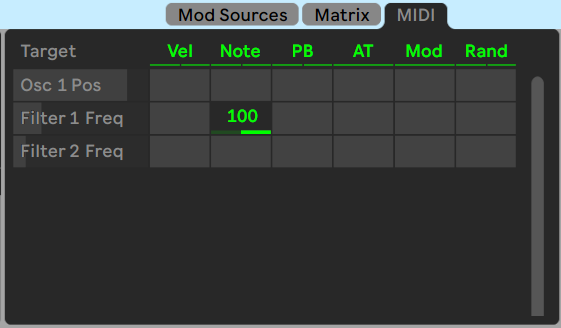
The first modulation assignment is to the High Pass filter. We want that filter to focus on the deepest harmonic of the bass note and boost it, that requires it to follow the keyboard pitch to keep it on pitch. We want to assign the keyboard pitch to the high pass filter frequency so that it tracks the note to the frequency.
Selection the MIDI tab in the modulation matrix and set the Filter 1 Frequency to be affected by the note at 100% (click on the knob of Frequency of the 1st filter so the target you need appears among the options)
Now, we need to assign the envelope to filter two.
The MS20 has two envelopes, but the main ADSR applies to both the synth volume and the filter cut-off (via dedicated EG2 knobs)
We won’t apply the envelope generator to the high pass (Filter 1), because we want that to stay very stable and follow the pitch, but we can apply it to the Low Pass (Filter 2) and get a nice unified analog style bass sound.
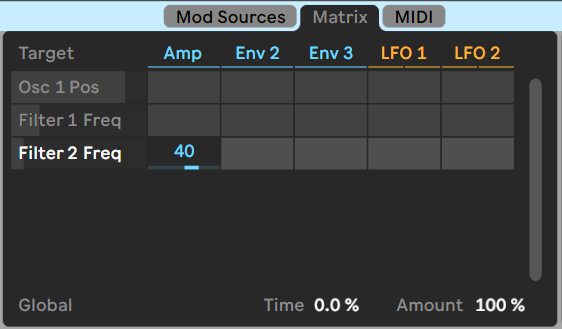
To assign the Amp Envelope to the Filter 2 Frequency set the value to 40, as pictured above (click on the knob of Frequency of the 2nd filter so the target you need appears among the options)
The ADSR Envelope Settings
Now finally to the envelope which controls both the amplitude and the filter.
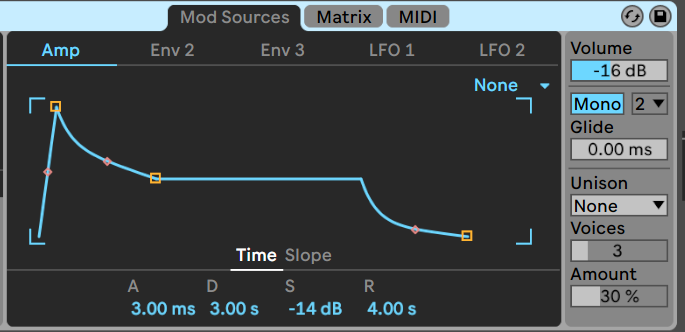
Click on the tab for the Mod Sources: Amp envelope and set the Times to:
- Attack: 3.00ms
- Decay: 3 seconds
- Sustain: -14 dB
- Release: 4 seconds
Now look for the word “Slope” just above where you entered those numbers, this allows you to type in the slope values.

Click “slope” and type in.
- Attack: 0
- Decay: 50%
- Sustain: -14 dB
- Release: 75%
That should produce the bass sound you heard at the start of this tutorial.
So, what next? Of course, the Wavetable synth has a lot more features, and you can make the synth sound a little more analog if you like. A slow LFO on the Low pass filter helps give a little motion.
Even more useful for though is the hidden “random” feature in the MIDI tab. Visit the MIDI tab and on the far right you’ll see the Rand column. Type 15 into the Osc 1 Pos row, and try adding some randomisation to the Filter 2 frequency.
Watch the video to see how we set all these settings:
Get Fatter!
The MS20 has two oscillators, and so you might want to try adding a second oscillator to this patch.
The second oscillator on the MS20 has a low range an octave higher than the First oscillator, so try a Semitone setting of +24, and a sawtooth wave.
Go beyond an MS20
Increase the drive of the Filter 2, and set the Unison mode to Noise … and we get a fat analogue style bass far beyond what the MS20 can achieve.

Save this preset and use it to completely dominate the mix of your next track !
I hope you enjoyed this tutorial. If you want to see more tips on how to create your own unique synth patches in Ableton Live, leave us a comment and we’ll take note for the next posts!


 50 Industry Music Production Tips You Must Know


