
Synth pads are sounds that can add a lot of atmosphere, depth and vibe to a piece of music. However, depending on the genre that we want to make and the instrument we’re using, they can easily get too static or boring, making our track dull or lacking interest, and this is something we probably don’t want for our music.
This is why we decided to take a look at how to create an evolving pad on Ableton’s Wavetable, a powerful and versatile synth with extensive modulation capabilities and sonic possibilities that will allow us to create exciting, everchanging timbres that are perfect for this kind of sound.
We’re going to use Ableton’s native synth, but you can follow along with your own daw and any other modern virtual wavetable synthesizer such as Serum, Pigments, Massive, or even hardware synths like Novation Peak/Summit or ASM Hydrasynth, since the concepts, tools and workflow that we are going to use are pretty much the same in all of them.
This is what we’re going to get at the end of this tutorial:
So let’s open your favorite DAW and your synth of choice and get to work!
We’re going to open an empty MIDI track and load Ableton’s Wavetable into it. Make sure to pick the default ‘Wavetable’ instrument, no preset selected, to get an initialized patch. Remember, if you press the right-arrow button on the top-left corner of the device, its UI will expand, making it more comfortable to use and getting more visual feedback at once.
It should look like this:
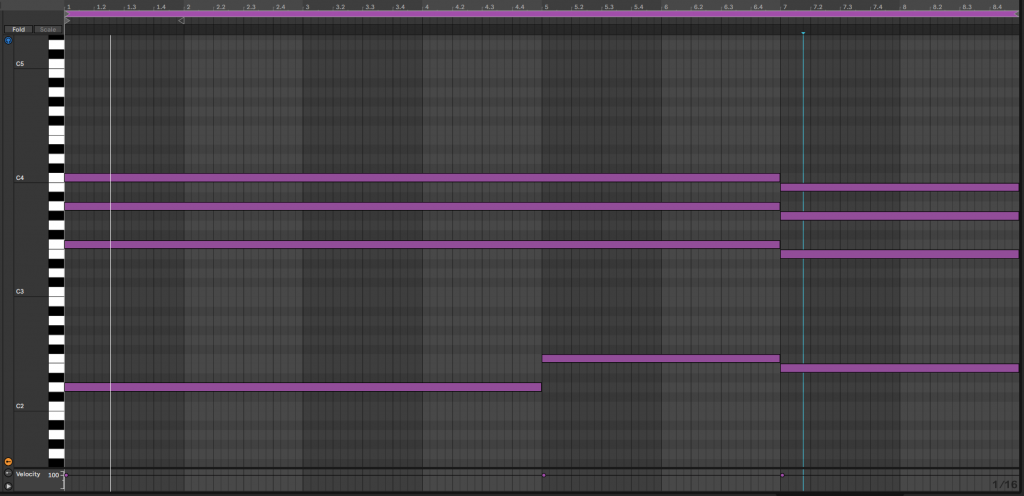
In order to totally focus on the sound design aspect, we already recorded a very simple chord progression in a MIDI Clip. The chords we are playing are Dmin 7 and F and E.
1. Setting up the oscillators.
We are going to start creating our sound from scratch, starting with setting up the oscillators. Make sure the ‘Osc 1’ tab is selected in the upper frame. This is a wavetable synth, which means it works by loading a file loaded with a number of different waveforms that usually morph between them through the ‘Position’ slider, placed at the right side of each oscillator’s display.
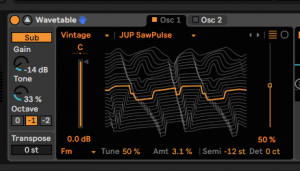
You can select a category first and then a particular wavetable inside that category with the two available drop-down menus right below the ‘Osc 1’ tab. For the first oscillator, we’ve chosen the JUP SawPulse from the Vintage category. Then we moved the Wavetable position slider, right next to the visualization display, up to 50%.
It’s not really important what timbre we select here, since we will be modulating this later, getting the sound to move through all the different timbres inside this particular wavetable. Let’s also drop 12 semitones via the ‘Semi’ control right below the Position slider we just tweaked..
On the FX selector, right below the Oscillator volume slider, we are going to select ‘Fm’. This will allow us to generate extra harmonics. We will set the tune to 50%, meaning the modulator will be one octave above the carrier. We’ll crank up the amount up to 3% only, since we will modulate this parameter later.
We also want to add a bit more body to the current sound, so we are going to use the ‘Sub’ Oscillator. Toggle the ‘Sub’ button on the top-left corner, we’ve put the volume around -14 db and the Tone at around 30%. Also, make sure the Octave selector is at -1 so the sound coming out of the ‘Sub’ oscillator is an octave lower than ‘Osc 1’.
This is what the Osc 1 section looks like once we have done all these steps:
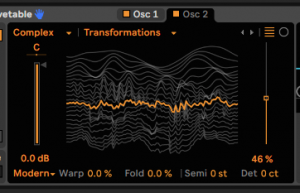
Now let’s move on to Oscillator number 2. To access its control panel, just click on the Osc 2 tab, right next to the ‘Osc 1’ on the top of the device’s interface. Here, we are using the ‘Transformations’ wave table inside the ‘Complex’ category. We’ve put the WT position slider at 50% again, since we will be moving this with modulation later as well.
We are not going to apply any FX on this Oscillator, since the wavetable we have loaded already has a lot of different shapes and enough harmonics. We will keep it at the original pitch, so the ‘Semi’ control is left at 0. This makes Oscillator 2 one octave above Oscillator 1 and two octaves above the Sub oscillator, filling up a lot of the frequency spectrum.
This what ‘Osc2’ looks like now:
2. Setting the filters, amplitude envelope and global controls
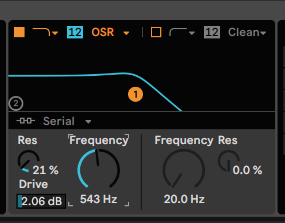
The oscillators are now set up, so it’s time to tweak the filter. We can find the filter section right in the middle of the device. It has two independent multimode filters with different routing possibilities, but for now we are gonna use just the first one. We keep it as a Low Pass and 12db/octave.
We are going to change the filter circuit from ‘Clean’ to ‘OSR’ just to be able to add a bit of drive. Once the filter circuit is changed, the Drive slider will appear right below the Resonance knob.
As for the filter controls, we will turn the Frequency knob to set the cutoff around 550 Hz, Resonance around 20% and 2 dBs of drive to add some warmth. In the picture below you can see exactly how it’s been set up.
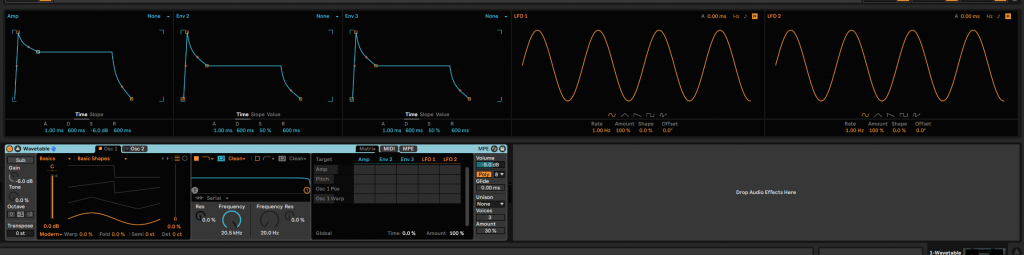
If you expanded Wavetable’s view, you will find the Amplitude envelope on the first display of said expansion. Otherwise, you’ll have to go to ‘Mod Sources’. This will control how the volume responds to the notes being played. We are using a 800 ms of attack, 6,6 seconds of decay, -3.1 dB sustain, so it doesn’t fade away too quickly, and 1.7 seconds of release.
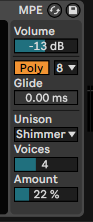
Now let’s tweak some of the global controls, which you will find on the right side of the device. First, we’ll turn down the volume to -13 dB, so it doesn’t go too loud. Make sure the synth is set as ‘Poly’ to be able to play the chords.
Then we are adding a bit of Unison for that detuned effect. We’ll set it up to ‘Shimmer’ mode, as it also creates different pitches to get something similar to a shimmering reverb. Set it up to 4 voices and around 25% of unison amount.
Your global settings section should look like this now
What we’ve got so far sounds like this:
Now we have a nice pad starting sound, but it is too ecstatic, there’s no movement at all, so let’s bring it to life with some modulation.
3. Adding movement through modulation
In order to add this movement, we are going to use the Modulation Matrix. You can access it via the ‘Matrix’ tab on the upper-right part of the device.
As you can see now, there are only certain parameters available in the matrix. But don’t worry, you can add any other that you want to modulate. The way to do that is very simple, just click on the parameter that you want to modulate, and you will see it appear in the matrix as a new row. To add modulation to it, just drag one of the modulation source boxes in the same row up or down.
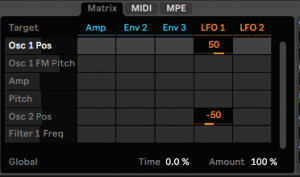
For instance, we want to modulate the position of Oscillator 2 with an LFO. In order to do that, just go to ‘Osc 2’, click on the Position slider – the one on the right side of the display, and it will appear in the Matrix. Then, just find the LFO 1 column, and go to the box that matches that column with the ‘Osc 2 Pos’ row. Click and drag inside that box, if you drag upwards you will turn on positive modulation, and if you drag it downwards, said modulation will be negative, as you can see in the picture:
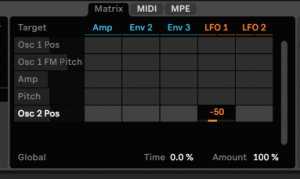
For now, let’s just leave the modulation amount for ‘Osc Pos 2’ with the LFO 1 at -50. We are going to do the same for the position of oscillator 1, so repeat the process but instead, use positive modulation.
If you’re wondering why, there is a reason. Both wavetables have smoother waveforms in the upper region and more harmonic content in the lower one, so if we modulate each wavetable im the opposite direction, while Oscillator 1 is playing more aggressive waveforms, Oscillator 2 will be playing smoother ones, keeping things balanced and nice.
Now LFO1 is moving both oscillators’ wavetable positions, but it’s moving too fast for what we had in mind, so let’s set up this LFO right. To do that, just go to the LFO1 display if you have expanded the device, or if you haven’t, just click on the LFO1 name inside the matrix or in the ‘Mod Source’ window.
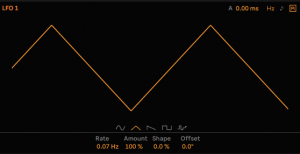
First, toggle off the ‘R’ button on the top-right corner of the display. This is the retrigger button, so toggling it off will allow the LFO to always run free, instead of restarting it’s position every time a new note is played.
Then, we want to use a triangle shape on this LFO, so make sure this is the one selected. Finally, turn down the rate, so the LFO moves slower. We are using a value of 0.07 Hz.
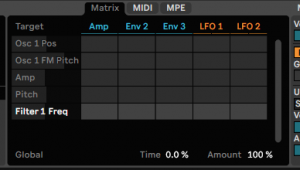
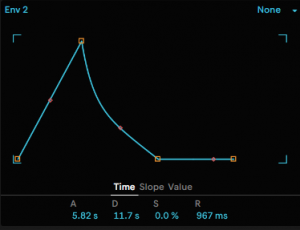
Let’s add some movement to the filter too, this time using Envelope 2. Click on the Frequency knob, then go to the Matrix and drag the ‘Filter 1 Freq’ box corresponding to ‘Env 2’ up to 19. Then let’s configure the envelope.
We are using a long attack of 5,82 seconds, a longer decay of 11,7 seconds, no sustain and 960 milliseconds of release, so the movement of the cutoff won’t be too aggressive.
We are also going to add further modulation to the filter with LFO 2, but this time a very little amount, only 1.6. We toggled off the Retrigger (R Button) of LFO 2, set it to triangle wave and around 0,7 Hz of rate.
To make this subtle filter movement even more unpredictable, modulate the LFO 2 rate with LFO 1 with the procedure we’ve been using in the matrix. We used a modulation amount of 7.8
Next, we are going to modulate the amount of FM that we applied to Oscillator 1. So click on the ‘Amt’ on the lower side of the display and go to the matrix. We will be using Envelope 3 here, so drag it up to 48.
For Envelope 3, we want to use it as a looping envelope, something very similar to an LFO. To do that, just go to the top-right corner of the envelope’s display, where it says ‘None’, and use the drop-down menu to change that to ‘Loop’.
For the ADSR values, we are using these: Attack 66,7 ms, decay 141ms, 0 sustain and minimum release. We will also modulate the envelope’s decay with LFO 1, so the length of the envelope loop is different every time.
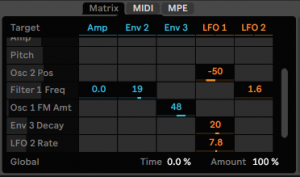
Click on the decay, go to the matrix, find the ‘Env 3 decay’ row and the LFO1 box related to it and drag it up to around 20.
This is what our modulation matrix looks like now – keep in mind ‘Osc 1 Pos’ is also modulated, but doesn’t show up in the picture.
We have enough movement for now and our Synth pad is sounding like this at the moment:
4. Adding the final touch with FX
We finally have a pad with movement in its timbres and frequency content. This is already nice, but let’s finish it with some FX.
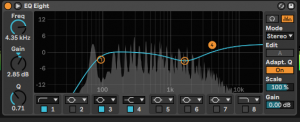
First, we added an instance of Ableton’s EQ8 to cut a bit of the low end and make a dip around 1.5 kHz to make the sound a bit smoother.
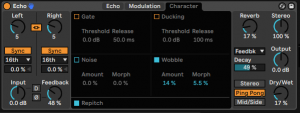
Then, we add Ableton’s echo with a delay time of 5/16 on both channels, in Ping Pong mode and with a filter cutting the low end. We’ve also added a bit of ‘wobble’ effect in the character tab.
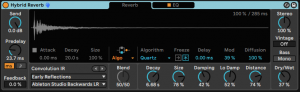
Finally, some Hybrid Reverb in Algorithm mode, with the Quartz option selected, and tweaking the decay, size and distance parameters as in the picture below:
This is everything we have done to achieve the result of the first example. But there are lots of things you can try: modulating different parameters, trying different wavetable combinations, adding more aggressive effects like redux or overdrive to get grittier results…
As always, experiment and have fun!


 50 Industry Music Production Tips You Must Know


