
Are you bored of always using the same old libraries and samples? Would you like to have your own, unique, organic sounds for your music projects? Today we’re going to show you how to create a beat from scratch with samples recorded in a kitchen, by using just an audio recorder to capture the sound of cutlery, pots, a mop and a cutting board, either hitting them or rubbing them against each other.
This is what the end result is going to sound like:
If you’d like to know how to turn home-made sounds into music in an easy way, keep reading because we’re going to show you step by step. Furthermore, you can try using the samples we recorded by downloading them from here:
So download our samples or record your own, start Ableton Live or your prefered DAW and let’s get started.
Step 1: Setting up the project and loading a Drum Rack
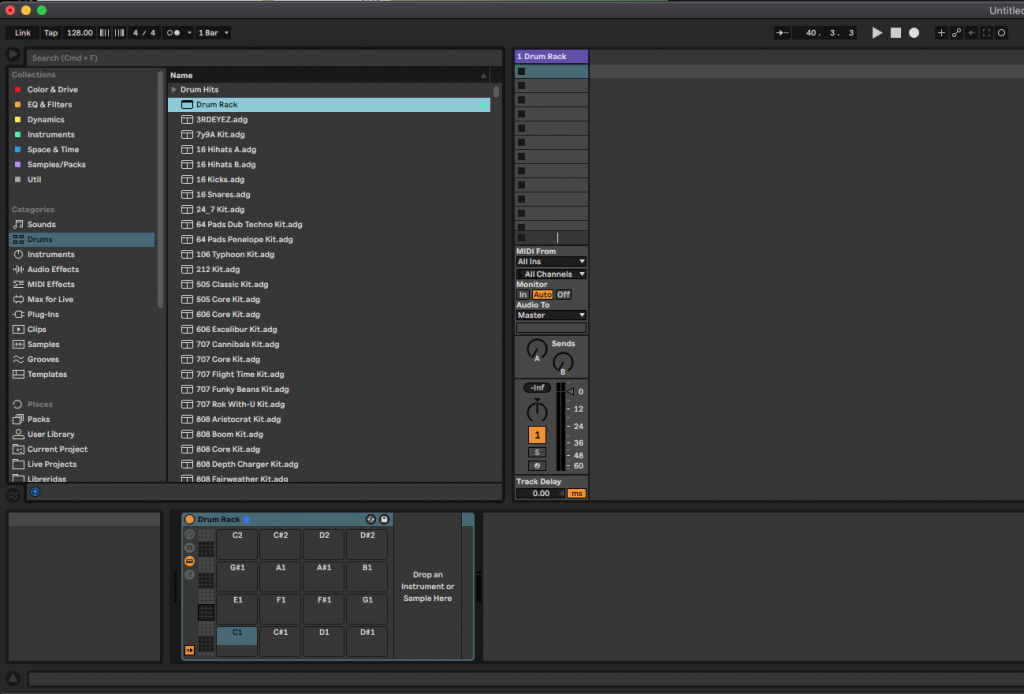
First thing we did was setting our project to 126 bpm in 4/4. Then we loaded a Drum Rack on an empty MIDI track, so create the track first if you don’t have it there already and then find a Drum Rack on the Drums section of Live’s browser and drag it to the track.
Step 2: The kick
To achieve this sound, we’ve hit a cutting board against the kitchen’s countertop. The result is already pretty usable, but we’re going to further process it to refine it.
First, drag and drop the ‘Kick’ sample to the C1 cell of your Drum Rack. This will allow Ableton to create a Simpler, which is the usual thing when we drop a sample on a MIDI track or on a Drum Rack cell.
Once we’ve got our Simpler with our Kick loaded in, we will change the playback mode from ‘1-Shot’ to ‘Classic’. Then, we deactivate the ‘snap’ button and select a sample starting point, which will be the closest zero-crossing to the start of the transient. (A zero-crossing is the point of a waveform where its value is zero).
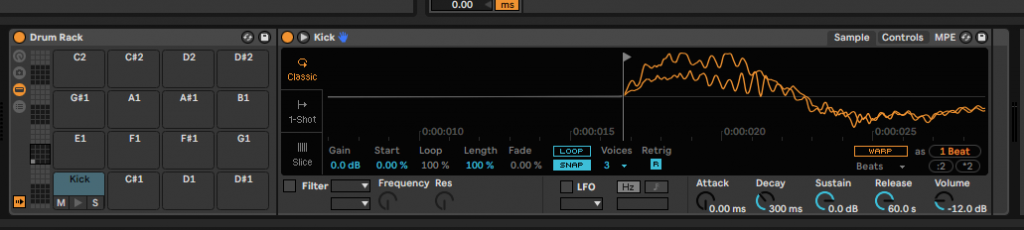
Now, we’re going to decrease the tone of the sample, so the fundamental frequency hits a bit lower, closer to where a normal kick would. From the ‘controls’ panel, we set the ‘transpose’ parameter to -2, which will transpose the sample down by 2 semitones.
Time to set up the envelope, with decay at 3 seconds, attack and sustain at minimum value and release at 300 milliseconds. We will also turn on Simpler’s own filter, making sure we have a Low Pass filter selected. Then we set the cutoff around 500 Hz. We can also select one of the filter circuit algorithms in Ableton, we’ve chosen OSR for this one, and applied 8 dB of drive.
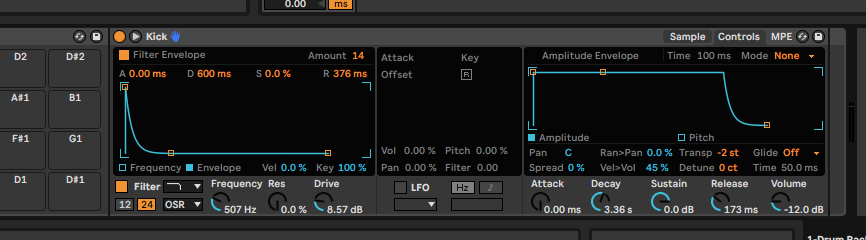
We will also activate the filter envelope, by clicking on the ‘envelope’ button just above the filter and then toggling the yellow button labeled as ‘filter envelope’ on the top-left corner. What we want to do is modulate the filter to let the higher frequencies of the transient go through it, so we will set up a decay of 600 milliseconds, minimum attack and sustain, release at 300 ms and then we set the modulation amount at 22 approx.
Now to round-up the kick, we will add some processing. First we drag a ‘Utility’ stock plugin to the cell on the Drum Rack, so it only works on the kick and not on the whole Drum Rack. We want to keep its low end frequencies in mono, so we toggle ‘bass mono’ on and set the frequency around 300 Hz. We also want to keep the higher frequencies under control in terms of stereo image, so we will crank down the ‘width’ knob to 35%, leaving room for other sounds.
We will also add Ableton’s native compressor, with the following settings: 4:1 ratio, 26 ms attack, 30 ms release and threshold at -28 dB. We also want the ‘lookahead’ feature to be working so the compressor works in advance of the transients for further precision, so we’ll set it up to 10 ms. The last step here is to set the output volume of the compressor to compensate for the loss, so we’ll apply 3.6 dB of gain.
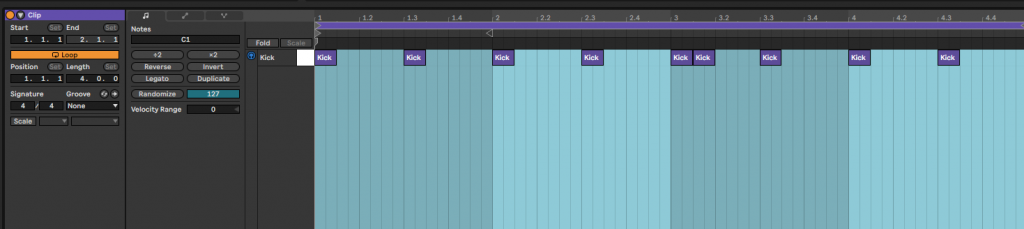
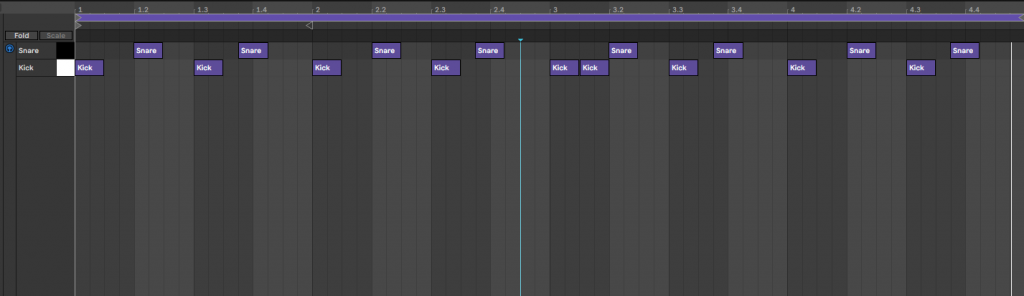
Now it’s time to draw a pattern. In the following picture you can see a kick hitting on the 1st and 3rd beats of every bar, and a simple fill in between bars, in a 4-bar long clip.
You can listen to what we have so far in the audio below:
Step 3: The Snare
Now it’s time for the snare, so let’s pick up the ‘snare’ sample (a recording of a fork hitting a pot) and drag it to the next free cell of the Drum Rack, selecting the classic playback mode and deactivating the ‘snap’ button as we did before.
Adjust the starting point of the sample in a similar way as in the former sound, then transpose it down 17 semitones. Set up the envelope to minimum attack, 1.9 seconds decay, sustain at -5 dB and 700 ms release time.
We will also activate Simpler’s filter, choosing a Low Pass SMP filter circuit. Set the cutoff to 2,70 kHz and the drive up to 3 dB. Let’s also apply some filter envelope modulation, as we did before, but this time with a modulation amount of 18, keeping the decay parameter at 600 ms and sustain at minimum value.
Let’s also load a Utility stock plugin on this sound, so we can turn its stereo width down to 70%, and keep the bass frequencies in mono up to 300 Hz. If you listen carefully, you will notice that this sample is heavily panned to the left, so let’s use Utility’s balance knob to bring it back a notch to the center of the stereo field, setting it in the 13R position.
As we did earlier with the kick, let’s drop a compressor on the snare as well, with very similar values: 34 ms attack, 30 ms release, 4:1 ratio, threshold at -30 dB, lookahead on at 10 ms and make up gain around 2 dB.
Now that the sound is shaped, let’s draw a pattern for it. We made a pretty simple rhythm, hitting on the second beat of every bar and then a 16th before the fourth beat of every bar, giving it this syncopated feeling. To further enhance the groove, we moved the notes slightly off the grid.
The result on the piano roll looks like this:
In this picture we zoomed in to clearly see how they are placed off the grid:

In the audio below you can listen to what we have so far, kick and snare playing together.
Step 4: The shaker
Moving on to the next sound, let’s drag the ‘shaker’ sample to the next free cell of our Drum Rack, as always selecting the classic playback mode and deactivating the ‘snap’ button.
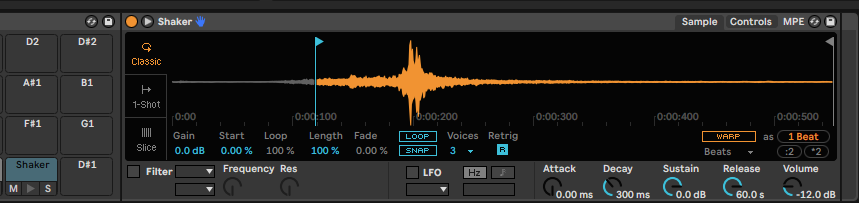
Now, for the sample starting point, this time we’re not going to look for the transient, instead we will leave some of the sound playing before the percussive part hits too. We encourage you to try and experiment with different starting points until you find a result you feel satisfied with. In the following picture you can see where we placed it.
Then, we crank up the volume knob on the simpler up to -2 dB, transpose the sample two semitones up, making it sound higher and set up its envelope to the following parameters:
13 ms attack, 160 ms decay, minimum sustain and 60 ms release.
In this case we won’t use any filter, but rather load Ableton’s EQ Eight to boost the high end frequencies of this particular sound.
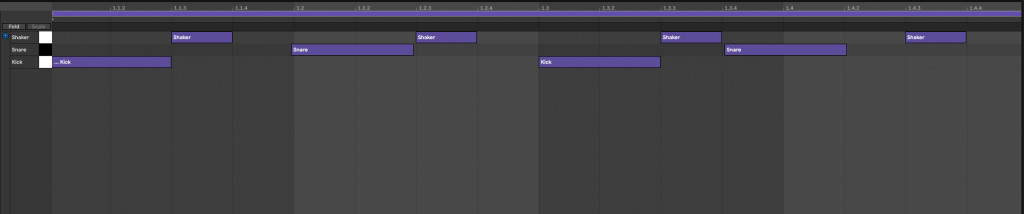
Time to draw a sequence for the shaker, a simple off beat hi-hat pattern on every beat will do, moving the notes slightly off the grid. You can see how we did this in the picture below:
Furthermore, we will add Ableton’s delay stock plugin to add groove and movement. For the delay settings, we unlinked the left and right channels, so we can set different times for each one. On the left we’ve chosen a 1/16 pattern, and on the right 2/16, but we also added delay offsets to further enhance the groove, with -0.5% on the left and 2.1% on the right. Now we set the ‘dry/wet’ knob to around 18% and place the cutoff around 3 kHz with a bandwidth of 7.
The result along the kick and snare sounds like this:
Step 5: Extra percussion
With the rest of percussion samples, we will fill the beat to add movement and syncopation as if they were toms, rimshots, bongos and congas. Drag each one of them to the next free cells on the Drum Rack, from Perc 1 to Perc 4, setting the playback mode to ‘classic’ and deactivating the ‘snap’ button.
Below there’s the detailed parameter setup we used for each sample:
Perc 1
- Set sample start to the second transient – the loudest one.
- Transpose -7 semitones.
- Set up the envelope to minimum attack, 700 ms decay, minimum sustain, 300 ms release.
- Turn the volume down to -20 dB.
Perc 2
- Set sample start to the first transient.
- Transpose -20 semitones.
- Set up envelope to minimum attack, 245 ms decay, minimum sustain, 88 ms release.
- Volume to -19 dB.
- Add ‘Utility’ to turn the stereo width down to 40%.
Perc 3
- Transpose -33 semitones.
- Adjust envelope to minimum attack, 300 ms decay, sustain at -16 dB, 60 ms release.
- Volume at -19 dB.
- Activate Low Pass Filter and set cutoff to 1.2 kHz.
- Add ‘Utility’ and set ‘bass mono’ up to 300 Hz.
Perc 4
- Set the sample start to the first transient.
- Set up the envelope to minimum attack, 50 ms decay, sustain at -21 dB and 200 ms release.
Once you’ve set up all the Perc sounds, you can play with them if you have a midi controller such as Ableton Push, just trying to get patterns that complement the beat we have so far. We’ve added some syncopated notes, different velocities, slightly off the grid placement…
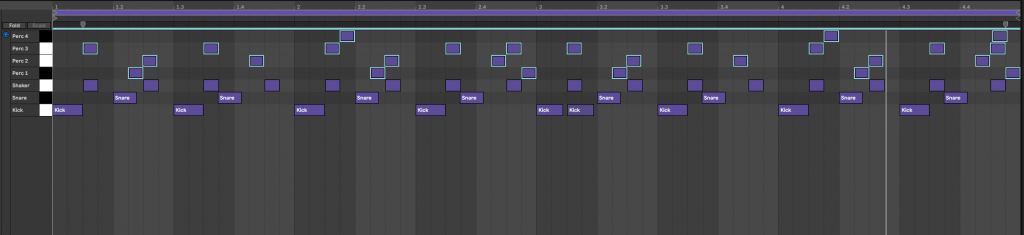
In the following picture you can see the pattern we wrote for these 4 perc sounds:
And here you can listen to the beat with the latest additions:
Step 6: Adding FX
Finally, we will add some effects to process the beat as a whole, so we will load them in the Drum Rack track instead of in particular sounds as we were doing before. The first thing will be a Saturation Knob, Softube’s great and simple saturation effect that we recommended for you on our latest ‘free plugins’ post. Turn the knob up to 9 o’ clock, just to glue the different sounds together and add some warmth.
Next we will add some reverb to give an ambience to the whole beat. Although the samples already had their own real reverb from the kitchen where we recorded them, it got lost with all the filtering, envelope shaping and whatnot, so it’s a good idea to add a reverb to glue all the sounds in the beat in terms of space.
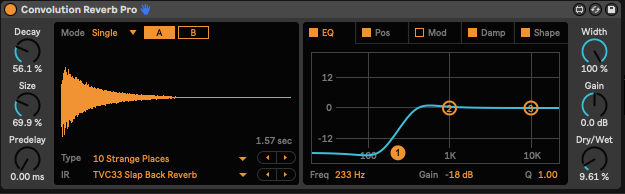
For this task, we’ve selected Ableton’s own Convolution Reverb Pro. Once we have it on our Drum Rack channel and placed right after the Saturation Knob, we go to the drop down menu in the bottom-left side of the plugin. There, under the 10th category, ‘Strange Places’, we picked the TVC33 Slapback Reverb IR. We turn down the size and decay knobs until we get a tail of about 1.6 seconds. Roll off the lows on the built-in EQ and decrease the ‘Dry/Wet’ ratio down to 9%.
In the following screenshot you can see how we set it up:
Last but not least, we will add Redux, Ableton Live’s own bitcrusher, to spice things up by adding texture and character to the beat. We will add this after the reverb, so the ambience gets processed as well. Set the rate up to your taste, we used 13 kHz, Jitter at around 15% and the ‘Dry/Wet’ left at 100%.
This is it, now it sounds like in the first audio example that we showed you at the beginning of the post. We encourage you to experiment with different samples, envelope setups, effects, and so on, so you can find your own way of doing things.


 50 Industry Music Production Tips You Must Know


