
Introduction to shimmer reverb
If you ever needed an ambient reverb you may have encountered that magical sound called a “Shimmer Reverb” because alongside the Mutable Instruments Clouds the Shimmer Reverb has become a must-have effect for making huge shifting textural ambient reverberant spaces.
This is what the tutorial will make. This sound.
A snare drum through a regenerative shimmer reverb
The Shimmer Verb creates a mobile soundscape which transforms even the simplest incoming sound into an evolving textural sound bed. Whereas a normal large hall reverb can be useful for accurately reproducing the ambience of a cavernous space like a church or arena the shimmer reverb is used for creating texture, magic, motion. It is definitely an effect which has a sound and will sustain a listeners interest all on its own.
Here’s an electric piano sound through the same effect we will be making.
An electric piano through the effect
This tutorial shows you how to make a regenerative feedback shimmer-verb using only stock Ableton Effects available in Live, it doesn’t require Suite or Max For Live – just some simple effects and some feedback paths.
The benefits of making your own shimmer verb are that you’ll be able to customise your own effects, you’ll understand how to make all kinds of new effects, and create your own unique sounds in your music.
if Reverb is your thing, this free masterclass chapter on pop producer Avedon will get your juices flowing especially in vocal treatment!
The sound of a shimmer reverb
Technically speaking the components of a shimmer verb are a core reverb, some pitch and frequency changing, and feedback paths to send the altered sounds back into the reverb.
When constructing the shimmer-verb in Ableton we’ll use the following components
- An effect rack
- the stock reverb,
- the frequency shifter.
- the gate
How to make a shimmer reverb
Set up the track
Firstly we’ll need a noise source so that as we work we’ll hear the effect developing. A snare drum is perfect, with a percussive sound and wide frequency range.
Make an empty MIDI track in Session, now in the browser search type “Ludwig” and go to all results at the bottom of the Categories section and double click it to add it to your MIDI track.
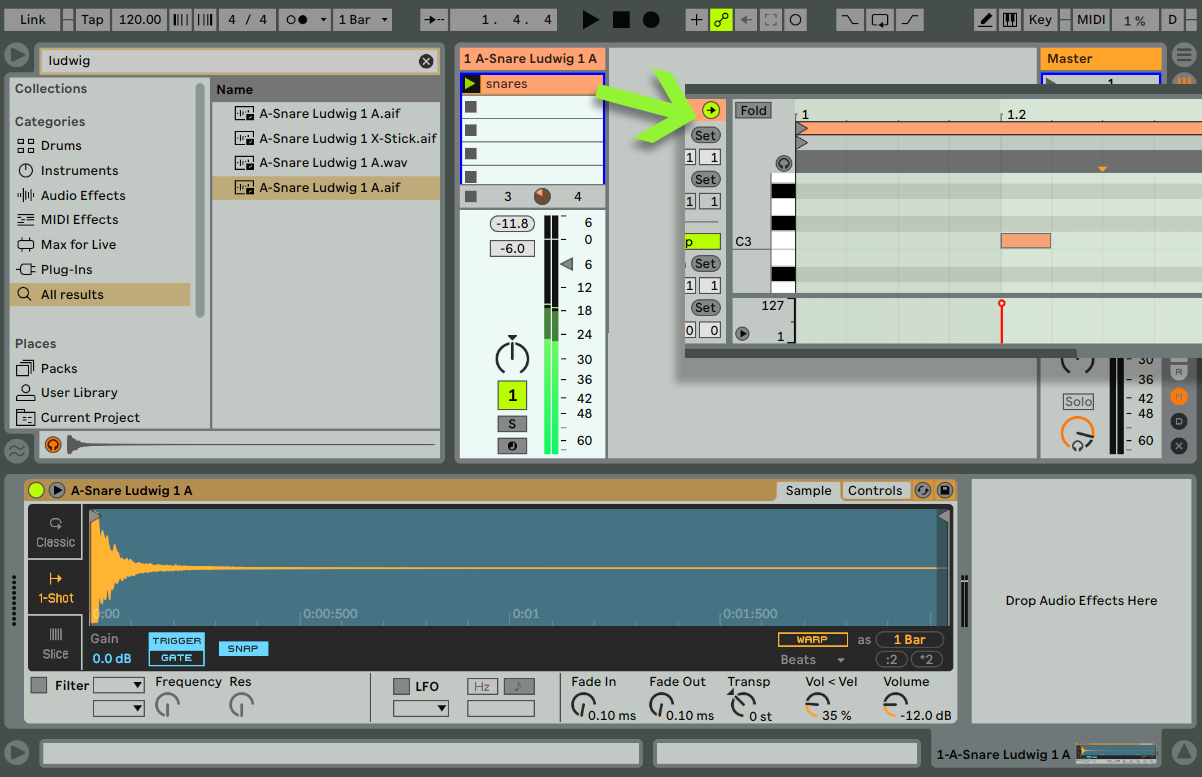
Add a snare sample to an Ableton MIDI track, and a note to play the sample
Now create a midi note or two in a midi clip on that track and check that when you play the clip you can hear the snare drum playing. All good? Then lets continue…
Set up the effects
The core of our shimmer verb is (of course) a reverb, we’ll use a stock Ableton preset here. In the browser search type “Ambience Medium” and once again look at the bottom of the Categories to see the All Results entry “Ambience Medium” and double click or drag that to add it to your Ludwig Snare track. If your clip is playing you should now hear a very reverberant snare drum playing.
In this effect you’ll see that there’s a frequency damping in the diffusion network section, deactivate the two switches “high” and “low” so that the reverb is not damped by the internal EQ.
Group this Reverb effect into an Effect Rack. Select it and use Control & G / Command G (Mac), or use the menu item “Group” with the reverb selected. Now save the rack as “My ShimmerVerb”
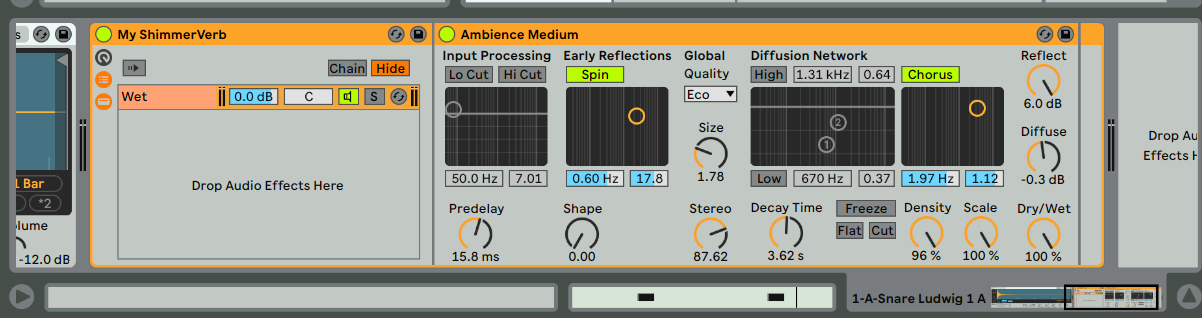
reverb with EQ removed, in a rack, the chain is named “wet”
Unfold the chain list using the little marble in the rack to see the names of the chains. You’ll have one chain called simply “Chain”, rename that chain to “Wet”.
Add an EQ8 before the Reverb with the bottom end rolled off with a high-pass filter, and the top end muted a little with a low shelf. As in the image here:
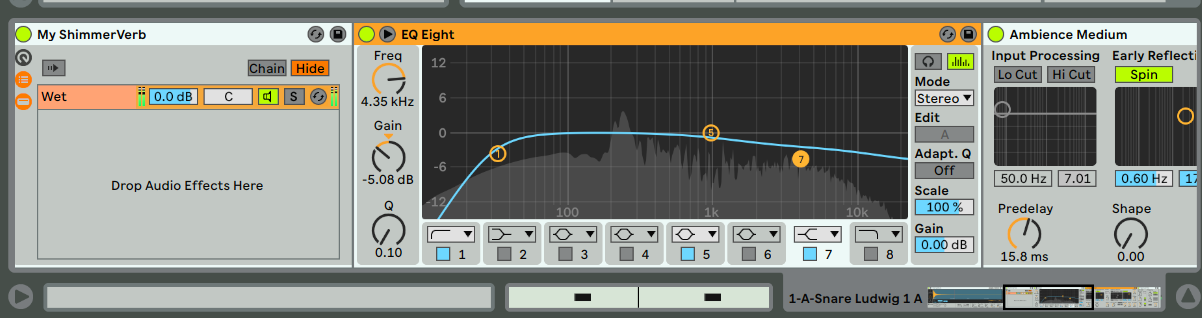
EQ SETTINGS
After the EQ and Reverb Devices at the end of this chain add a Frequency Shifter Device, and when its in position right click the “Fine” control and assign it to Macro 1.
If the other devices (The EQ and the Reverb) were folded you’d see this, try turning the Fine macro control and make sure it’s affecting the pitch of the reverberation.
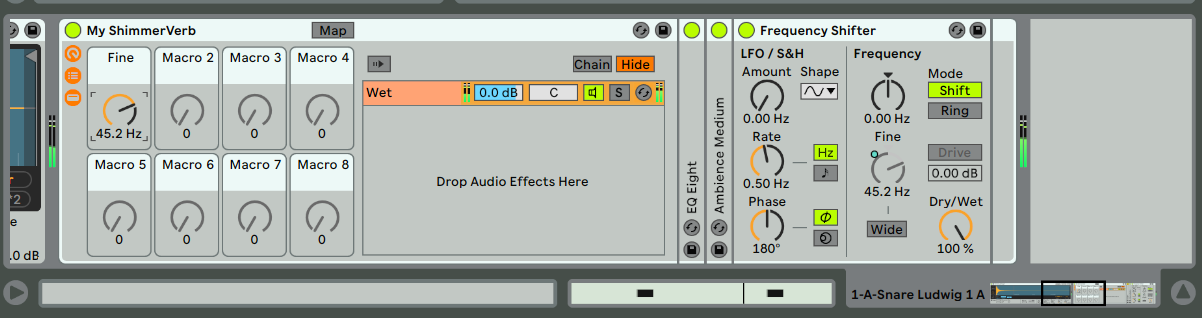
MACRO FINE TUNING TEST
Creating Feedback paths
Now we have a reverb with a small amount of tonality and tune-ability, so it’s time to take it into space. We need to create a feedback path for the audio so that the output of the frequency shifted reverb is fed back into the input of the web audio chain. By taking some of the frequency shifted output back into the input we create an eternally rising or falling reverb effect, which is the start of more complex feedback effects.
Feedback and Latency Calculations:
In Ableton if the application detects a feedback path it can no longer accurately calculate plugin latency on that specific path, so it will allow the feedback but must remove it from any automatic latency calculations. This applies here, but as we are creating an ambient shimmer reverb it doesn’t concern us if the snare is 5 milliseconds off the beat, as the whole effect is to blur time!
The secret trick – allowing audio feedback within Ableton Live tracks
To create feedback paths for audio in Ableton Live requires some trickery, as there is no dedicated audio routing device. To route audio we can use the Side-Chain pre-listen facility of any native device which offers pre-listen. As the lowest resources are consumed by the Gate device we will choose that.
Adding feedback to an Effect Rack
In the browser look for the Device called “Gate” and add that Gate device before the other effects in the Wet chain as in the image below. Make sure that the Gate device has a lookahead of 0ms.
Add another Gate device in a new chain and name that chain “Feedback” , turn the Feedback chain volume down to zero (-inf).
Note the first Wet chain contains all your other effects, and this new chain contains just one gate effect, and the volume of “Feedback” is -inf. Make sure that the Gate devices both have a lookahead of 0ms.
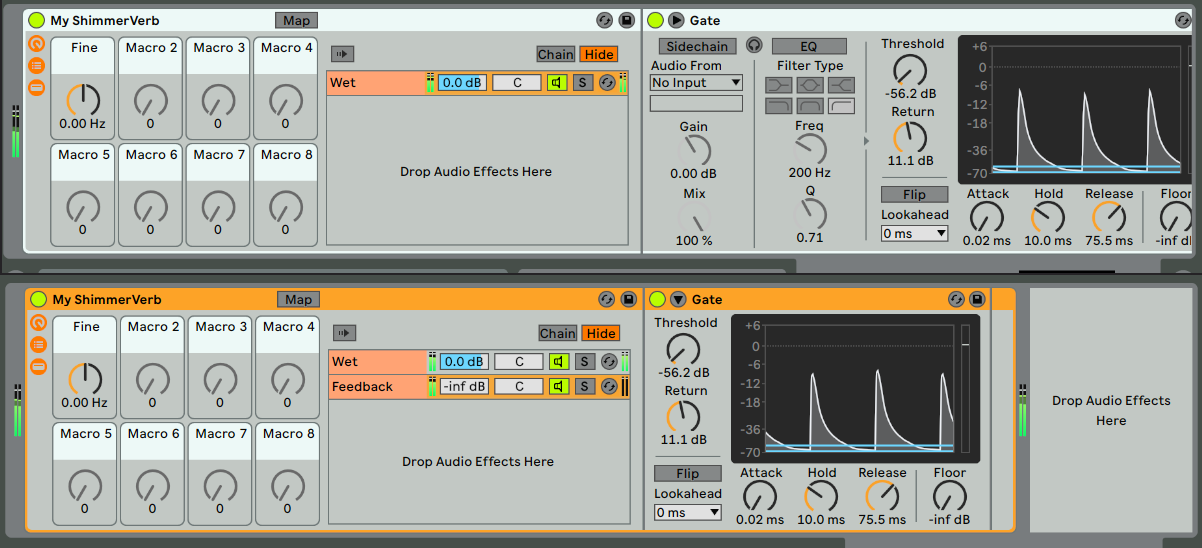
ADD GATE DEVICES
Warning: watch your ears in the next part, in case you got a detail wrong you might hear a nasty screaming noise. Take your headphones off, and turn your monitors down – better to be safe than sorry!
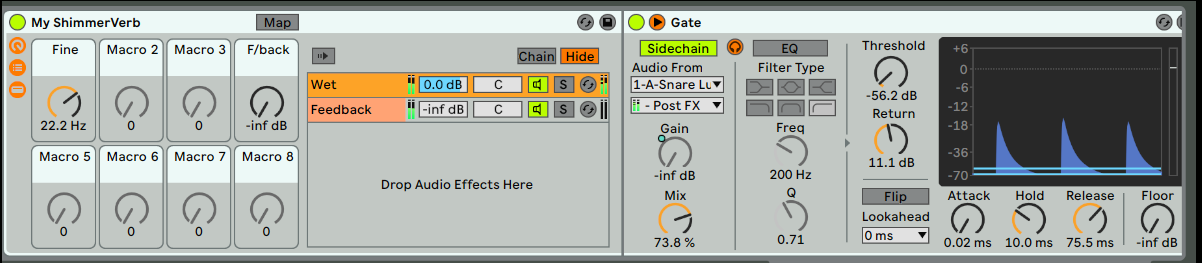
In the Feedback chain’s Gate Device activate the sidechain. Use the little arrow on the device top bar to unfold all the controls and click “Sidechain” and then the headphones icon.
In the side-chain input selector “Audio From” choose the track “A-Snare Ludwig 1 A” (or if you named your midi track differently use whatever your track is called)
, and in the second pull-down menu choose “My ShimmerVerb | Wet | Post FX”
If your set is playing you should see the audio coming into the gate from the side-chain.
Now to connect the feedback loop, remember to look out for your ears here. A good precaution is to set the “Fine” macro to something higher than 10Hz, this will shift the pitch and prevent runaway feedback.
Stop the set from playing (if it is).
Now, In the Wet chain edit the gate device. Set the Mix (under the Sidechain button) to 75%.
Map the Gain control to Macro 4. Rename Macro4 as “F/back”. Turn this Feedback macro down to 0.
Activate the Sidechain button and the headphone icon. Set the “Audio From” to be “1-A Snare Ludwig 1 A” (or if you named your midi track differently use whatever your track is called). In the second pull-down choose “My ShimmerVerb | Feedback | Post FX”
Your Effects rack should now look like this
FEEDBACK SETTINGS
Start the set playing again.
Now, slowly turn up the feedback control and you should start to hear the sound of a rising pitch shifting reverb as the Frequency Shifter feeds back on itself.
You can fold the Gate device up to save some space, you won’t need to edit it again.
Improving the Effect
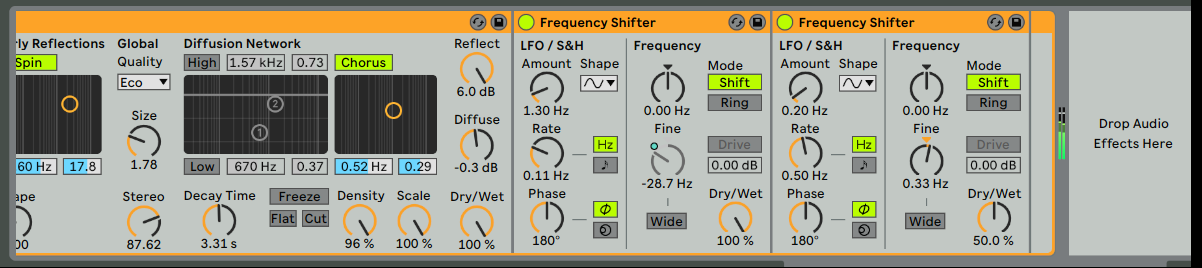
To add more “cloudiness” to the effect we need to add more phase decorrelation to the signal in the feedback path. That can be accomplished with modulated delay lines or filters affecting the phases of the frequencies.
Lets add another Frequency Shifter.
Stop the set playing and add another frequency shifter at the end of the Wet chain, set this one to 50% wet and a very small amount of fine shift, for instance : 0.3% Use the built in LFO to modulate the frequency a little.
MORE PHASE DECORRELATION
Now with a careful eye on the Macro for Feedback start your set again, you should hear that the snare drum is much more “cloudy”!
still confused about Ableton plug ins? this masterclass on the fundamentals of music production will get you up to speed on everything plug ins and production
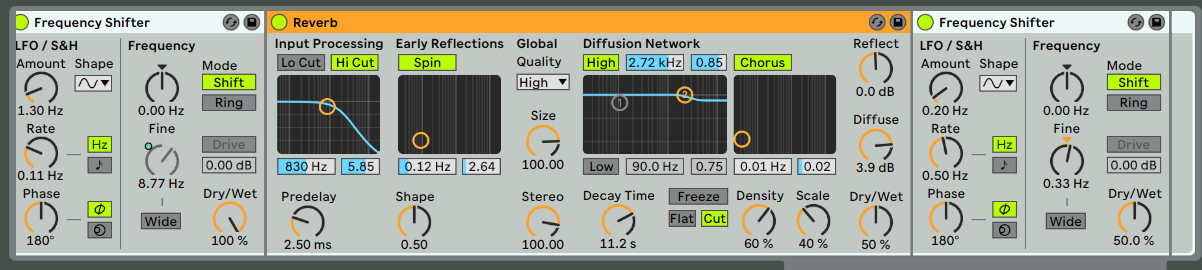
To make this more intergalactic we can add another reverb in the chain, so that the effect will run: EQ, Reverb, Frequency Shift1, Reverb, Frequency Shift 2
Add a reverb between the two Frequency shifters. Have a large decay time and a 50% wet setting. Use the built in EQ this time to help control the high frequency peaks.
MORE REVERB
Now – remember to save your effects rack.
The magical part is: when you load this rack from the Browser it will automatically remember the feedback paths, you will have a self-contained feedback effect ready to create interstellar ambience whenever you need it.
Some other things to try
Effects such as the grain delay, and chorus, and phasers can all add an element of pitch smearing to the effect. Try dropping them into the feedback path and mapping some parameters to macros so you can find sounds you enjoy.
Hopefully that gives you a start on understanding how to construct self contained feedback effects. There’s a lot more to explore but take care with your ears, feedback can sneak up on you so take precautions if you want to explore and have fun!


 50 Industry Music Production Tips You Must Know


