
Compression is one of the most important tools in audio and it is essential for creating high quality musical mixes. However, at the beginning it can be a bit difficult to understand what compression really does and its parameters can be quite confusing to be used, even when you have already a bit of experience with it.
That is why we are going to explain some basic concepts, controls and examples of use so compression stops being a challenge and we get the most of it. Also, this is the first of many more articles talking about compression we will be posting. So stay tuned with us for more.
What is a Compressor?
A compressor is a processor that allows you to control the dynamic range of an audio signal. In order to understand that better, let’s have a look at the concept “dynamic range”
What is dynamic range?

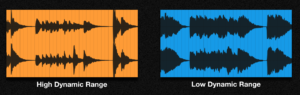
In the context of music, dynamics is the difference between loud and soft parts of a song. In the context of audio, the meaning of dynamics is very similar, but instead of talking about loud and soft parts, we are talking about the individual peaks and the dips of a signal.
Therefore, we can say that the dynamic Range is the difference between the peaks and the dips of a signal:
If such dynamic range is high, the difference is very big, but if it low, there is no much difference between those peaks and dips:
What do compressors do, then?
So, you will use a compressor to manipulate the dynamic range, to turn a high dynamic range audio into a low dynamic range one, in a much or lesser degree. Look at an example:

And you will compress by using the parameters that we will learn in the next sections and for the reasons that we will explain:
Why to Compress?
By compressing we level out the volume of tracks so they sit better in the mix. Think about the following examples:

Imagine you are trying to mix some vocals with other instruments, but some words are too loud and some others are swallowed up by the rest of instruments and can’t be heard.
Instead of changing the volume of each word or syllable, which would drive you crazy, what you will use is a compressor.

Imagine you have all your drum sound in just one track, and doesn’t sound bad, but you want to get the feel that all the sounds (kick, snare, hi-hats, etc.) get more glued together in order to have a fuller bigger sound.
The compressor will help you get your drums sounds more definite and detailed. They will sound louder without the need of increasing its gain, which would unbalance your mix.

You may think that you can solve the problem of having an instrument sticking out in the mix by decreasing its general volume. However, that will not solve that such instrument sounds too low in volume in certain moments.
Only by reducing its dynamic range you will achieve that it has a balanced volume and detailed sound throughout the whole song.
How to Compress?
One of the barriers to using compression correctly is not understanding what exactly each of its parameters do. So, we will have a look at each, one by one, of the basic parameters you will find in any compressor, whether it is hardware or a plugin:
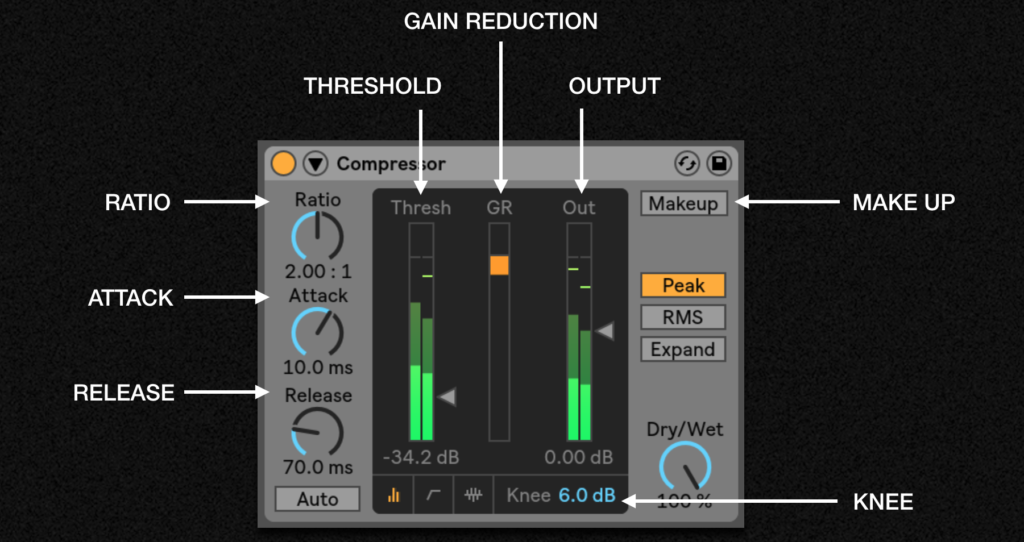
Threshold
It is the control, set in decibels (db), that tells the compressor WHEN to start compressing the signal. When the signal gets louder than the decibels you set for the Threshold, the signal will get compressed. In the following example, the threshold is set at -19 dB:
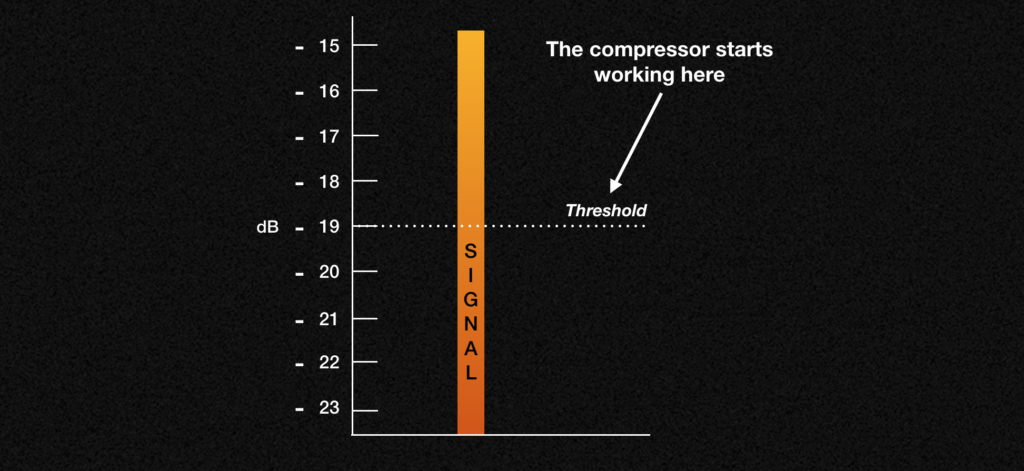
And remember, if the signal is below the threshold, the compressor is not working and the signal is not being affected.
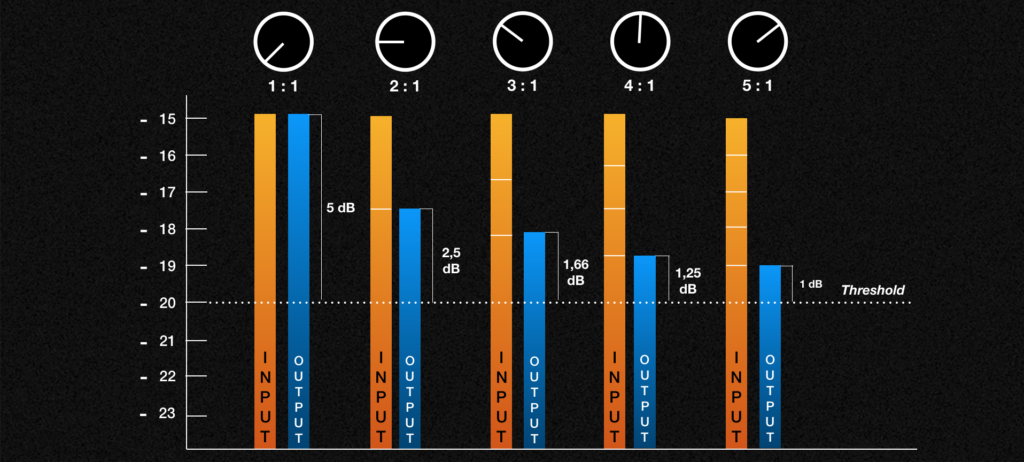
Ratio
It is the control that tells the compressor HOW MUCH compression to apply to the signal. Ratios are used to compare two things. In this case we are comparing the input and output signals of the compressor:
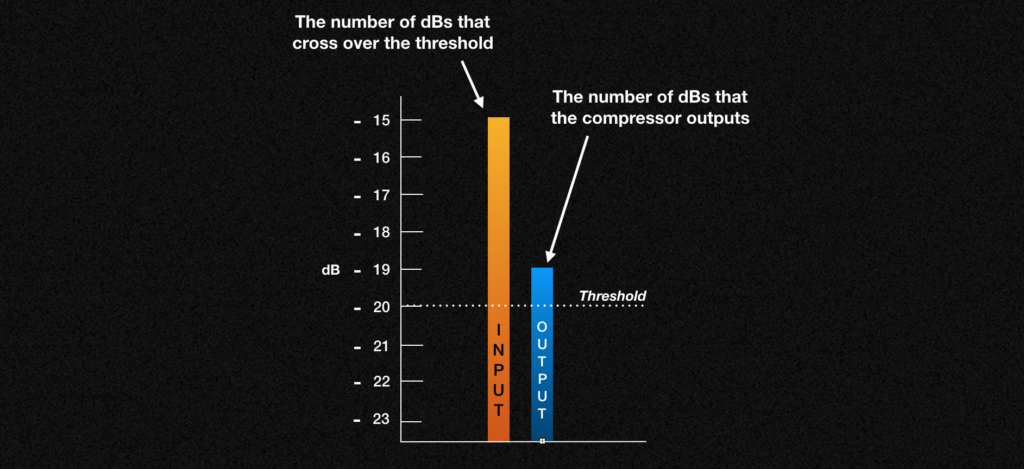
So, imagine that we have a threshold applying compression at -20 dB, and then we have a ratio set to 2:1, which means that for every 2 decibels that the signal goes over the threshold, the compressor only will output 1 decibel.
With those settings, if our signal is getting 5 decibels over the threshold, only 2,5 decibels will be out the compressor. But imagine that we change the ratio to 5:1. Then, when getting 5 decibels over the threshold, only 1 decibel would go out of the compressor:
Gain reduction
It is the number of dBs the signal is losing as a result of the compression that is applied. So in our previous example, with no compression, the signal would have reached -15 dB. But when compression is applied, we have 4dBs of gain reduction and the signal only reaches -19dBs:
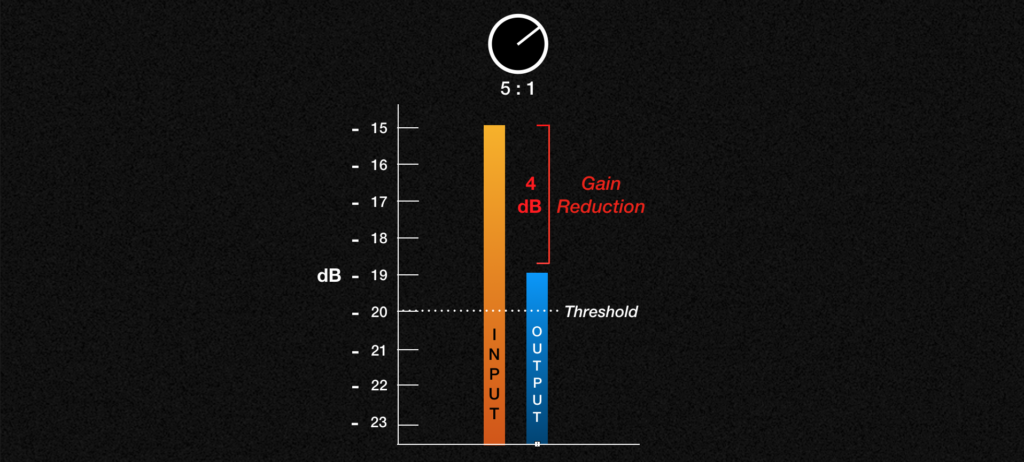
The gain reduction meter you will find in most compressors will help you know in a easy, visual way how much compression is being applied. It will only start moving when compression is being applied, so that will help you set the threshold correctly.
Attack
It is the control that sets the speed at which the compressor reacts to the signal after it crosses the threshold. Have a look at the following examples:

As you can see, when you have a slow attack, more peaks or transients remain in the sound wave because the compressor has not had enough time to compress. However, when the attack is fast, less transients remain in the audio, and the compression is more noticeable.
Now, let’s get a bit more technical:
The attack time that we set to the compressor is normally measured in milliseconds (ms). Such milliseconds are the time it takes for the compressor to reach 2/3rds of the target gain reduction.
Have another look at the example we saw before:
Our target gain reduction in this case is 4dB. If we divide 4 into 3, we get that it is 1,33 approximately, so 2/3rds of 4dBs is 2,6dBs approximately. So, imagine that we set our attack time to 40 ms: that means that it will take 40ms for the compressor to achieve 2,66 dBs of gain reduction. Now imagine that we set our attack time to 300ms: that means that it will take 300ms to achieve 2,66 dBs of gain reduction.
Relese
In the same way there is a speed for the compressor to start compressing (attack), there is a speed for it to stop compressing, which is set with the release parameter. So, we can control the rate at which the signal falls back below the threshold and the compressor returns back to normal.
As it happens with the attack parameter, it is important to adjust the release correctly to find the sound you need, because it can really make a difference on the noticeability of the compression over the signal. Have a look:

As you can see, the wave of the compressed with slow release signal (orange) does not have the transients sticking out as much as the wave of the not compressed signal (white), but that is thanks to the attack amount we have applied, which was quite fast, and has nothing to do with the release.
Now, If you notice, the rest of the white wave (from the transients onwards) looks very similar to the orange wave with no compression, which means that the compressor is not sustained after the transients. That will result in a less perception of compression when listening to it.
The wave with compression and fast release (blue), on the other hand, is much more sustained (it can be seen at the thickness of the wave after the transients) and, therefore, its compression is more noticeable to our ears.
Let’s get technical too with the release parameter:
The release time that we set to the compressor is normally measured in milliseconds (ms) but it can even go up to a few seconds. Such time is what it takes for the compressor to recover 2/3rds of the gain that was reduced.
Let’s recover once more time our previous example:
Let’s remember that our target gain reduction is 4dB and that 2/3rds of 4dBs is 2,6dBs approximately. Imagine that we set our release time to 600ms: that means that it will take 600ms for the compressor to recover 2,66 dBs of the signal that was reduced. Another example. Now imagine that we set our release time to 2s: that means that it will take 2s to achieve 2,66 dBs of gain reduction.
Make up
As we have seen, when compression is applied, there is a gain reduction that can make that your signal sounds a lot quieter than the not compressed signal. Have a look:

The Make Up gain is to be used to compensate for any gain that was lost due to the compression applied. It is important you use this gain control and not just the volume slide of the track, for example, in order to avoid noise and other audio issues.
If your compressor has an auto Make Up botton, have it on so you always hear the signal with the same level. That will help you really focus on the changes of your signal by the compression applied, and you will not be distracted by the variations of volume.
Knee
The Knee control adjusts how gradually or abruptly compression occurs as the threshold is approached. Many compressors give you the option of either hard-knee or soft-knee compression but plugins normally give you a slider to adjust the response of the “knee.”
If you want to squash a signal’s transients quickly, you’ll want hard knee compression. If you want to use a compressor to gently glue a mix together by tightening up transients, you’ll want a soft-knee compressor.
We have the theory. What now?
Now it is time that you experiment with a compressor and train your ear to notice all the sound changes you can create with its parameters. That is the only way to get familiar with the tool so you can use it effectively in your productions.
You will probably discover that you do not always need to use it, even though you see a lot of producers using it everywhere. That is because you will be in control of what the compressor is really doing to your sound, and you will be able to decide if it is really necessary or if it will be counterproductive, or if you use it because you are interested in it as an effect to modulate the tone of the sound.


 50 Industry Music Production Tips You Must Know


