
Virtual synths can sound static and lifeless which leads many to overcompensate with layers. But that can fill a mix and still lack punch and interest. This tutorial shows how to make a fat and exciting bass sound which you can play in real time by modulating the tonality to give complexity and giving rhythmic inflections which engage listeners and keep your mix clean and tidy
We will be making this bendy modulated bass sound, though the technique stretches far further than just bass sounds, into pads, riffs, drums and beyond.
A modulated bass sound
By using this technique you will make unique and exciting rhythmic synth sounds only using stock Ableton instruments. Create your own patches with which are playable in real time with animated dynamic modulation for some unique and flexible sounds!
if you want to get a full comprehensive learning experience on the unique world of modular synthesis this masterclass will cover everything you need to know, now back to the article
Sequenced Modulation improves your sounds and playability.
You might be familiar with the sounds of wave-sequencing from the Korg WaveStation, or the rhythmic envelopes of Native Instrument’s Absynth. This tutorial shows how to create something similar to both, an exciting unique sound with stock Ableton instruments.
Take a listen to the sort of thing you can make.

Sequenced parameters in Ableton’s Operator
If you want complex engaging sounds from your instruments, or want to jam out and play those sounds live to become inspired – it’s great to have rhythmic envelopes and modulation giving complexity to the sounds you are playing in real time.
A rhythmic evolving parameter sequence which follows your fingers as you play, monophonic or polyphonic rhythmic parameter sequencing. When every parameter is automated the sounds of even the most basic synth becomes far more expressive.
A quick intro to the Modulation features
You are probably familiar with Ableton Live’s Automation envelopes, but not so many people are familiar with their sibling – the Modulation Envelopes.
Here is an Automation envelope for the Filter Cutoff parameter. Notice that the “Aut” (Automation) toggle switch is active, so we are viewing the Automation. There is a red dot in the pull-down for the Automation and the Blue dot shows there is also Modulation on this parameter.
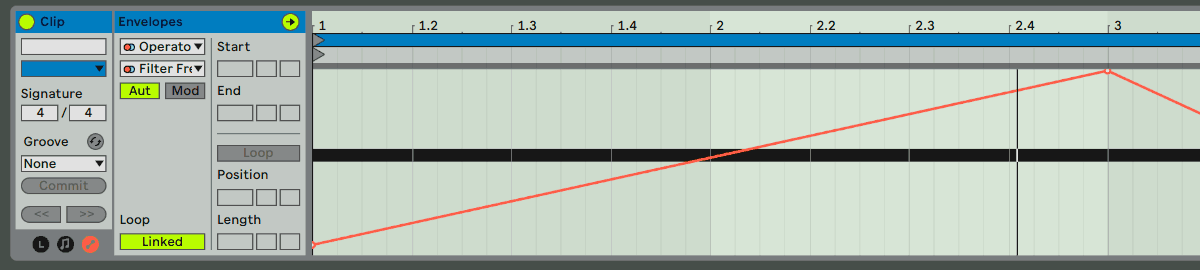
Ableton Automation on the same parameter
A Modulation envelope is like an LFO, it acts upon the “absolute value” of Automation with a “relative” offset.
Take a look at a modulation envelope for this same cut-off filter as pictured above. Notice that the Mod button is active, indicating we are looking at Modulation.
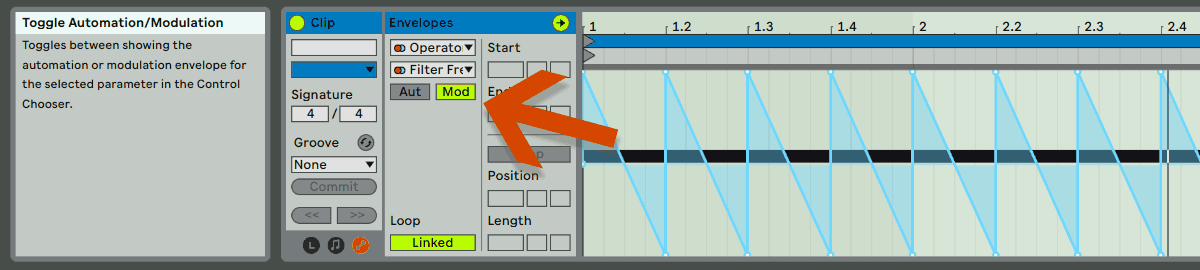
Ableton Modulation is marked with the arrow
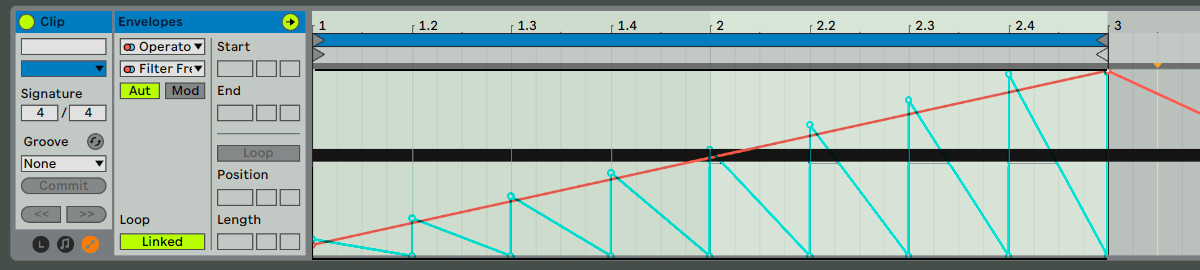
With both Automation and Modulation applied: if an Automation Envelope is slowly rising and the Modulation envelope is making the pictured repeating pulse it will look like this on the synth interface.
Automation controls the knob, and Modulation acts upon the Automation.
To visualise that interaction better I’ve created this visualisation overlaying the modulation over the Automation. Here modulation is in blue and Automation in red. See how they work together.
Modulation envelopes existed in Live for a long time but were hidden away in Live 9. In Live 10 Ableton enhanced the modulation abilities with a whole bunch of new features, this tutorial takes those features and makes them playable, fun, exciting!
Right, enough technical theory, here’s where we make stuff!
How to do it – step by step
This tutorial is based around Ableton’s Operator, but any synth will work. Preferably a built in synth, but any VST ought to work if it has plenty of knobs.
Step 1: Add an instrument.
In Session view: Drag in an Operator to an empty track and on Operator’s interface deactivate all but one oscillator “A” . If your filter is activated deactivate it for the moment.
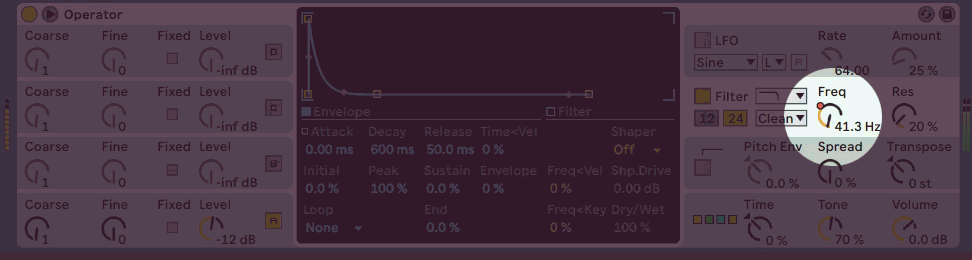
Set the Oscillator A amplitude envelope as shown: with a short attack and a short decay, high sustain. The short decay time is important because it affects how quickly the modulation will affect volume changes(!)
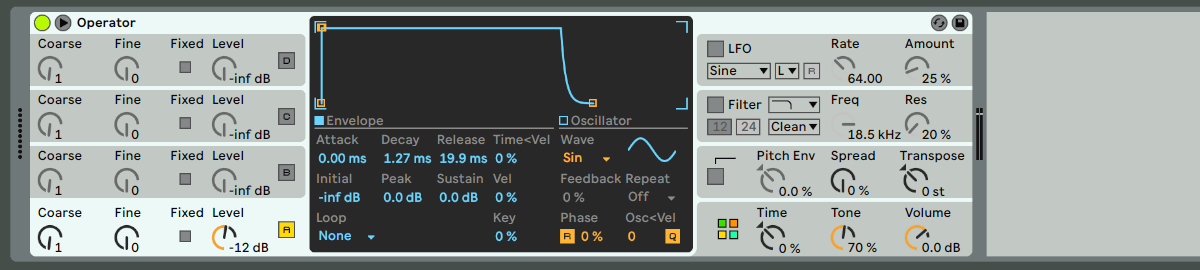
Set the FM routing the the one shown, the “square” with B into A and D into C.
FM Routing
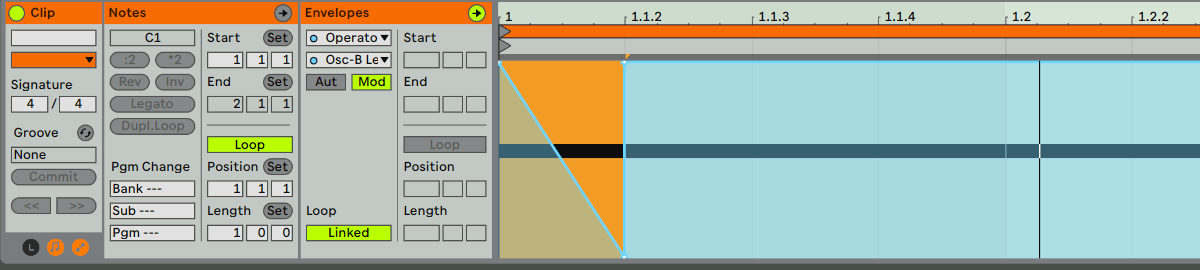
Now add a clip which plays 4 notes at C1 so that the Operator plays a noise.
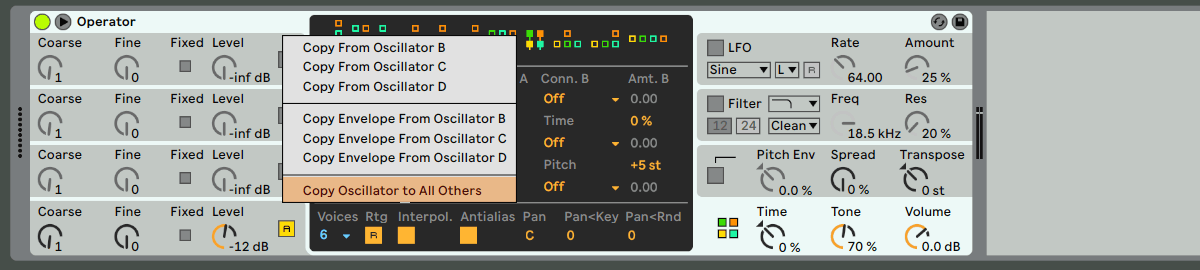
Copy the oscillator A to all other oscillators, using this right click (option) command. Right click above the button that says [A] to get this context menu.
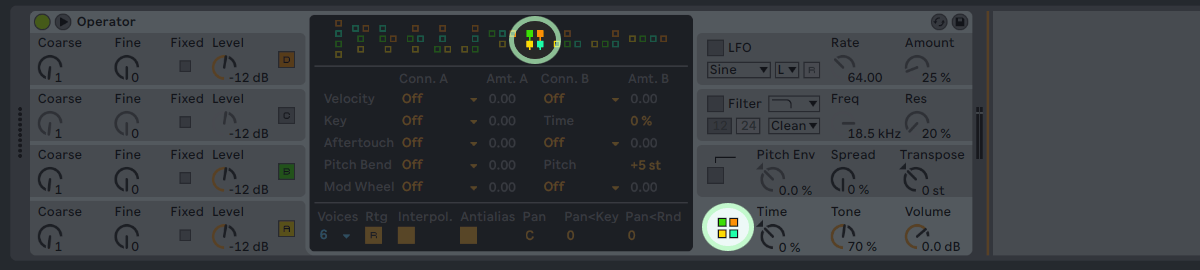
Now, for the moment deactivate Oscillator C, so that we are only hearing Oscillators B into A. Remember to make sure that the FM routing is set as described above (FM routing illustration)
Step 2: Start Adding Simple Modulation
To add your first modulation : right click the Level control of the Oscillator B, and choose “Show Modulation” from the menu. This will take you to the clip editor and show the Modulation for the Oscillator level.
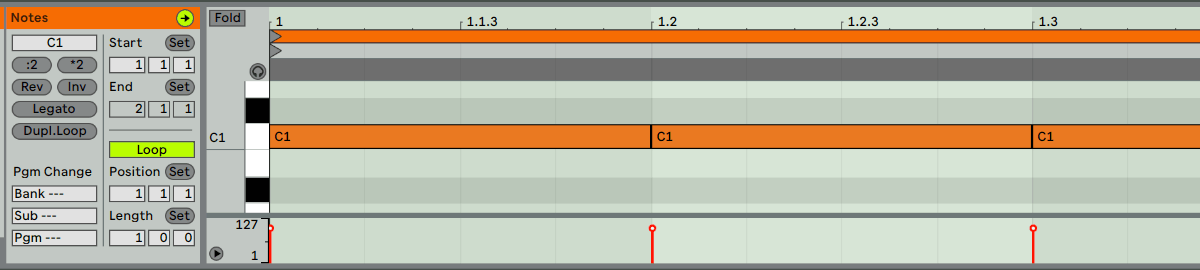
In the modulation envelope window we are going to draw a basic modulation pulse. Select a small part of the time bar, one 16th, and right click to see the Modulation menu, and choose the ramp indicated.
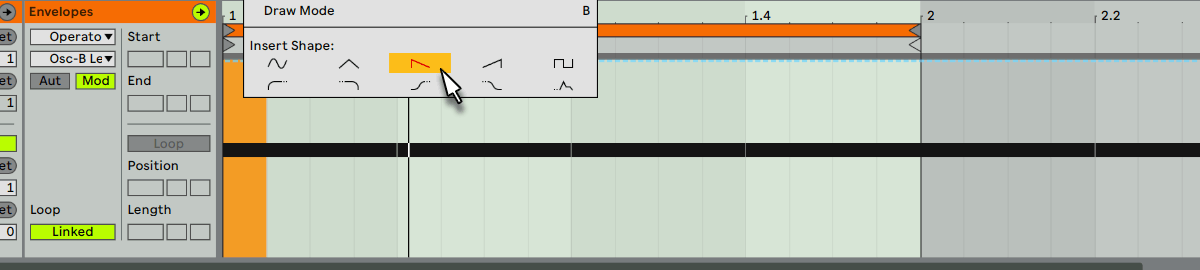
That will produce one ramped envelope, it should still be selected so it looks like this
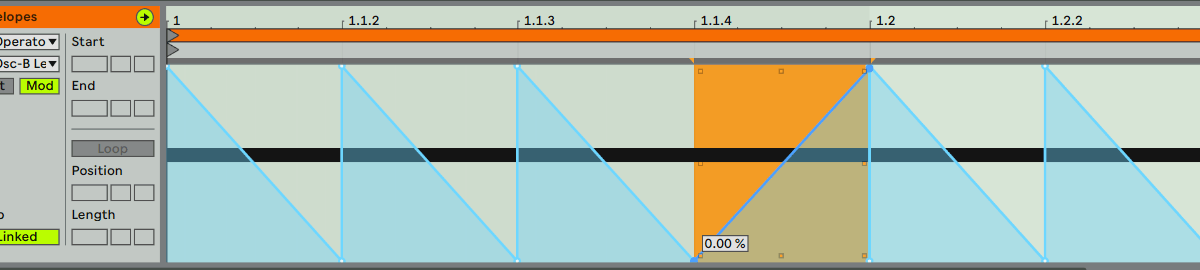
Now duplicate this ramp with control D / Command D, press that key combo 15 times to make a bar full of ramps. 16 steps of pulsing.

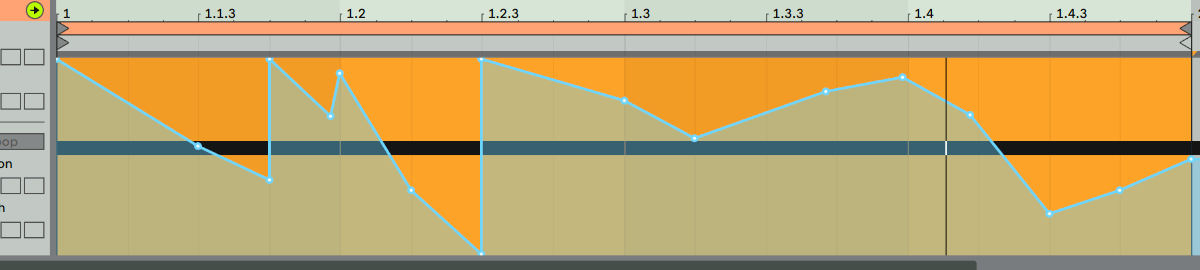
Try hitting play and you will hear quite a powerful pulsing bass note. So here’s where we can start to make it interesting. While the bass sound is playing, change the fourth envelope to look like this image. Drag the point from 1.1.4 to 1.2
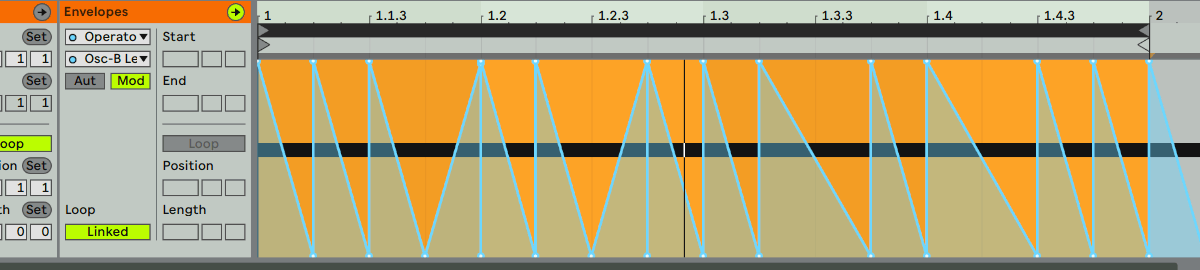
You will immediately hear the sound of a “wub”. Try tweaking the enveloped some more to get a pattern you like, for instance this one. A very very simple wubbing bass.
It will something sound like this.
How Modulation allows you to play and Jam
Return to the interface of Operator and turn the dial of the modulated level control. You’ll notice that it;s showing the modulation but you can turn it and the modulation keeps playing and the sound is affected in a quite novel way. You can tweak it and it stays rhythmic.
It will sound like this
From this simple example you will start to see the power of modulation over automation. You can still play while all this motion is happening. You can play notes, you can tweak dials – and the rhythmic modulation keeps playing – keeping you in time and adding harmonic interest.
Step 3: Animated PWM envelopes
We are going to make this sound into more of a fat bass sound which we can play, so lets go back and edit the Level modulation of Oscillator-B again. This time so it has a more interesting and flowing character. Something we could never achieve with a normal synth envelope.
Step 4: TB303 style fluid pitch sequencing
One of the most fascinating and engaging aspects of a Roland TB-303 is the way the sequencer glide interacts with the synth sound to give a flowing bending pitch sequence. It’s not possible to do that with an ordinary DAW MIDI sequence because the speed of the bends is set in the synth, not in the MIDI sequence.
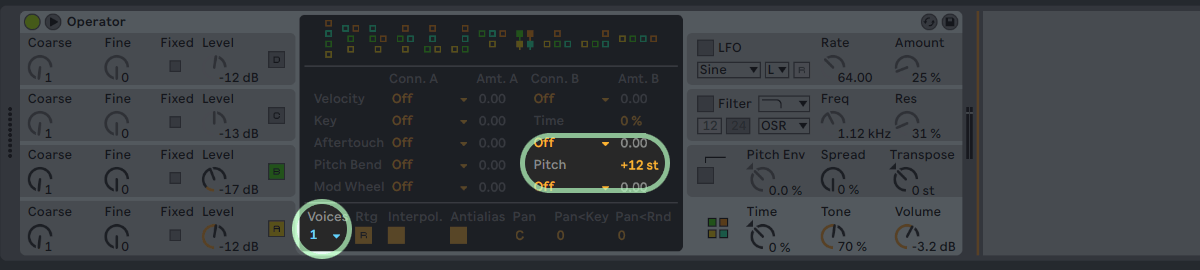
So lets control the pitch via modulation sequence. Set the pitch bend range to +12 semitones, and the Voice / Mono feature to 1 voice, as shown here.
Now lets add some pitch information to our modulation sequence, Pitch Bend modulation is a MIDI parameter (rather than a built in Modulation of the interface parameters) so use the Envelopes menu to choose MIDI Control and pitch bend should be selected already in the lower menu item.
Draw in a pitch bend, so we have some nice swoopy pitch modulation. As you draw this in it’s good to have the sound playing, so you can hear if it’s in tune, thought that doesn’t always matter !
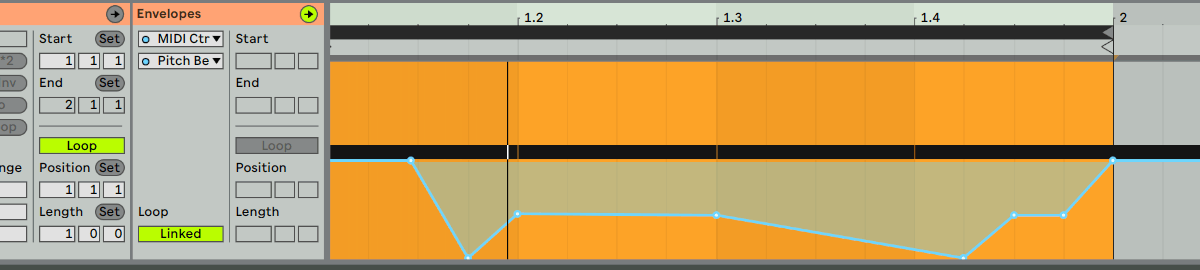
Pitch Bend modulation
It should sound like this
Now, lets fatten the sound up a little by changing the waveforms to squares. The interesting thing about FM squarewaves is that as the level of the Modulator changes the pulse-width will change – so what we will hear is a pulse-width modulation envelope.
For both Oscillators choose the oscillator “Square D”
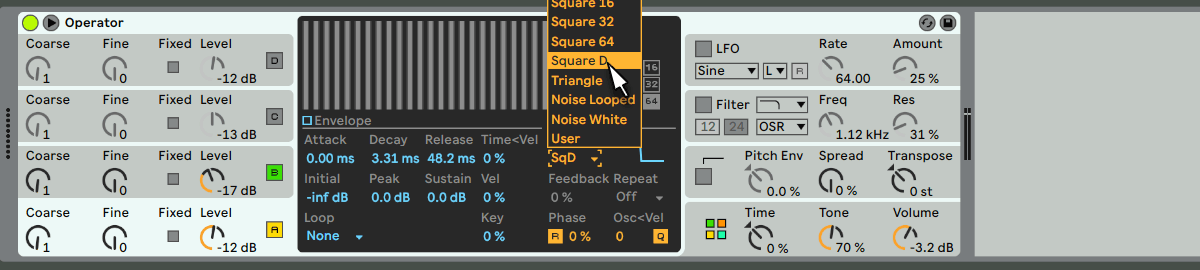
Change the oscillator to the square wave
Step 5: Bendy Filter Modulation
Lets add the Filter modulation, it’s going to have some real character so choose the OSR filter which has a nice Filter Drive parameter which you can set to around 6 dB
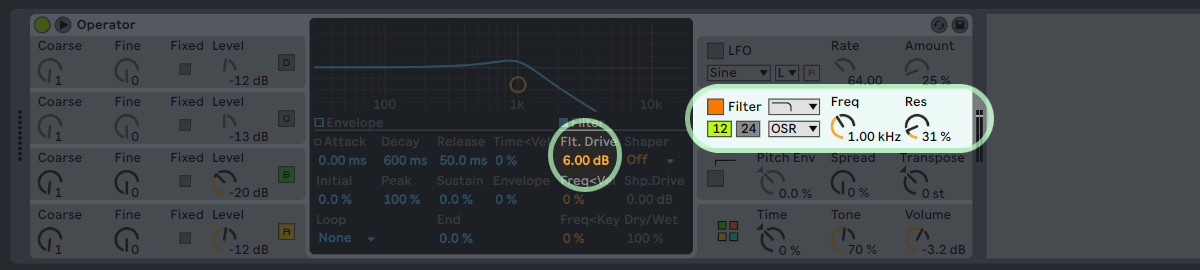
Set the Filter to 1Khz and slightly resonant with 6Db of drive
Now lets draw in our filter modulation envelopes, we have much more control here than if we used the normal Synth envelope of Operator’s filter section.
Draw a shape like this. To get the curves to bend like this you simply pick a point on the line you want to bend and hove over it, press and hold the shift key and you’ll see the bend tool
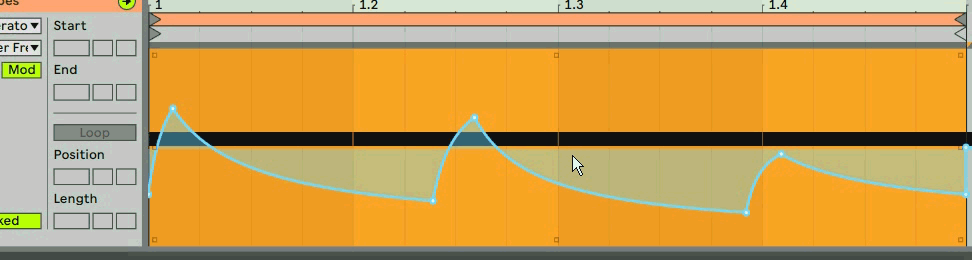
Bend the curve of the filter envelope so it sounds correct
It should sound like this when you have applied the filter modulation.
Tweaking!
Now try tweaking the controls to alter the sound, try changing the level of Oscillator B, listen to how the sound changes. Try changing the position of the filter cut-off, notice how the modulation will still play the rhythmic pattern but you are free to design your sound without limitations.
Step 6: Lets go fatter
To finish off lets make the bass sound even more rich, analogue and fat sounding.
Activate Oscillator C and set it to the same Square D waveform. Listen to how the square-waves combine with the modulation which produces fat PWM sounds. It sound sound like this:
Now try the same technique to modulate other parts of the sound.
Other things you can try
Metal Modular Rhythm Try modulating the envelopes for the pitches of the oscillators, both the fine and the coarse controls. These give great sequencing features for evolving rhythmic “modular” style sounds.
Play it & Jam it! Activate the track’s Monitor : In mode so you can play notes into the synth while the modulation envelopes shape your sound.
Speed Changes Try using the function which doubles or halves the speed of the clip, it’s in the Notes section, use :2 or *2 buttons to change the relative speed.
Poly-rhythms Try unlatching the different envelopes, so they all run at different loop lengths from each other for exciting poly-rhythms. To do this In the clip’s envelopes section at thy bottom where it says Loop click the button which says [Linked] to unlink each envelope. Now try setting the filter envelope to loop every 3 beats.
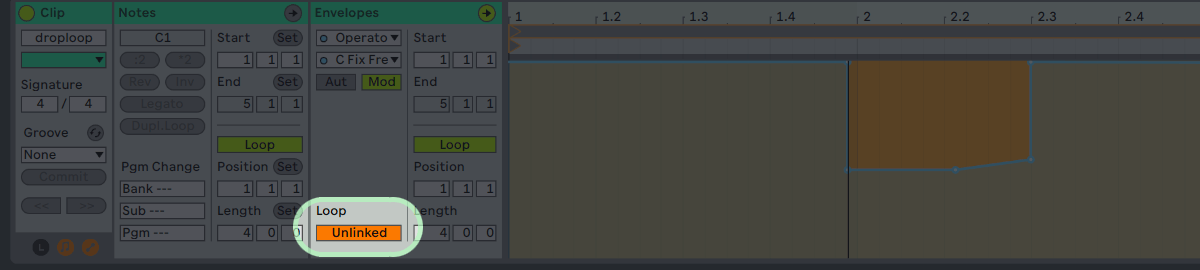
unlink envelopes
Tidy Up If your envelope menu gets too long, try choosing the option “Only Show Adjusted Envelopes”
Last Words
If you enjoyed this tutorial leave a comment and let me know and I’ll create a part 2, because this is a deep topic with lots more potential for sonic rhythmic exploration.


 50 Industry Music Production Tips You Must Know


