
An ambient evolving drone is a unique sound which can become a whole track, it can be used as a “sound-bed” supporting minimalist rhythms , or it can simply be a pleasant way to spend an afternoon.
This is what we are going to be making.
This sound is actually very simple, the source can be any simple synth or sampler preset – which is then sent into a rack of frozen reverbs which are layered and playable. The frozen reverbs capture the input sound and then by tweaking the controls of the different layers of frozen reverb you can sculpt an ambient drone track like the one you hear above
so there will be some talk about ‘automation’ in this blog and if you’re not sure what this, check out this free masterclass chapter on automation from Brazilian electronic music producer Gui Boratto to get you up to speed, so let’s continue;
Step 1: Create an initial sound source
First, we will need a noise source of some kind so that as we are creating the effect we can hear what we are doing. The simplest sound is fine. Here I’m going to use an Ableton Operator with a sawtooth, and no filter.

- Oscillator A
- Coarse: 1
- Fine: 0
- Level -12 Db
- Attack 1.00 s
- Decay 30.0 s
- Release 7.00s
- Waveform Sawtooth “D” (high resolution waveform)
Step 2: Start building the freezer!
Now we will add the basic reverb. Drag in a Live Reverb, just the basic reverb.
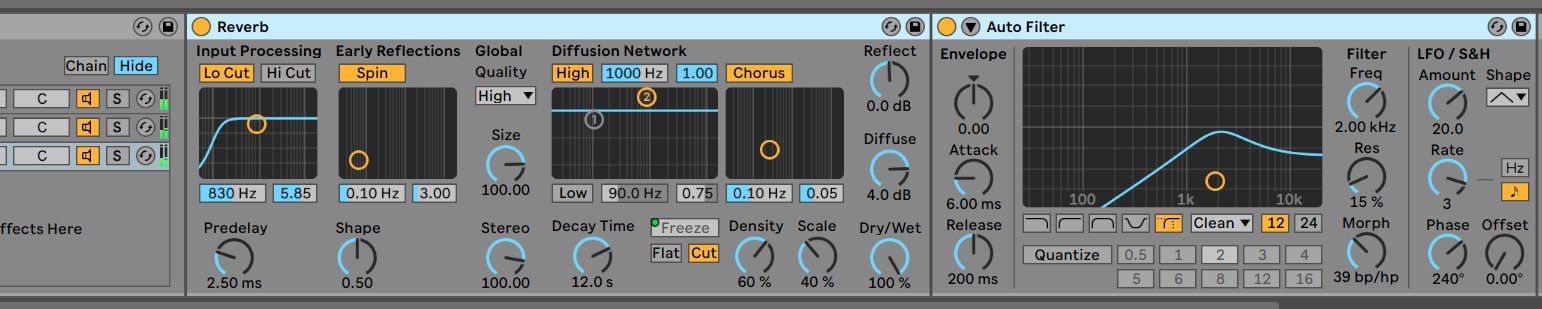
The parameters are as shown here:
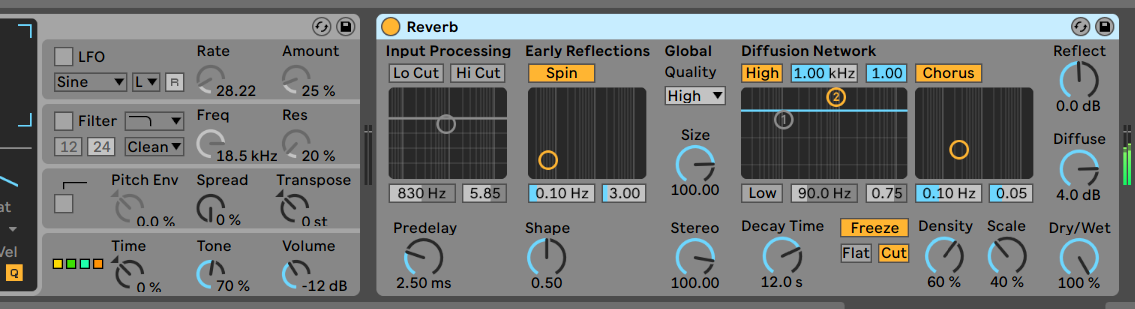
Parameters:
- Low Cut, High Cut : Off
- Pre Delay: default (2.5ms)
- Spin:
- on,
- 0.10Hz
- 3.00
- Global Quality: High
- Size: 100.
- Stereo: 1000
- Diffusion network :
- High : on,
- Low off
- Decay time: 12.0 S
- Freeze, Off,
- Flat: Off,
- Cut: On
- Chorus: 0.10Hz. 0.05
- Reflect: 0Db
- Diffuse: 4Db
- Wet:100%
So that’s the very basic frozen reverb. You can try it out now just to make sure it works: play your synth sound through the reverb. As the settings are right now it will just sound like a reverb. So press the Freeze button to check that the reverb freezes.
Here in this audio example you’ll hear me play three notes through the reverb, then I play them again and press “Freeze”
This is the beginning of our journey into space!
What exactly is a Reverb Freeze doing?
What Freeze does is hold and recirculate the audio in the reverb’s diffusion network so this causes the audio to sustain infinitely. You might be familiar with more typical types of audio feedback which tend to sound like a howl or screech. In the frozen reverb the diffusion network prevents this as it “diffuses” the sound, that means each little chunk of sound is being shuffled and having the phase “decorrelated” (which means it’s no longer aligned where it once was). Each time a little piece of sound moves around the loop it’s shuffled again, meaning that the sound is never the same and never sounding “stuck” , so we never hear the howl tone.
What are the Freeze Functions doing?
The “Freeze” button activates the infinitely sustaining feedback loop in the diffusion network, and the Diffuse volume control turns the volume of that buffer up and down.
Beneath the Freeze button are two buttons which may work in the opposite way that you think. The “Flat” button tells the frozen reverb to ignore the diffusion network filter. The diffusion network filter is the box above which will apply a filter to the feedback network, slowly rolling off the top end. If the Flat switch is active then the diffusion network is not filtered and will stay spectrally the same. If the Flat switch is off, then the filter is on (!) and the feedback of diffusion will slowly filter away.

Also beneath the Freeze button and next to “Flat” is the “Cut” button which, when activated, prevents the input signal from adding to the sustained sound, while if the Cut button is deactivated this means that audio input will be added to the currently sustaining frozen reverb.
Step 3: Creating the Frozen Drones rack
We have our sound source, and we have tested that the first reverb is set so that pressing the Freeze button will capture a sound.
The next step is to create motion, we will do this by layering three of these reverbs and each reverb will deal with the Low, Middle and High end of the drone. Each layer of reverb will have an autofilter with an LFO on to pan and modulate the output.
We will be able to perform the reverb by altering the freezes, the filters, and the levels of each drone.

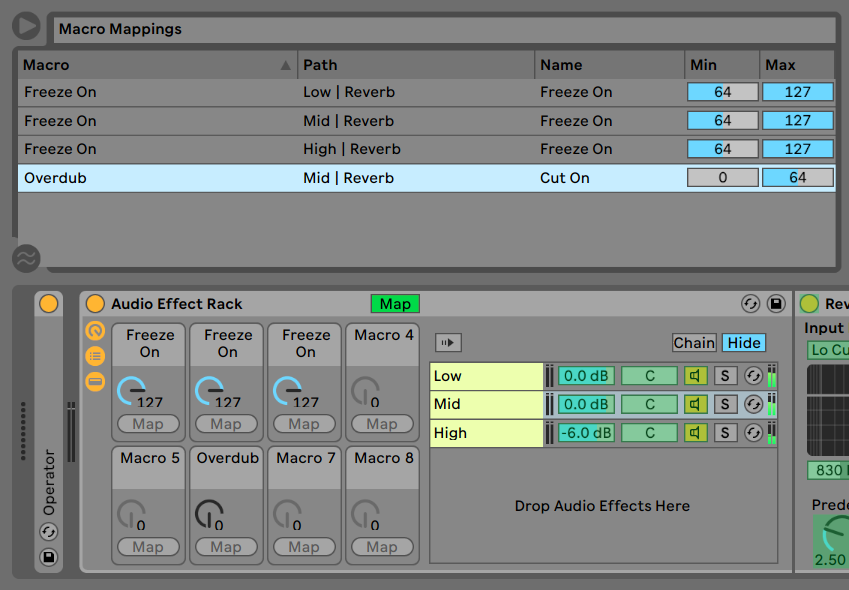
Rack the Reverb you made and map the Freeze button to Macro 1. It will name itself “Freeze On”
Now when you play the synth sound and then turn up that “Freeze” Macro to full it will freeze your audio input. When you turn “Freeze” down to zero it will release the sustained diffusion signal.
Duplicate the reverb chain
Duplicate the reverb chain two times so that you have three chains of reverb. You can simply click it use Control & D, or use the contextual menu and choose “Duplicate”.
Map the new reverbs Freeze buttons to new macros
In the copies of your reverb chain you need to re-map the Freeze button to new macros. The duplication process will have copied the Freeze mapping of Macro 1. So now edit each of the two new reverb chains and map their Freeze buttons to Macros 2, and 3 respectively. As in the image.
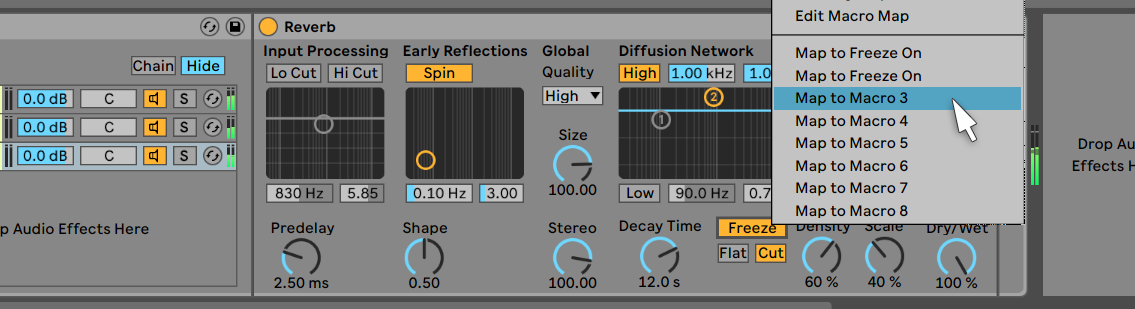
Now, you’ll have three playable controls. A Freeze for reverb 1, Freeze for reverb 2, and a Freeze for reverb 3.
Test the freeze rack
With all the Freeze controls off; play a note into the rack with your synth, first turn up Freeze one. The play another note and turn up freeze 2, then another note for freeze 3.
Step 4: Adding movement and width
This is a good start, now lets create some variation of personality between the different drone “voices”. I think that having one voice handing the low end, one doing the mid-range and another handling high frequencies is an acceptable strategy … but you can experiment to produce any number of variations,
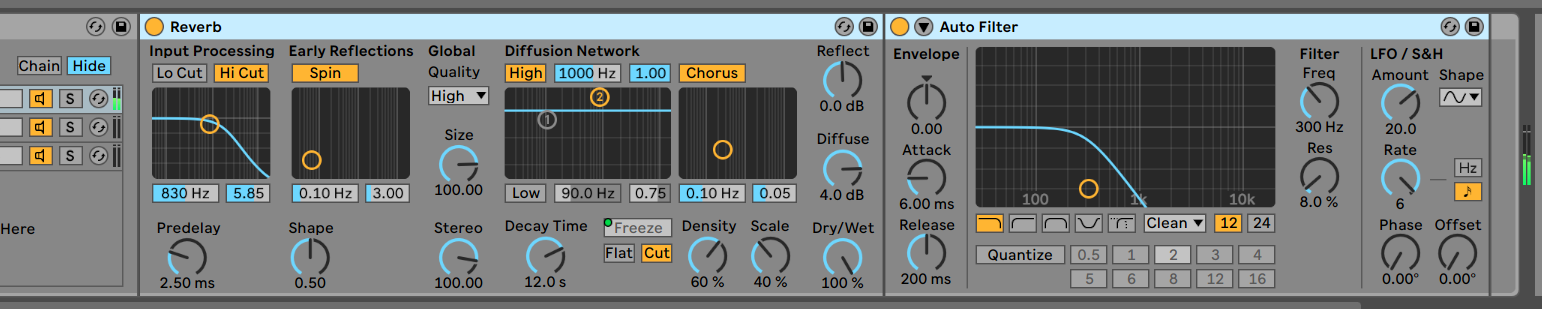
Adding personality – The low end
Rename Chain 1 “Low” , on the reverb input processing section activate the button “Hi Cut”.
After the reverb add an Autofilter with the parameters
- Filter Mode: LowPass 12db
- Filter Freq 300 Hz
- resonance 8%
- LFO Amount 20.0
- LFO Shape: Triangle
- LFO rate 6 bars (beats mode)
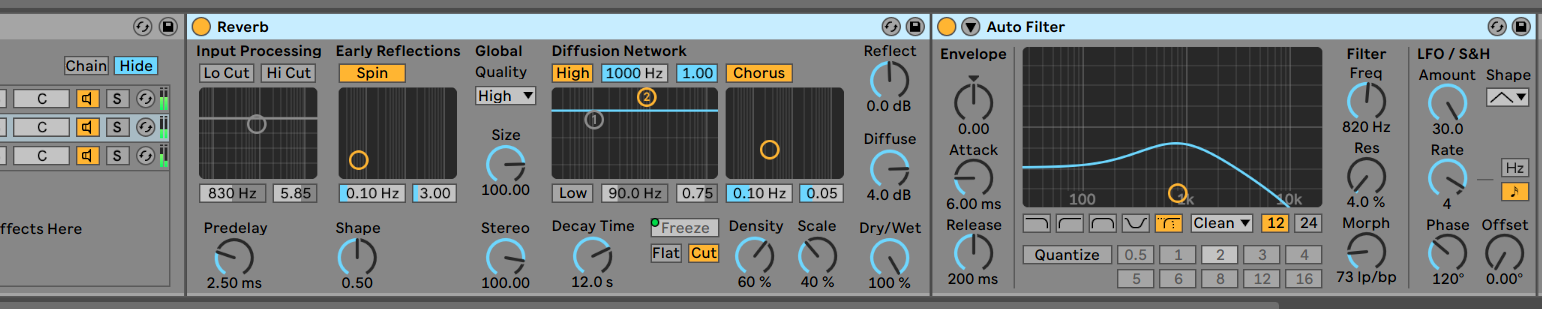
The mid-range
In the second chain, rename it to “mid” and after the reverb unit in this chain add an AutoFilter with the following settings
- Filter Mode: Morph 12db
- Morph 73 lp/bp
- Filter Freq 820 Hz
- Resonance 4%
- LFO Amount 30.0
- LFO Shape: Triangle
- LFO rate 4 bars (beats mode)
- Phase 120
The High end
In the third chain, rename it to “high”
Set the Reverb Input processing “Lo Cut” to active, and after the reverb unit add an AutoFilter Device with the following settings
- Filter Mode: Morph 12db
- Morph 39 bp/hp
- Filter Freq 820 Hz
- Resonance 4%
- LFO Amount 30.0
- LFO Shape: Triangle
- LFO rate 4 bars (beats mode)
- Phase 120
Test it out so far
If you play some notes into the rack now, try freezing one note into the low, then another into the mid, and the last note into the high. Notice how the notes subtly pan around differently and they fade up and down in volume.
It should sound something like this:
Step 5: Finishing touches
There are several ways to take this now, you may wish to add performance controls which allow you to control the tonality and volume of the different layers, or you may wish to add the capability to “overdub” into these layers
Lets try both.
In the Mid Chain map the “Cut” button to Macro 6. It will automatically rename to “Cut On”. Rename the macro instead to “Overdub”
When this Macro is at 0 it allows overdubbing, and when it’s at 127 it does not allow overdubbing. This is backwards so right click the “Map” button above the macro dials to edit this.
In the Mapping panel find the macro called “Overdub” and set the Min value to 0 and the Max value to 64. Now when the dial is turned up it allows overdubbing.
Add a low-pass filter to the feedback.
Adding a Low-pass filter to that same Reverb’s feedback allows us to control the intensity and create more interesting overdubs.
Map the box in the High Diffusion Network to Macro 7, it will automatically be called “Hi-Shelf Gain”. Rename that Macro dial to “Mid Filter”.
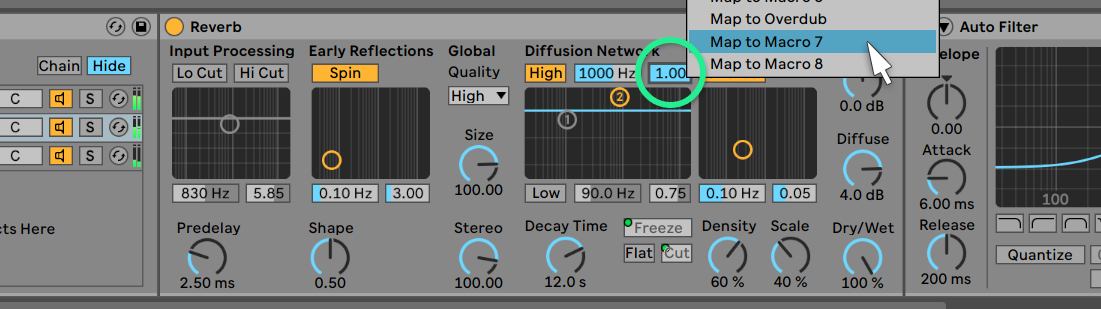
Now activate the macro Map button on the effect rack again and set the parameters for the “Mid Filter” Macro to Min 0.90 and Max 1.0:

Now if we play with this rack we should get an outcome something like this:
More rich and complex sounds
This example has used a very simple input sound: a single oscillator from an Operator synth. This example input was used to familiarise you with the processing abilities of the effect rack. You’ve heard how it can convert that simple unfiltered sawtooth synth sound into a lush evolving drone.
If Ableton live is still confusing to you, we recommend you complete our Ableton Live video manual course with an Ableton Live certified trainer
Now to make it even more lush and complex sounding – use a different input source. Try using more complex synths as an input, for example if you have a hardware analogue synth then try feeding that into the Frozen Reverb rack. You’ll find ways to create unique lush textures which are completely unique.
Of course, you can always use the Frozen reverb rack on an effect return, then you can feed any part of your mix into the effect and create a sound bed which really complements the sound. Try putting a side-chained compressor after the frozen drone effect and listen to it pump against your kick drum. You’ll soon find that this effect is useful in more ways that you might have expected.


 50 Industry Music Production Tips You Must Know


