
Transitions between different sections of a track are key to its development, since they help the music flow when they’re properly executed, but certain arrangement and structure decisions can make this process a bit more complicated.
Some people use sampled based effects from libraries, such as sweeps, risers, downlifters and so on, and they are a great choice, but nothing beats creating your own effects out of the actual elements of your tracks when it comes to musical integration.
This is why today we’re going to take a look at four different effects that are easy to use and really work, so you can give your track a professional touch.
1. Big Reverb Send
Imagine a section of a track where there’s a lead vocal or synth grabbing all the attention, and then the track moves on to a quieter section where this leading element disappears. This kind of transition can be tricky, especially if the energy also goes down, but this really simple trick usually works perfectly.
You just need to create a send/return bus on your project, load your favorite reverb effect and set the dry/wet or mix knob to 100%, since we don’t want the dry signal here. We also need a long decay time, and also a big room size if the option is available. How big and how long will depend on the style of the track and on how obvious you want the effect to be. Predelay can be set to zero, since the idea here is to bath that lead sound in reverb, so it’s washed out and smoothly fades through the transition.
We recommend that you add an EQ to your bus – after the reverb, so you can clean it up, cut the low frequencies off and shape it so it doesn’t get too muddy and mask the sounds on the new section after the transition is made.
Now the only thing you need to do is set up the automation from the lead instrument that is going to disappear into the reverb bus, so it only sends audio right before it stops playing and the section changes. In the picture below you can see how we send a lead vocal to a reverb bus before it disappears into an instrumental section.
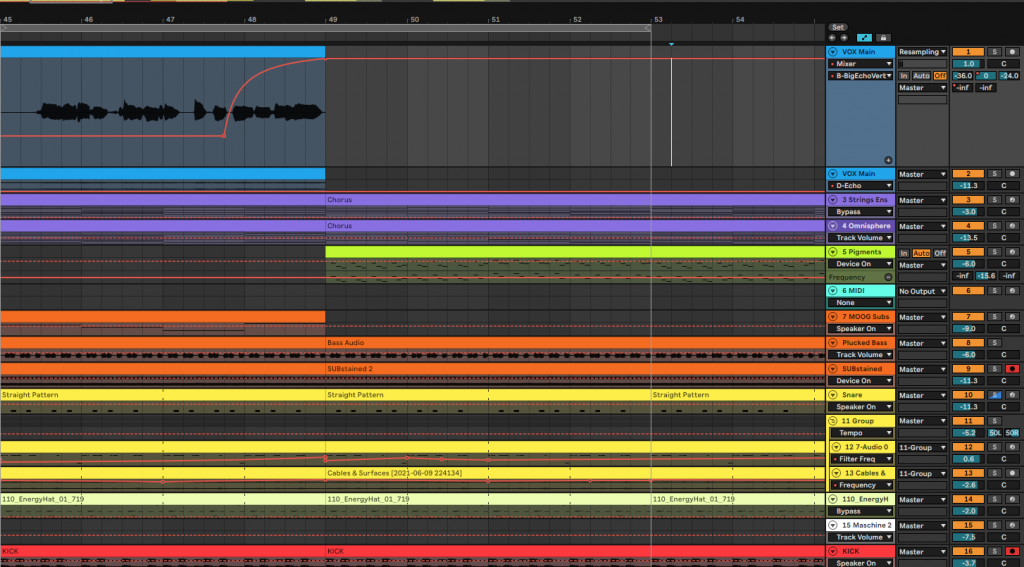
You can hear the result here:
You can use this effect not only on leading sounds, but also on drums when moving to a quieter section, or in a particular percussion hit to create interest. As always, experiment and try to find the way this better suits your music.
You can also try adding saturation or distortion after the reverb for a crazier, more obvious, over the top result.
2. Reverse reverb
This effect is usually applied to create anticipation before introducing new elements in a track, although it also works well with any kind of transition. It consists of recording a certain instrument, sound or track bathed in a considerable amount of reverb, more than the usual amount applied to it regularly in the track.
We can do this by increasing the ‘wet’ or ‘mix’ knob of a reverb effect that is already present in our project as an insert, or just creating one specifically for this purpose, either as an insert or a send effect.
Once the output is recorded, we need to edit it to cut the tail of the reverb, which is the part we will reverse to create this effect. This is an easy process that every DAW or audio editor can do. Now we just need to put it right before a certain sound enters the track, or just before a certain transition. In the following picture you can see how this effect anticipates the lead synth.
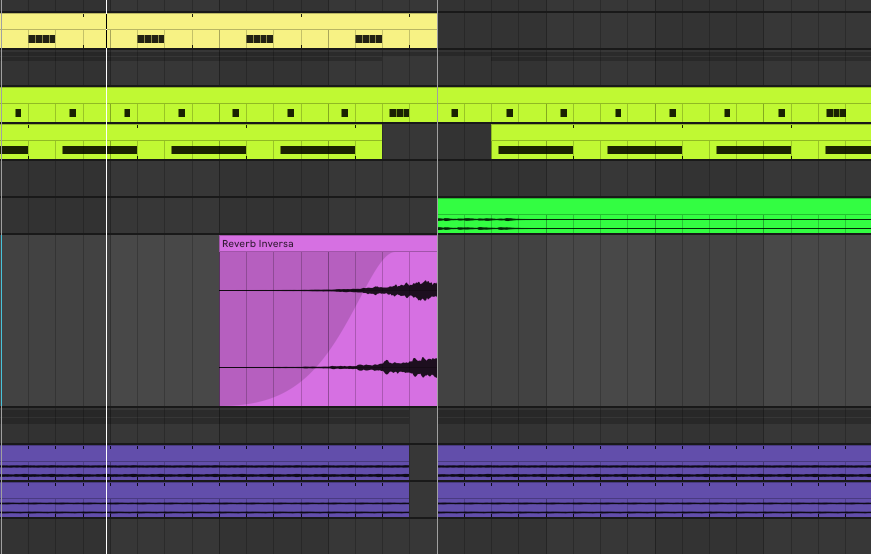
This will create a smooth transition and anticipation, and works really well with lead vocals or synths. If you want to go a step further, try doing rhythmical edits to the effect, which will turn it more into an ‘in your face’, obvious effect.
Listen to the music here:
You can also watch Andres Campo applying this trick in his Masterclass, using it for anticipating Kase.O’s vocal on Andres’ official remix of ‘Mitad y Mitad’.
3. Reverse delay
This follows up to the idea behind the previous effect, but instead of using the tail of a reverb, we will use the feedback of a delay. The process is more or less the same: create a send/return bus with your favorite delay effect, set the ‘dry/wet’ or ‘mix’ knob at 100%, a delay time you like and crank the feedback knob up to 70-90%, depending on the delay time and on how long we want this effect to be. We choose one of the sounds of our track, send it to the effect bus and record the audio output of the bus into an audio track.
Once it’s recorded, we cut the repetitions we want, reverse the audio file and place the resulting sample right before the transition we want to enhance.
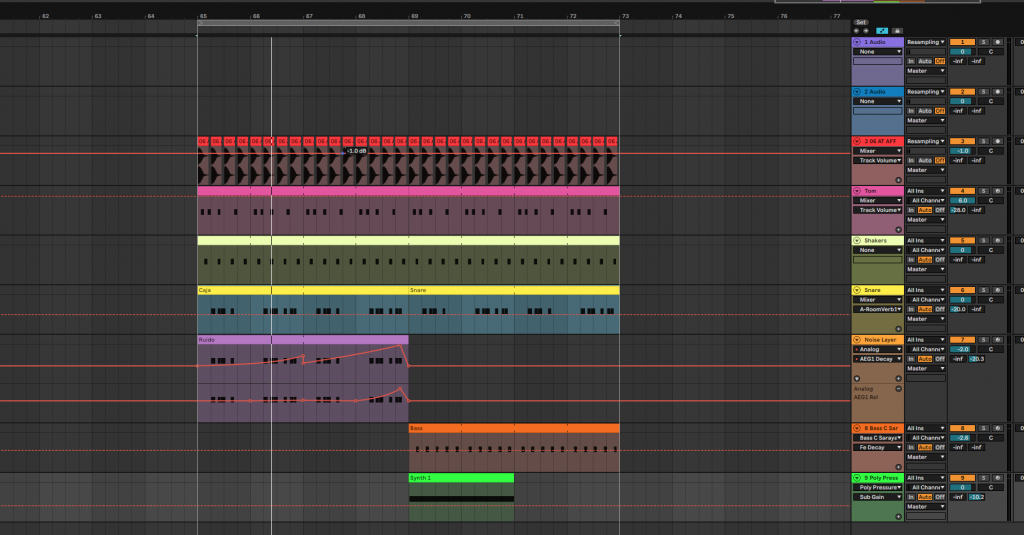
In the audio example below, you can hear the music moving from a quiet section to a more intense, kind of ‘drop’ one, by using a reverse delay on a vocal sample that’s not present there. You can see how it’s all placed in the picture afterwards.

As in the previous trick, this effect works very well to introduce new elements in a track, but is still effective for any other kind of transition. Experiment with different delay times, even with some of them unsynced to the tempo of your track for more chaotic, experimental results.
4. Create and automate white noise layers for your percussion
The idea here is to choose one of our percussion instruments, like a snare, clap, tom or hi-hat patterns, and layer some white noise that builds-up to the transition, creating tension and energy.
This particular effect requires just a bit more work, but if you’re an Ableton Live user there’s a simpler way which we will look into later. Now we’ll focus on the option for every DAW.
Load into your track a synthesizer that allows you to select a noise oscillator as its unique sound source. The idea is to add a noise layer note for every percussion hit, and later on automate the envelope of the synth in order to make the noise layer build-up the energy.
This is way easier to do if you programmed your percussion on a MIDI track, since you can just copy the MIDI clip and drag it into your noise synth. Otherwise, you will have to write the notes so they match the audio percussion hits, but it shouldn’t be that difficult either.
Once we get our hands on the synth, we’re only interested in noise audio signals, so turn off any other oscillators. Use a High Pass FIlter if available to cut the low end of the noise, at least up to 200 Hz. You can cut further up if you like it. If the synth you’re using doesn’t have a HPF, just drop an EQ on that channel to cut the low frequencies.
Besides the filter, we need to set up the envelope with low decay and release values, without attack or sustain. Then, automate the decay time and release for every hit, making them longer as they approach the transition, creating that energy and tension build-up effect.
In the picture below you can see the automation we applied to the Decay and Release parameters of our noise layer, adding some edge and energy to a clap/snare drum, right before a new bass and synth section comes in. You can also listen to the example:
To further enhance the effect, you can apply some reverb to the noise layer, even as in the first trick we explained to make the build-up effect even bigger. If you do so, it’s also a good idea to use an equalizer to shape the noise and make sure it’s not masking any other important sounds in the mix, and maybe boost the high end too.
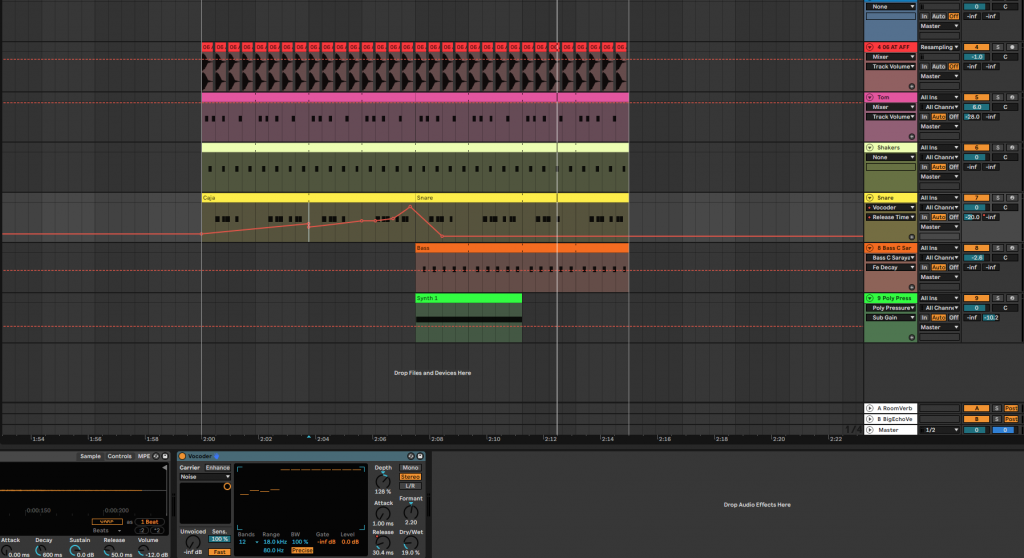
As we mentioned before, if you’re an Ableton Live user, there’s a quicker way to get this effect done. Just drop Ableton’s stock Vocoder effect on the percussion track you want to apply it to. On the drop-down menu on the left of the effect, select the ‘noise’ option, then turn the sensitivity slider up to 100% and make sure that the mix level is between 15 and 20%, release around 50 ms and range up to 18 kHz. Set the rest of the parameters to your taste and automate the release as explained before so it builds up tension.
Listen to the result next, you can also check out how we set the different parameters on the picture below.


 50 Industry Music Production Tips You Must Know


