
First of all, what is audio compression?
Audio compression refers to the process of reducing the dynamic range of an audio signal, which is the range between the loudest and quietest parts of the signal. This is typically done using a device called a compressor.
Audio compression is a powerful tool, and it’s important to use it judiciously in order to avoid over-compressing the signal and losing detail and clarity. It’s also important to choose the right compressor and settings for the specific material you are working with in order to get the best results.
Second of all, what is a compressor?
A compressor is a device that reduces the dynamic range of an audio signal, by lowering the volume of the loudest parts of the signal and raising the volume of the quietest parts, so that the overall dynamic range of the signal is smaller. This can be useful for a number of reasons, such as making it easier to hear all of the elements in a mix, or making a track sound more consistent in volume when played back on different systems. Compressors can be used on a wide variety of audio signals, including vocals, instruments, and entire mixes.
Let’s get more specific, in what ways a compressor might be useful?
There are many different ways that compressors can be used in music production and audio engineering. Some common uses include:
- Controlling dynamics: As mentioned earlier, one of the primary uses of compressors is to reduce the dynamic range of a signal, which can be useful for making the overall volume of a track more consistent.
- Shaping the tone of a sound: Shape the tone of a sound by changing the way that it responds to different levels of input. For example, a compressor with a fast attack time can be used to create a punchy, percussive sound, while a compressor with a slower attack time can be used to create a smoother, more sustained sound.
- Adding sustain to an instrument: Add sustain to an instrument by reducing the volume of the initial attack and increasing the volume of the decay and sustain. This can be particularly useful for instruments like guitar and piano.
- Enhancing vocals: Even out the level of a vocal performance, making it easier to hear the lyrics and improving the overall clarity of the vocals in the mix.
- Creating special effects: Create special effects, such as pumping and breathing, by intentionally exaggerating the amount of compression applied to a signal.
Let’s listen to some examples of how a compressor can help improve a sound
- Controlling dynamics: in this example, we can hear how a compressor can improve the sound of a recorded guitar in order to control its dynamics.
Uncompressed:
Compressed:
- Enhancing vocals: in this example, we can hear how a compressor helps enhance the clarity of a vocal recording, making it easier to hear the lyrics and improving the performance.
Uncompressed:
Compressed:
How can I use a compressor in many different ways with the same plugin/device?
A compressor is made of many features that will modify the sound. Combining them in a specific way, it will let you achieve many results that can be useful in different ways, as we discussed above.
There are several elements that make up a compressor, and understanding how these work can be helpful in getting the most out of the device. Here are a few:
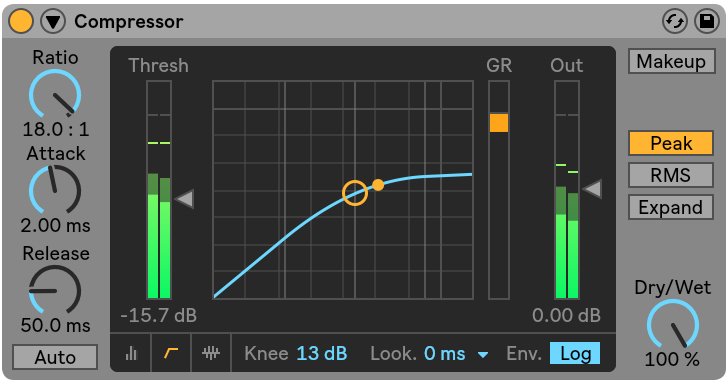
- Threshold: This determines the level at which the compressor begins to take effect. Only signals that exceed the threshold level will be affected by the compressor.
- Ratio: This sets how much the compressor will reduce the level of the signal once it has exceeded the threshold. A ratio of 2:1 means that for every 2 dB the signal exceeds the threshold, the output level will only increase by 1 dB. Higher ratios result in more compression, while lower ratios result in less.
- Attack: This dictates how quickly the compressor will begin to take effect once the signal exceeds the threshold. A fast attack time means that the compressor will start reducing the level of the signal very quickly, while a slow attack time means that it will take longer for the compressor to kick in.
- Release: This governs how quickly the compressor will stop reducing the level of the signal once it falls back below the threshold. A fast release time means that the compressor will stop compressing the signal quickly, while a slow release time means that it will take longer for the compressor to stop compressing the signal.
- Makeup gain: This is an additional gain control that is used to boost the overall level of the signal after it has been compressed. This can be helpful in cases where the compressor has reduced the level of the signal too much, resulting in a loss of overall volume.
There are many compressor devices and plugins out there, what are the differences?
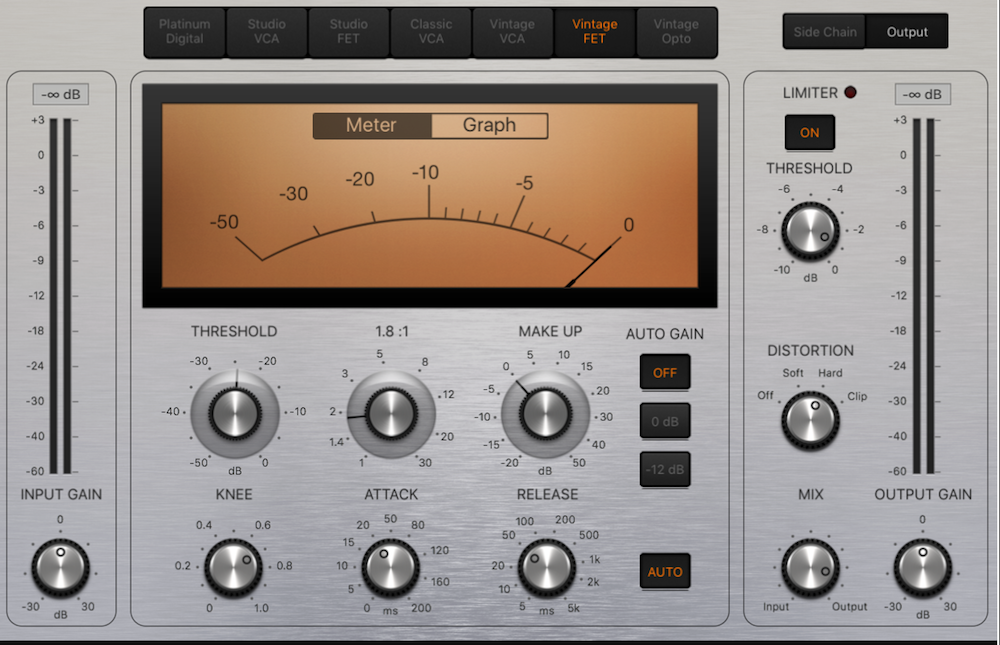
There are several different types of compressors, each of which has its own unique characteristics and applications. Every plugin or device might be a different type and might have a different effect in an audio signal. Here are a few common types of compressors:
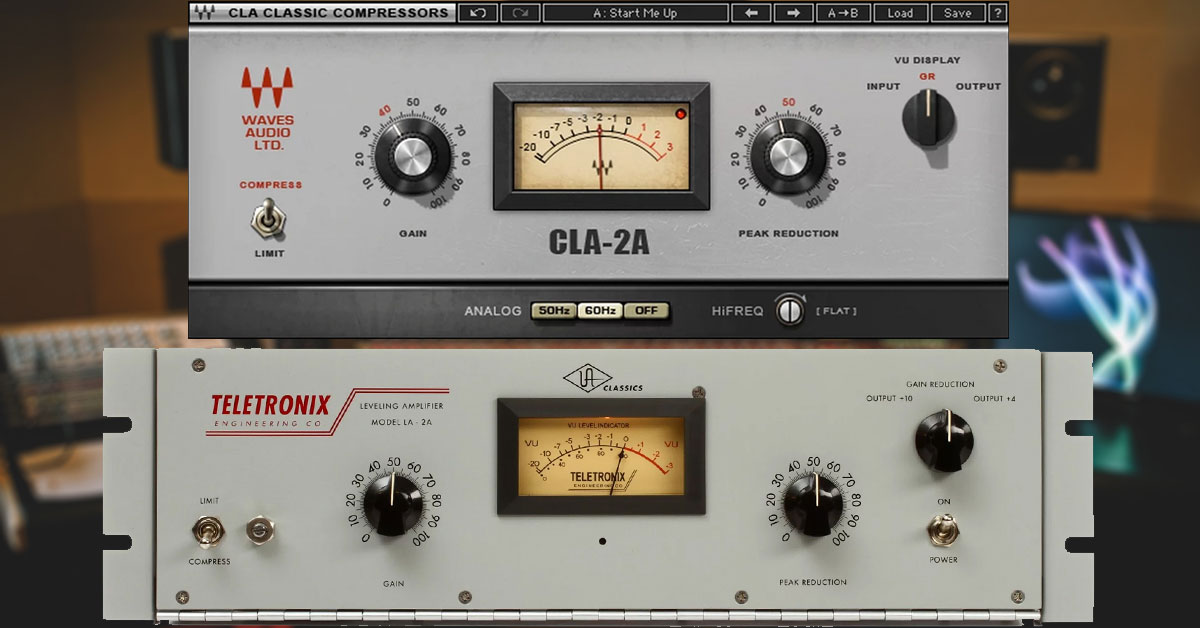
- Optical compressors: These use a light-dependent resistor (LDR) to control the gain of the signal. They are known for their smooth, natural-sounding compression and are often used on vocals and instruments. Example: Teletronix LA-2A.
- VCA compressors: These utilize a voltage-controlled amplifier (VCA) to control the gain of the signal. They are known for their fast attack and release times and are often used on drums and other percussive sounds. Example: DBX 160.
- FET compressors: These compressors employ a field-effect transistor (FET) to control the gain of the signal. They are known for their ability to add character and color to a signal and are often used on vocals and guitars. Example: Urei 1176.
- Tube compressors: These compressors use a vacuum tube to control the gain of the signal. They are known for their warm, smooth sound and are often used on vocals and bass.Example: Fairchild 670.
- Digital compressors: These ones utilize digital signal processing (DSP) to control the gain of the signal. They can offer a wide range of customization options and are often used in software and digital audio workstations (DAWs). Example: FabFilter Pro-C.
All these types of compressors have been digitized and converted to plugins by many brands. They are a digital emulation of the original analog compressors and they respect very well the features of each one.
What are the differences between analog compressors and plugin emulations?
Analog compressors and digital compressors (plugins) are two different types of devices that are used to reduce the dynamic range of an audio signal. Here are some key differences between the two:
- Technology: Analog compressors use physical components like vacuum tubes or transistors to control the gain of the signal, while digital compressors use digital signal processing (DSP) algorithms to achieve the same effect.
- Sound: Analog compressors are also known for their warm, organic sound, while digital compressors can offer a more clinical, precise sound.
- Customization: Digital compressors on the other hand, tend to offer more customization options and parameters than analog compressors, which can make them more flexible and versatile. However, this can also make them more complex to use.
- Ease of use: Analog compressors tend to be easier to use than digital compressors, as they often have fewer controls and parameters. However, this can also make them less flexible and less capable of achieving specific results.
- Ultimately, the choice between an analog compressor and a digital compressor will depend on the specific needs of your project and your personal preferences. Both types of compressors can be useful in different situations, and many engineers and producers will use a combination of both in their work.
Before we finish, a few tips to help you be a “master” of compression…
-
How do I set the threshold and ratio on a compressor?
The threshold determines the level at which the compressor begins to take effect, while the ratio determines how much the compressor will reduce the level of the signal once it has exceeded the threshold. To set these controls, you’ll want to listen to the signal and adjust the threshold so that it is just below the loudest parts of the signal. Then, adjust the ratio to determine how much compression you want to apply to the signal. Higher ratios will result in more compression, while lower ratios will result in less.
-
How do I set the attack and release times on a compressor?
The attack time sets how quickly the compressor will begin to take effect once the signal exceeds the threshold, while the release time determines how quickly the compressor will stop reducing the level of the signal once it falls back below the threshold. To set these controls, you’ll want to listen to the signal and adjust the attack and release times based on the character and style of the music. Fast attack and release times can be used to create a punchy, percussive sound, while slower attack and release times can be used to create a smoother, more sustained sound.
-
How do I know when to use a compressor?
Compressors can be used in a wide variety of situations, but most commonly to control the dynamics of a signal and make it more consistent in volume. If you’re having trouble hearing all of the elements in a mix, or if you’re finding that a track sounds too quiet or too loud when played back on different systems, a compressor can be a useful tool. Additionally, compressors can be used to shape the tone of a sound and add sustain to an instrument.
-
How can I avoid over-compressing a signal?
Over-compressing a signal may result in a loss of detail and clarity, as well as a flattening of the dynamic range. To avoid over-compressing a signal, you’ll want to be careful not to set the threshold too low or the ratio too high. You should also pay attention to the attack and release times, as these can have a big impact on the amount of compression applied to the signal. Finally, be sure to use your ears and listen to the signal as you make adjustments, and make sure that the compressed signal sounds natural and musical.


 50 Industry Music Production Tips You Must Know


