A few days/weeks ago we shared with you the first part of this post, getting our hands into Ableton to create classic Rave sounds such as a detuned lead and a hoover. Today we’re going to see how to make two new ravey sounds from scratch within Ableton Live 11.
If you missed the first part, we recommend you to check it out before reading this one here.
At this point, you’re probably more familiar with Ableton Live’s Analog, its two main oscillators, the filter and amplification sections, Unison controls, how to access options via the contextual display… and you might have noticed that we have been mostly using sawtooth waveforms on the oscillators all the time.
The reason for sawtooth waves is simple. Back in the 90s, most affordable synths didn’t really have a lot of options when it came to waveforms. Most of them were the classic sine, triangle, square and sawtooth… so out of those four, the sawtooth is the one that offers a bigger amount of harmonics.
And what are these harmonics, you ask? We don’t want to get too technical here, but harmonics are the overtones that help define the timbre of a sound, giving it character, brightness and energy. So for those highly energetic, intense Rave sounds, the best choice most of the time was the sawtooth.
The sounds we’re going to see today also make use of that particular waveform. Let us start with the first one!
1. Acid Bassline
Acid basslines are one of the most iconic sounds in electronic music. Although they were already popular before the big rave sound took over in the 90s, this trend embraced a more aggressive and energetic take on the basslines that we had already listened to in acid house tracks.
The squelchy, crispy and resonant sound was born in the circuits of the infamous Roland TB303. And while the 303 and its clones and emulations are the quickest way to get that kind of bassline, you can easily replicate it in any synth with sawtooth waveforms and resonant filters available.
First, let’s listen to what we are going to create here:
So let’s create a new MIDI track and load Ableton’s Analog. You could also do this with Operator or even Wavetable, but we’re sticking to Analog for now.Now, draw a pattern or copy the one we made, you can check it out here:
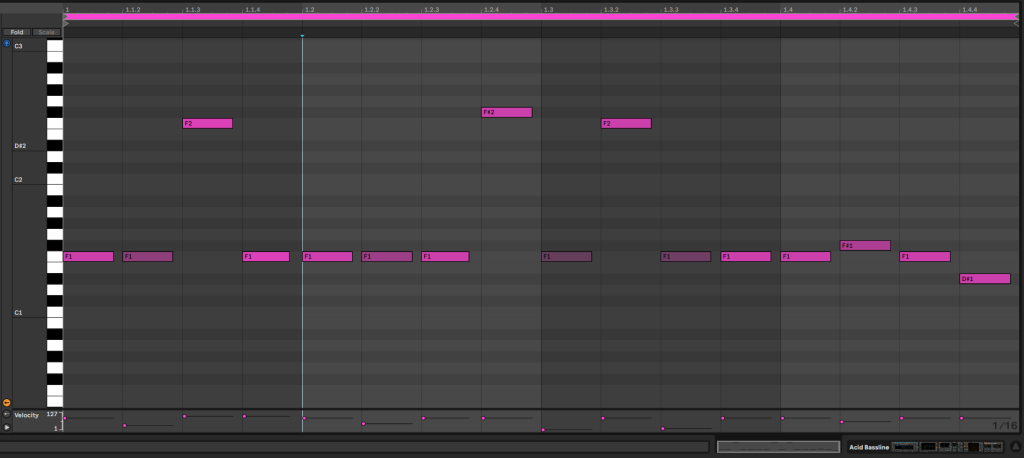
Notice how some notes have different velocity values to make the sequence a bit more dynamic.
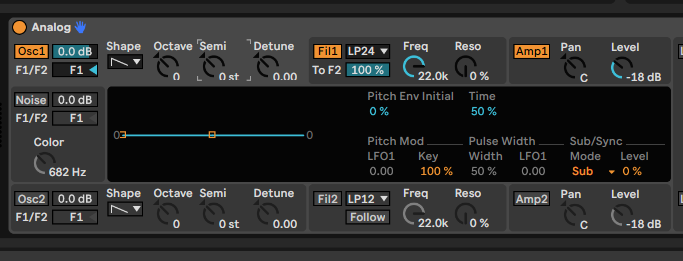
Now, let’s get our hands on Analog and create the sound. This is a pretty simple sound. We only need one oscillator for the job, so toggle off both ‘Osc 2’ and ‘Noise’ oscillator. Then, click somewhere in the ‘Osc 1’ module to access its options on the display, and make sure that there is 0 amount of Sub or Sync in this oscillator.
The waveform that we’re using is a sawtooth again, but you could also try a square one, getting a different timbre.
This is how the oscillators section should look like now:
After that, let’s tweak a couple of parameters from the ‘Amp1’ and the global controls.
Click anywhere in the ‘Amp1’ section of Analog to show the options in the display. You should change the envelope settings to the following: 5 ms attack, 800 ms decay, 0 sustain and 500 ms release.
On the global section, the one on the right side of the device, just make sure there is no Unison selected. You can use Glide if you want, but we are not using it in this particular patch.
Then, head to the display, find the Voices option – not unison voices, the one to the left, and put it to mono. Acid basslines don’t play more than one pitch every time, so there’s no need for polyphony here.
What we have so far sounds like this:
Not that exciting, right? It’s because we’re missing the most important element of the synth yet. The filter is the one in charge for delivering that squelchy sound.
First, toggle on Filter 1, we have it on Lowpass, 24 dB per octave. You could also use other kinds of filters here, like a bandpass, for different results. We’ve turned the cutoff down to 345 and dialed in some resonance, up to 37 %.
Now we need an envelope to modulate this filter for the sound to come alive. Head to the center display while the Filter 1 section is highlighted to have access to the related options.
Here, we’re using 5 ms attack, 430 ms decay, 0 sustain and 250 ms release for the filter envelope. On the lower row, find the ‘Env’ control in the ‘Freq Mod’ submenu, and bring it up to 2.25. On the right, under the ‘Res Mod’ submenu, we also want to add a bit of envelope modulation to the filter resonance. In this case, we’ve brought it up to 3.29.
We have also changed the filter drive, on the left of the bottom row of the display, to Asym2 for extra harmonics. This is what our filter section looks like now:

And our bassline is finally sounding ‘Acid’ enough. Check it out:
It is not quite there yet, it needs to sound fatter and more aggressive, so let’s finish it up with some effects.
We’ve used EQ Eight to cut a bit of the lowend off and slightly tame the high-mid frequencies. After that, we loaded Saturator, cranked the drive up to 8 dB and selected the ‘Hard Curve’ circuit from the drop down menu. This added body and character to the sound, but also a lot of volume, so we dialed back the Output knob to -4.5 dB. Then we added Overdrive, to bring up that distorted, aggressive vibe.
After that, we needed to bring the volume back a bit again, since it was going too loud due to the distortion applied by Overdrive, so we loaded Utility and turned the gain down to -14.4 dB.
FInally, mixed in some Echo and Reverb for movement, space and depth.
You can look at how we setup the different effects here:


Now, everything should sound as in the first example here:
The twisting movement in timbre and energy you’re hearing is due to an automation we’ve recorded on the filter’s cutoff, try moving the knob up and down to make the sound even more alive.
That’s it for our acid bassline. However, if you want to dive deep into this kind of sound, we strongly recommend you to take a look at Acid techno legend Regal’s Masterclass here, where he shares all his knowledge on the topic so you can become a master like him.
Now, on to the next sound!
2. Chord stabs
The fourth and final sound of our two-part tutorial about Rave sounds is another classic, the chord stabs. Back in the day, the usual process was to record some chords from synths, electric pianos or other instruments or records, and then play them back with a sampler. And that’s the approach we’re taking here.
But first, let’s listen to the final result we are going for:
We could start by looking for a chord sample to use, but let’s use Analog to create our own Synth chord sample. Create a new MIDI track, load Analog, and draw a chord you like. We made a D minor chord, with the 3rd on top, voiced as in the following picture.
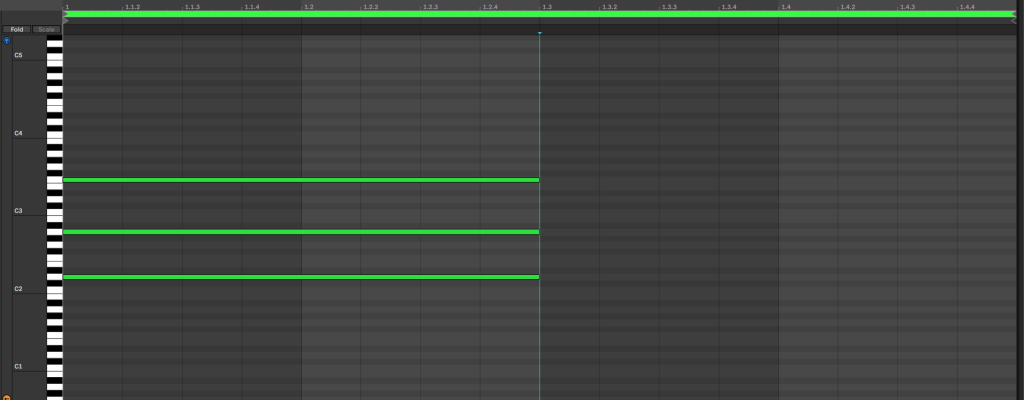
The sound we’re going for here is pretty simple. Toggle on all three oscillators and route them through filter 1. The first oscillator is a sawtooth with no further adjustments.
The second one is a square wave, with the ‘octave’ knob at 1, so it plays one octave higher. It also has some ‘sync’ effect going on. You can activate that in the contextual display of ‘Osc2’, in the same place where we added the sub in previous sounds. On the ‘Sub/Sync’ submenu, select the mode ‘Sync’ and bring the Ratio up to 24%. Now bring down the volume of oscillator 2 to -9dB.
For the Noise oscillator, we’ve put the color knob to 12kHz and the volume slider to -24 dB.
This is what it looks like now:
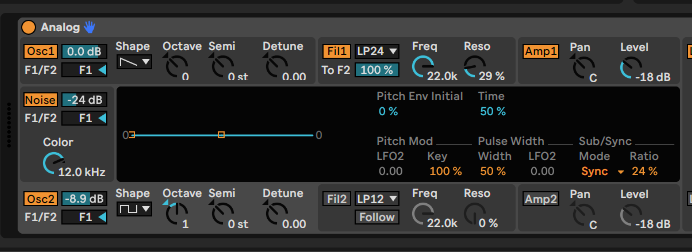
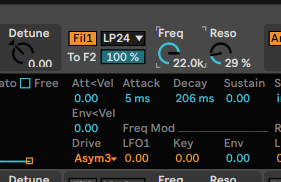
For the filter, we haven’t touched the cutoff, just went to its display options and selected ‘Asym3’ in the ‘Drive’ drop-down menu, to get some crunchiness in the sound. We’re not using any kind of modulation in the filter.
Now in the amp section we’ve just added a bit of release, up to 626 ms.
And finally, on the Global section, we activated Unison and moved the ‘Detune’ slider to 32.03. Then, going to the display, we selected a higher number of unison voices, 4, and also a higher number of regular voices, on the left, up to 16.
This is needed because we are playing a chord here, and since it has three different notes, and each note is using 4 unison voices, we wouldn’t have enough with only 8 voices available.
Drop the general volume of Analog down to -9 dB.
Now, all that’s left is to create an audio track and record the synth sound.
It should sound something like this:
Time for loading our sample into Ableton’s Simpler. To do that, just create a new MIDI track and drag the sample into it. If this isn’t working for you, just load an instance of simpler and then drag the sampler to it.
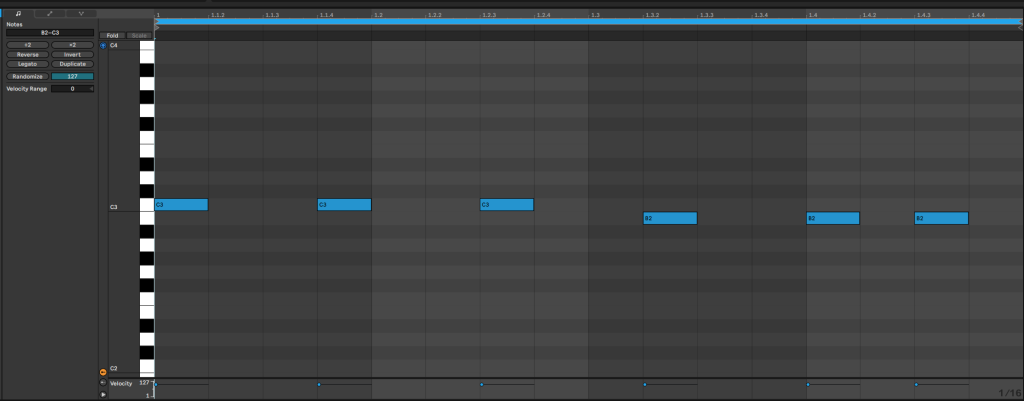
After that, we can write a MIDI pattern. Since the sample we’re using is already a chord, we don’t need to draw more than one note every time. This is the pattern we’re using here:
Regarding the settings in the simpler, there’s not a lot that we need to do. About the volume envelope, we cranked the release time up to 700 ms, and the attack one down to 12.7 ms.
The filter is doing most of the work here. We’ve turned down the Frequency knob to around 300 Hz, and the resonance up to 11%. We’ve also selected the MS2 filter circuit on the drop-down menu and brought the Drive up to 13.3 dB.
Then, we activated the Filter Envelope. Turned the amount up to 65, and the decay down to 376. Sustain and attack should stay at 0, and release is set to 50 ms, we didn’t touch it either.
This is how we’ve set up Simpler:

If you’ve followed along correctly, you should listen to something like this:
Now we’re very close to the final result, it’s only lacking some effects. First, we balanced things up a bit with EQ Eight.
After that, we loaded Erosion, a distortion plugin that allows you to distort a certain band of frequencies. We used the Sine mode at 3.6 kHz with an amount of 19.5, bringing up some metallic harmonics, making it sound a bit more crushed. Redux would also work here.
Then, we loaded Overdrive and Saturator for some more fatness and harmonics. Look at how we’ve set up these effects:

And here’s how it’s sounding with the new effects.
All that is left is to add a bit of Echo and Reverb, and we’re done! Check out the settings we used here:

Finally, it sounds exactly as in our first audio example:
For different results, try different chords and voicings, or just sample anything you find that plays a chord. You can also try different filter modulations like LFOs, and different chains of effects.
This is it for now, we hope this tutorial was helpful. As always, experiment and have fun!


 50 Industry Music Production Tips You Must Know


