
So, you have your track finished, either to already publish it on your social platforms or to send it to a mastering engineer. However, when you want to export your track from the DAW, you see several options that may not be as clear as you’d like and you may feel a bit lost. That is why we are going to have a look at each of them on this Ableton Live tutorial and give some directions on which ones to set in each case. Before we continue if you have never opened Ableton Live, you can get a full copy of Live Intro and hours of beginner friendly educational content to help get you started.
So, let’s apply the shortcut Shift + Cmd + R (on Mac) or on Ctrl + Shift + R (on windows) to open the “Export Audio/Video” menu and let’s start!
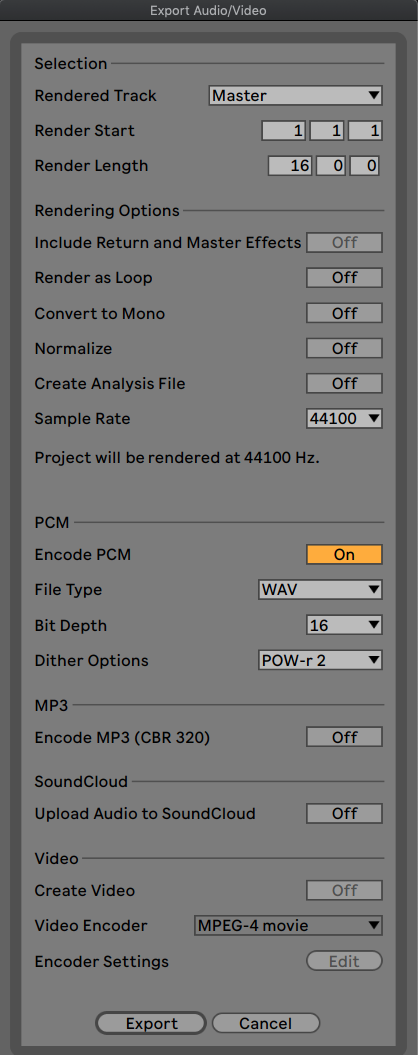
As you can see, this window is divided into different sections: selection, rendering options, PCM, MP3, Soundcloud and Video. However, we are going to focus on the rendering and the PCM sections, which are the ones that give place to more confusion.
If you’re still confused we recommend you to check out this masterclass by an Ableton certified trainer.
Selection Options
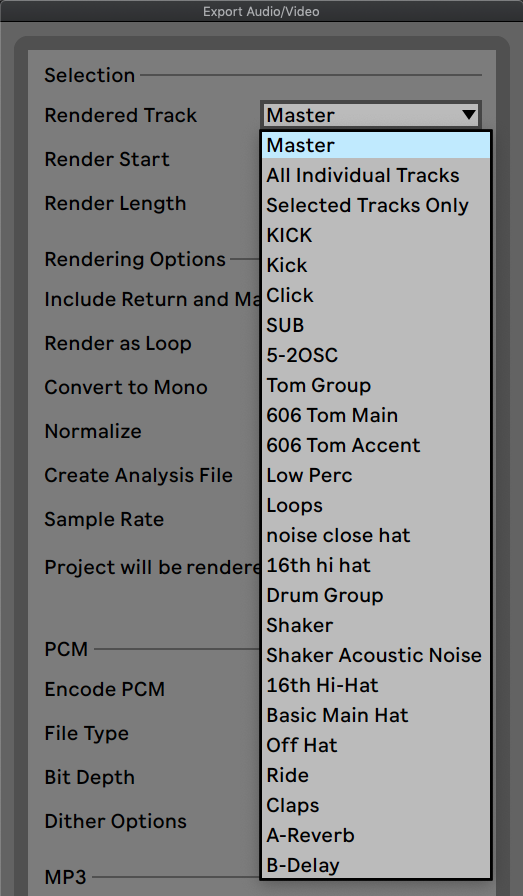
This section offers several options for which audio signal to render, which can be:
- MASTER: It renders the post-fader signal at Live’s Master output. If you are monitoring the Master output, you can be sure that the rendered file will contain exactly what you hear.
- ALL INDIVIDUAL TRACKS: It renders the post-fader signal at the output of each individual track, including return tracks and MIDI tracks with instruments. Live will create a separate sample for each track. All samples will have the same length, making it easy to align them in other multitrack programs.
- SELECTED TRACKS ONLY: This is identical to the All Individual Tracks option, but only renders tracks that were selected prior to opening the Export dialog.
- SINGLE TRACKS: This renders the post-fader signal at the output of the selected track or track group. You’ll be able to choose the one you like because you will see all your tracks listed at the end, including the return tracks, which start with letters (A-Reverb, B-Delay, C-Compression, etc.)

The other Selection fields determine the start time and length of the exported material:
- RENDER START — sets the position at which rendering will begin.
- RENDER LENGHT — determines the length of the rendered sample.
TIP! — A fast way to set both the Render Start and Length values is to select a range of time in the Arrangement View prior to invoking the Export Audio/Video command. But remember: a rendered audio file contains only what you heard prior to rendering. So, for example, if you’re playing back some combination of Session View clips and Arrangement material, then that is what will be captured in your rendered file, regardless of which view is active when you render.
Rendering Options

The Export dialog offers several audio rendering options:
- INCLUDE RETURN AND MASTER EFFECTS: If this is activated, Live will individually render each selected track with any return tracks used by that track, as well as effects used in the Master track. This is especially useful when rendering material for a live performance, or when providing stems to a mixing engineer or remix artist.
- RENDER AS LOOP: If this is activated, Live will create a sample that can be used as a loop, which is very useful when you don’t want your effects to be noticeable once the loop finishes and starts again. In other words, this option will create small fades at the beginning and end of your file to prevent clicking.
- CONVERT TO MONO: If this is activated, Live will create a mono file instead of a stereo file.
- NORMALIZE: If this is activated, the sample resulting from the render process will be normalized, which means that the file will be amplified so that the highest peak attains the maximum available headroom. Not recommended if you are going to master your track afterwards since you will end up with no headroom to apply any processing.
- CREATE ANALYSIS FILE: If this is activated, Live will create an .asd file that contains analysis information about the rendered sample. You should select this if you intend on playing this again in Live, but not if you just want a final bounce.
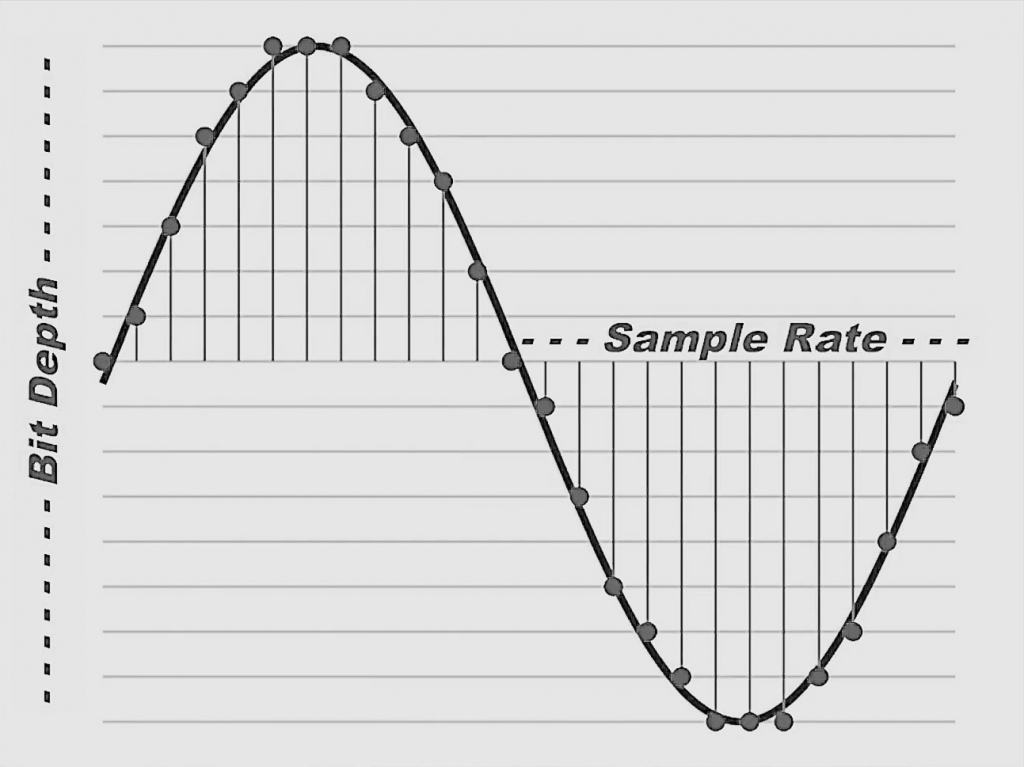
- SAMPLE RATE: As you know, sound is a wave or a set of them. This wave has a height that varies over time. To digitally capture a sound wave it has to be subdivided into a certain number of samples. The more samples of the wave you have, the more faithful it’ll be to the original wave. For example, imagine a digital photo: the more pixels it has at the time of capture, the higher the quality of the photo.
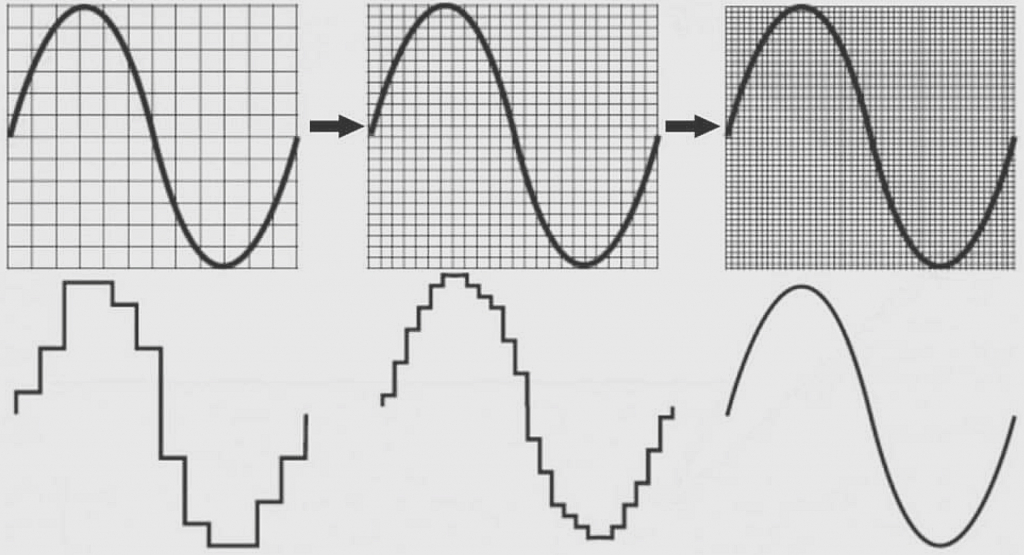
In summary, the sample rate is the amount of audio samples you take in one second.
We expect recordings to “sound” better at higher sample rates. But the reality is that if we record at high sample rates, with a very good sampling, our sound will not “sound better”, but will be more detailed. And obviously, if our sound source is bad, our microphones and preamps too, and so on, even if we record at 192000, the result will not be better.
In Ableton, your choice of sample rate when rendering works as follows:
- If you select a sample rate equal to or higher than the rate you’re using in your project (as set in the Audio tab of Live’s Preferences), Live will export in a single step, at the sample rate you’ve chosen in the Export dialog.
- If you export at a sample rate that is lower than your current project sample rate, Live will first export at the current project sample rate and then downsample the file in a second step using a high-quality process. Note that this may take a few moments.
To burn it to an audio CD or to export it into a standard MP3 file, choose 44100. For mastering choose the ‘sample rate you had used throughout your production or the mastering studio asked for, if you want to learn more about mastering check out this masterclass all about analog mastering techniques.
Encoding Options
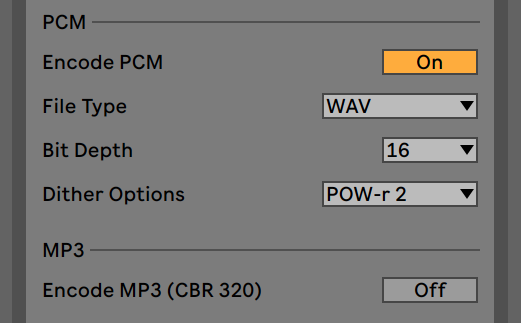
- ENCODE PCM: Pulse Code Modulation (PCM) is a modulation procedure used to transform an analog signal into a sequence of bits (digital signal).
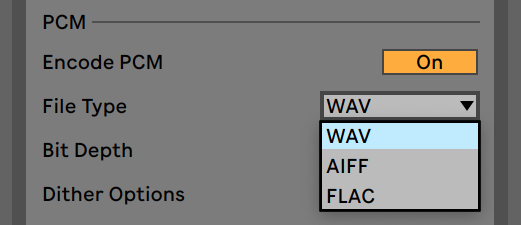
If activated, a lossless audio file is created. WAV, AIFF and FLAC formats are available for PCM export. If, on the other hand, you prefer an MP3 file, activate the Encode MP3 and a 320 kbps MP3 file will be created. It is possible to export PCM and MP3 simultaneously. However, if neither toggle is enabled, the Export button will be disabled. As for the SoundCloud option, if activated, a helper application will launch that will allow you to upload your exported audio file to your SoundCloud account.
- FILE TYPE: WAV, AIFF, and FLAC formats are available for PCM export, as we said before.
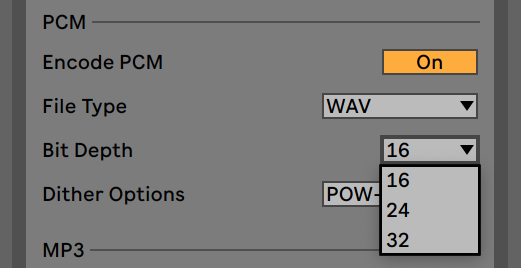
- BIT DEPTH: In digital audio using pulse-code modulation (PCM), bit depth is the number of bits of information in each sample, and it directly corresponds to the resolution of such sample. Examples of bit depth include Compact Disc Digital Audio, which uses 16 bits per sample, and DVD-Audio and Blu-ray Disc which can support up to 24 bits per sample:
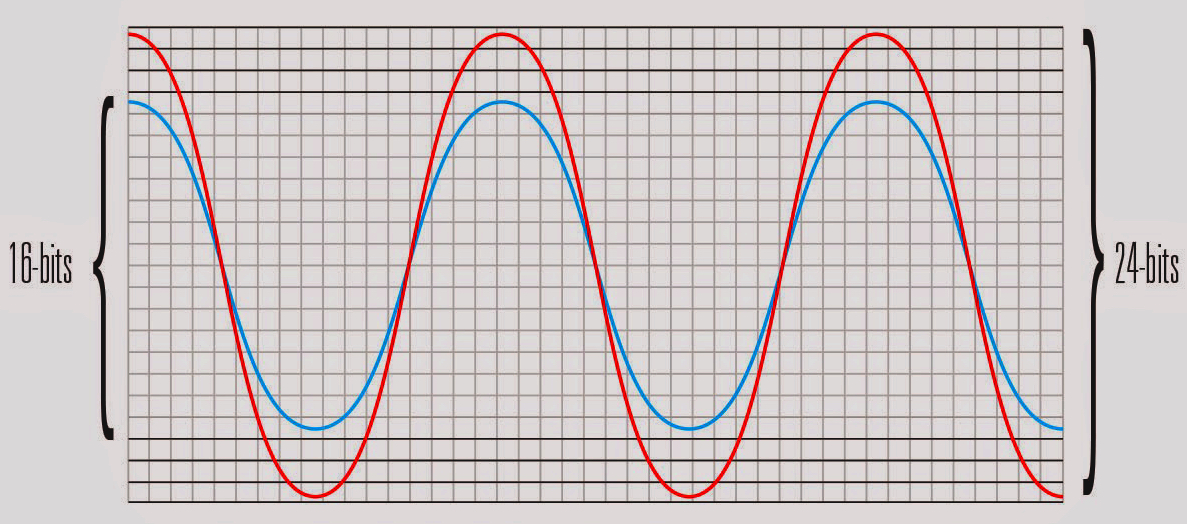
See in the following picture the difference between the bit depth and the sample rate:
To burn it to an audio CD or to upload it to your social media platforms, choose 16. For mastering choose the bit depth you had used in your Live Set or the bit depth the mastering studio asked for.
- DITHER OPTIONS — If you are rendering at a bit depth lower than the one you were producing with, choose one of the dither modes. Dithering adds a small amount of noise to rendered audio, but minimizes artifacts when reducing the bit depth. Note that dithering is a procedure that should only be applied once to any given audio file. If you plan to do further processing on your rendered file, it’s best to render to the same bit depth you were producing with to avoid the need for dithering at this stage.
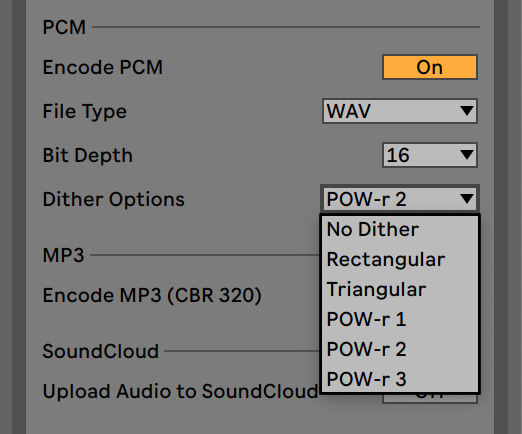
- By default, Triangular is selected, which is the “safest“ mode to use if there is any possibility of doing additional processing on your file.
- Rectangular mode introduces an even smaller amount of dither noise, but at the expense of additional quantization error.
- The three Pow-r modes offer successively higher amounts of dithering, but with the noise pushed above the audible range.
- POW-r 1 is optimized for low dynamic range program, such as highly compressed pop music.
- POW-r 2 is optimized for less complex program, such as spoken word
- POW-r 3 is optimized for complex, high dynamic range program, such as orchestral performance.
Ready? Then click on “export” and that’s it!
We hope this article was useful and helped to solve some basic but sometimes difficult concepts about rendering audio. If you have more questions, don’t hesitate to leave us a comment. And if we think it’s an interesting topic you are touching, we can even create a whole article out of it! See you at our next post and have a happy production time!


 50 Industry Music Production Tips You Must Know


